

joblo
-
Posts
109 -
Joined
-
Last visited
Content Type
Dumont News
Dumont Conditions
Dune Food
Forums
Calendar
Gallery
Posts posted by joblo
-
-
A few more updates

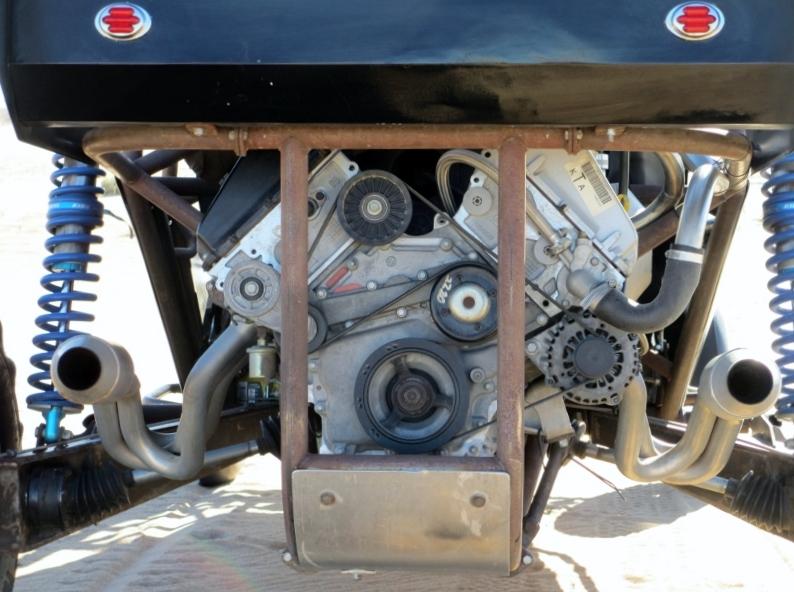
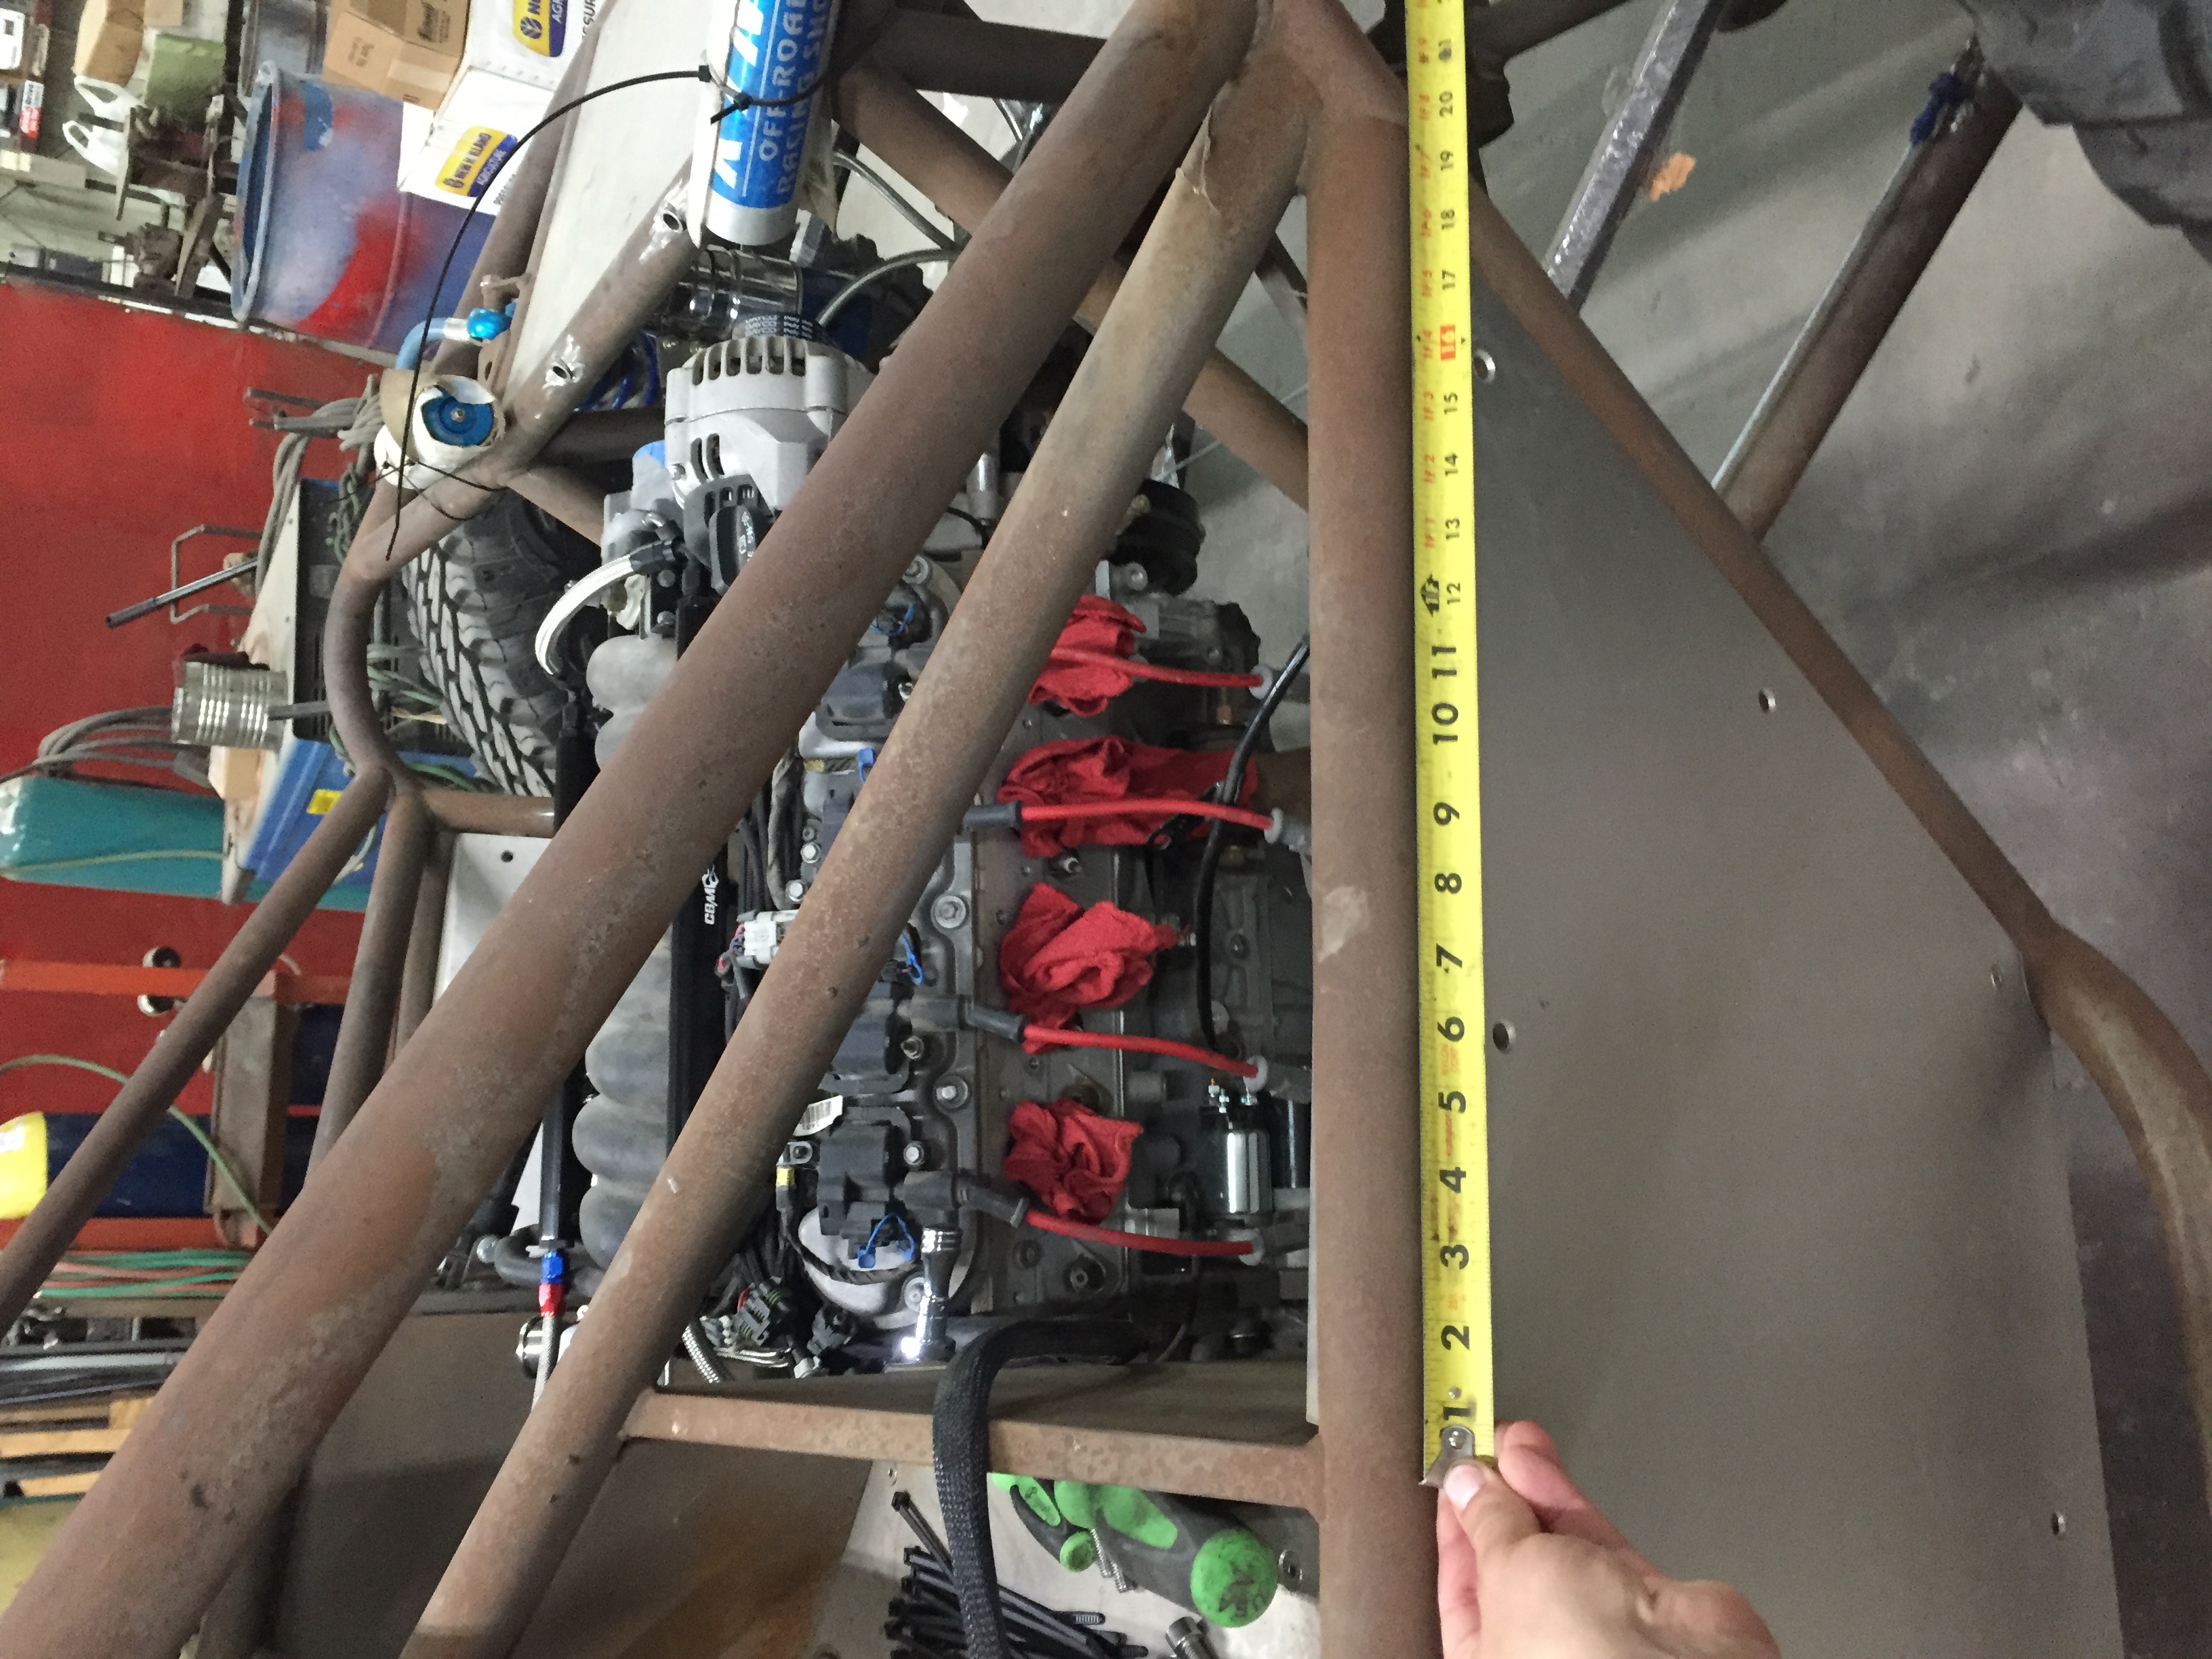
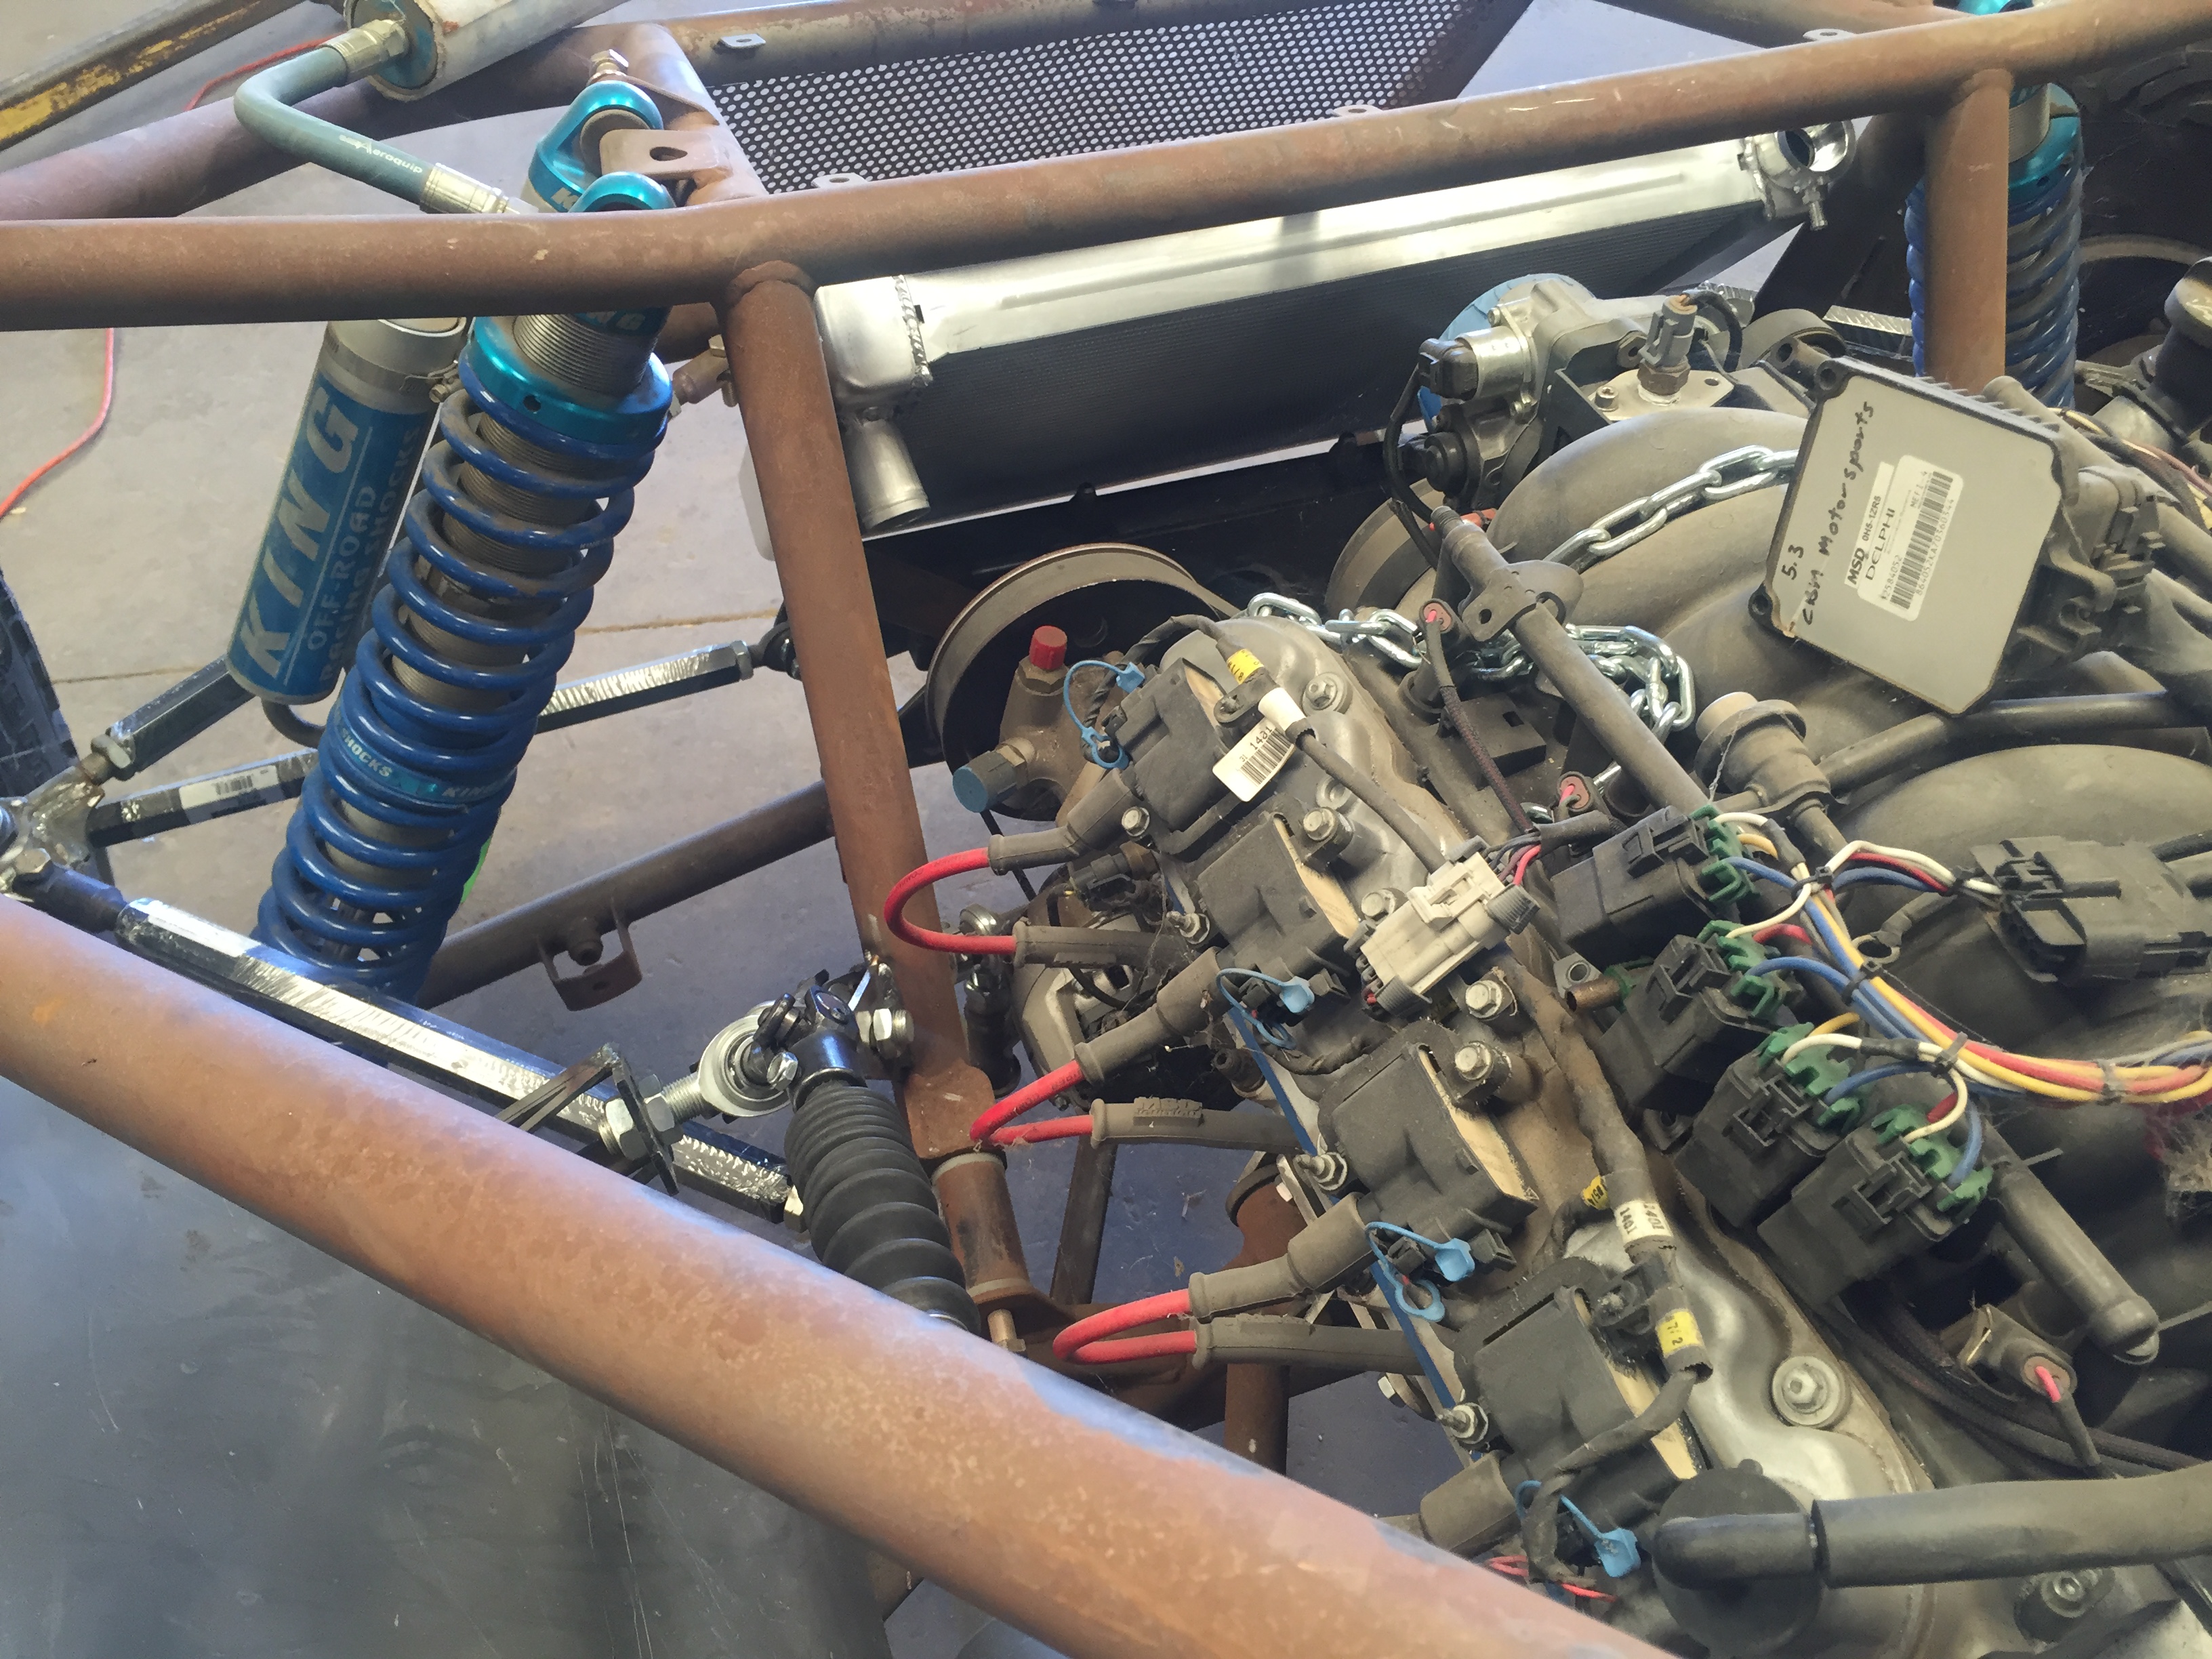
transmission cooler in. Got a different pulley from cbm for the tensioner. Helped to put a shorter belt on and now the belt doesn’t rub itself.

Radiator mounted and lines hooked up. I had to make a short hose for suction on the quick change oil line. The fitting I had in there hit the skid pan so it had to go.
Got fluids all in.
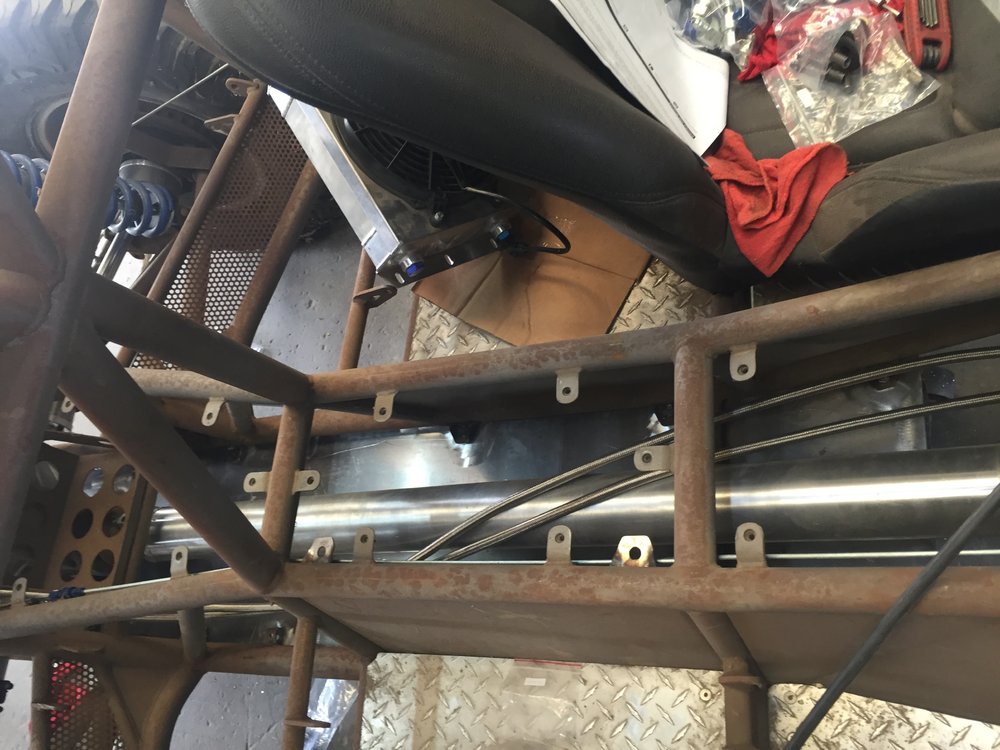
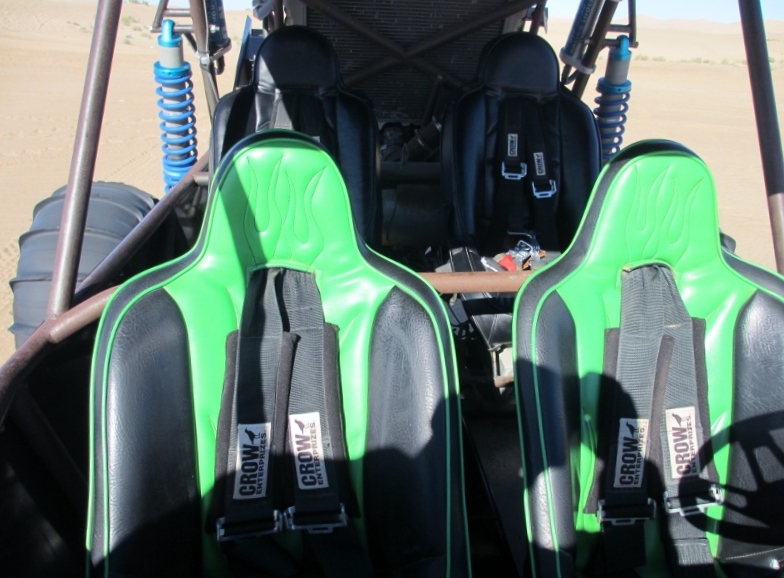
Limit straps done done in the rear.

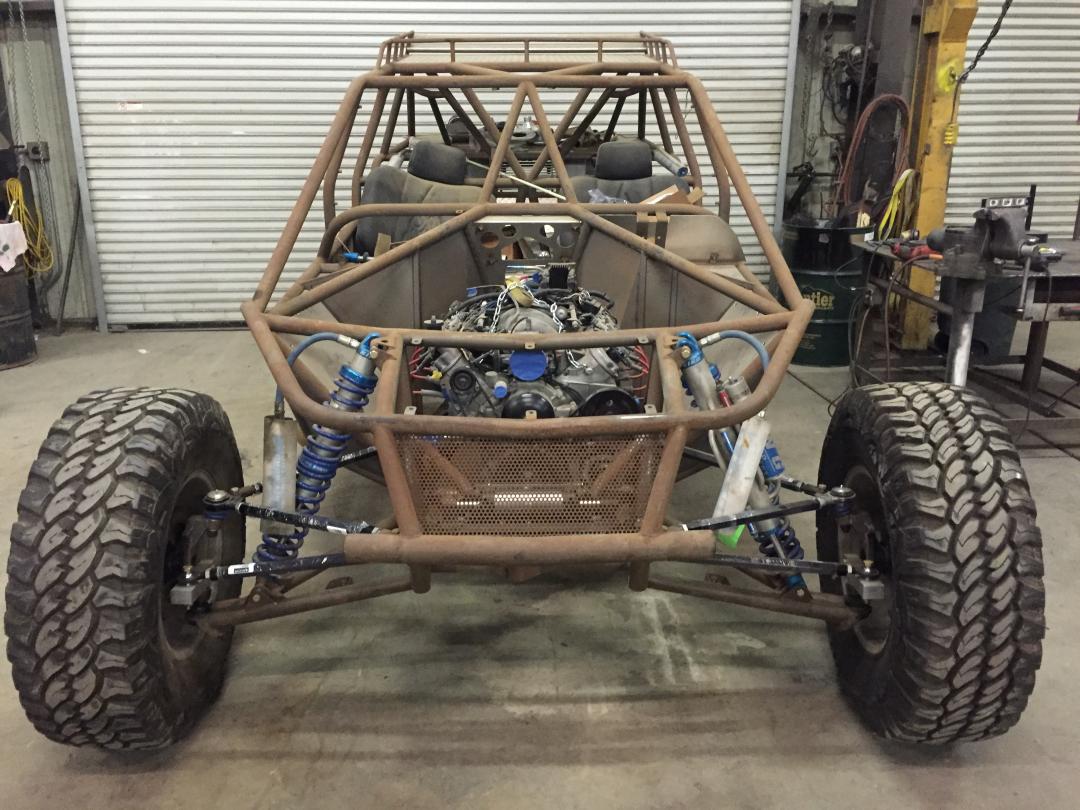
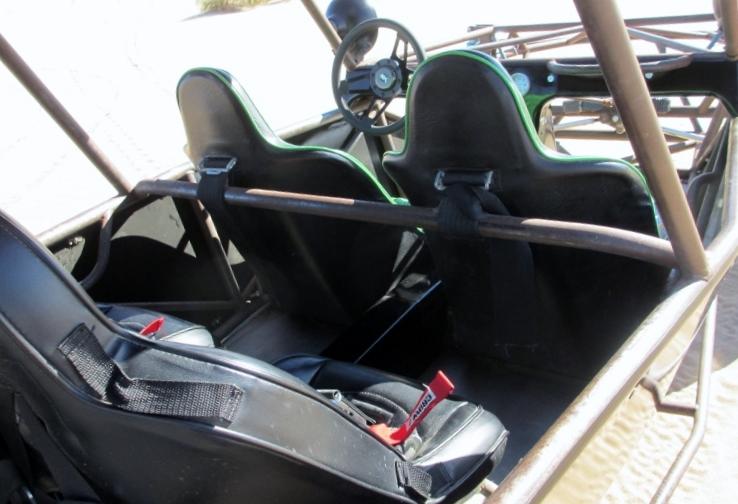
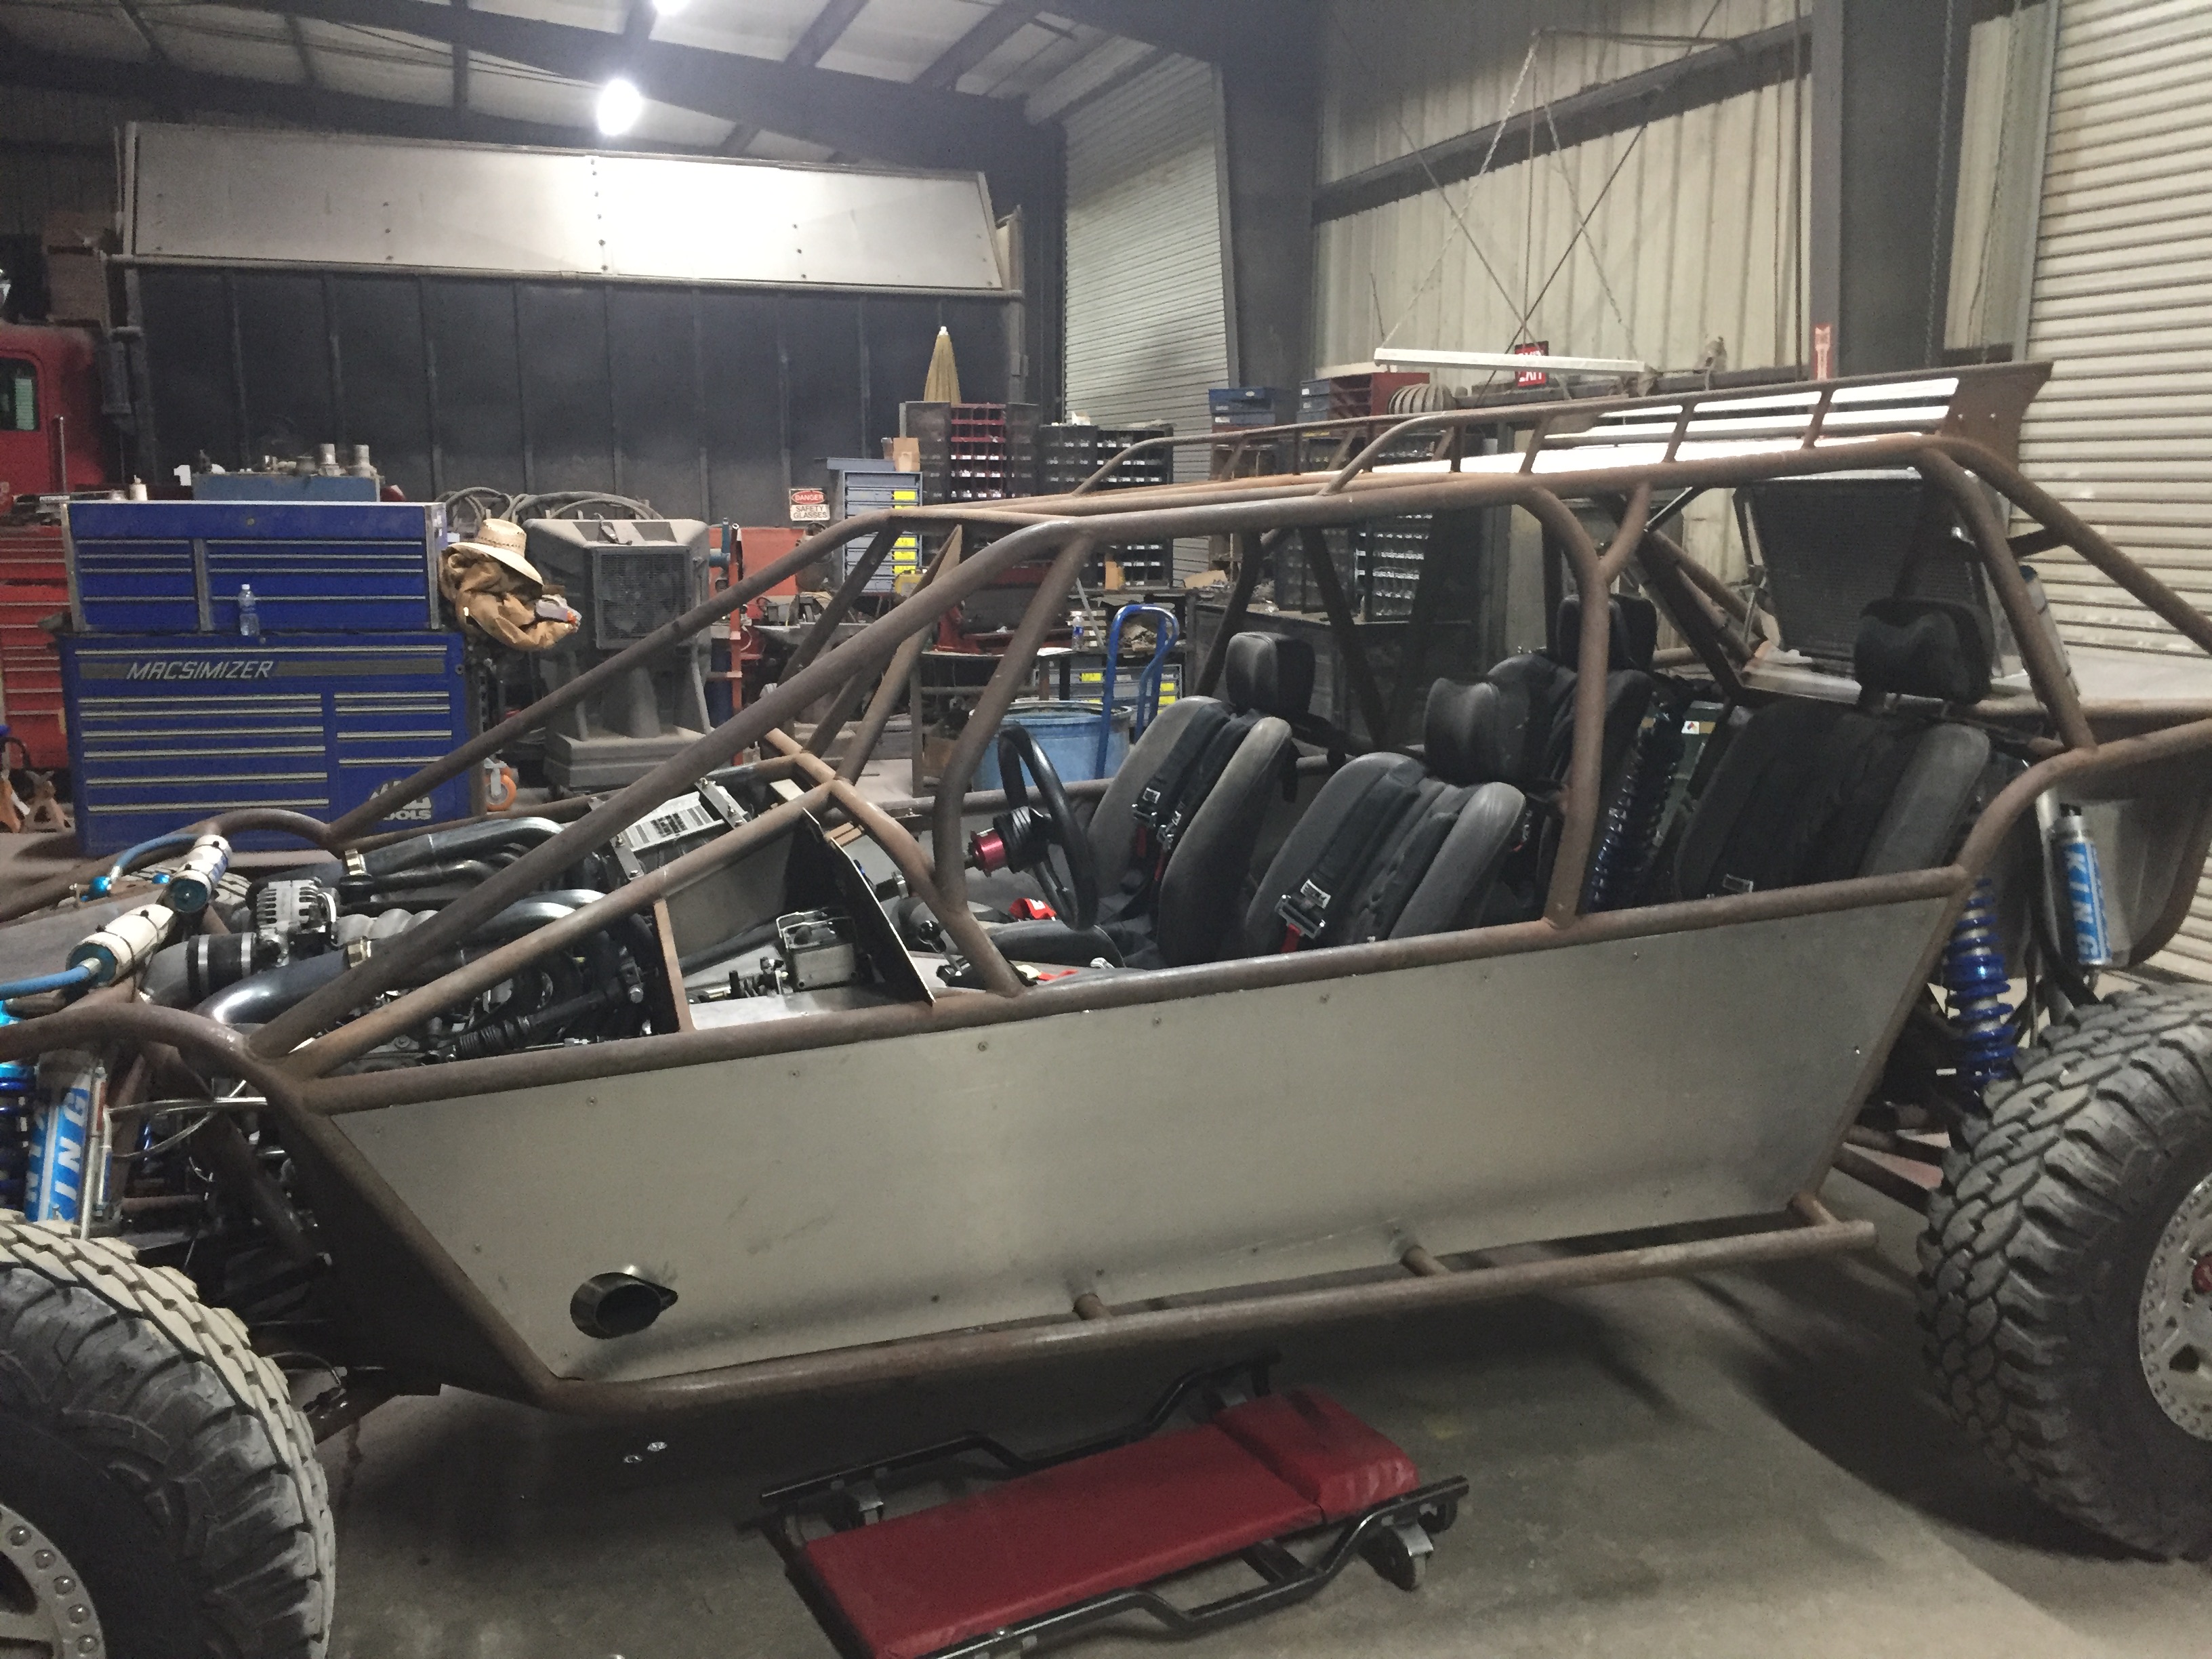
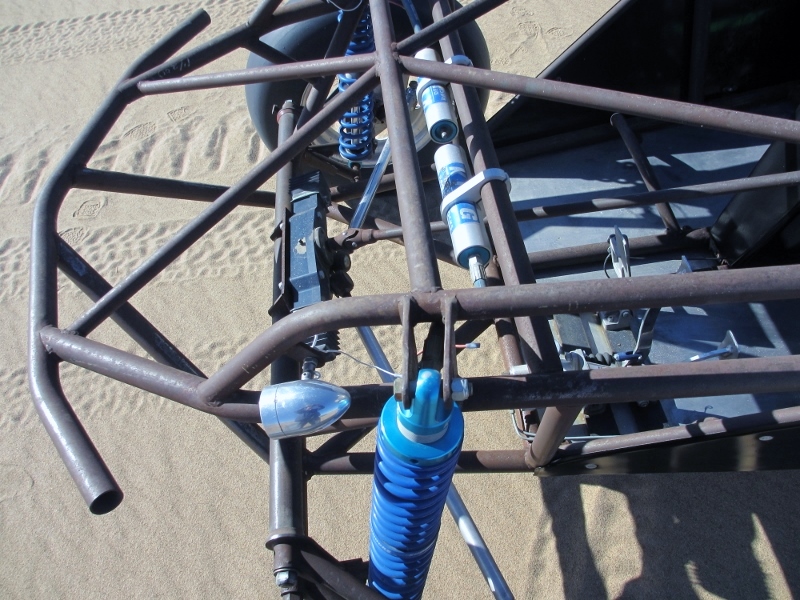
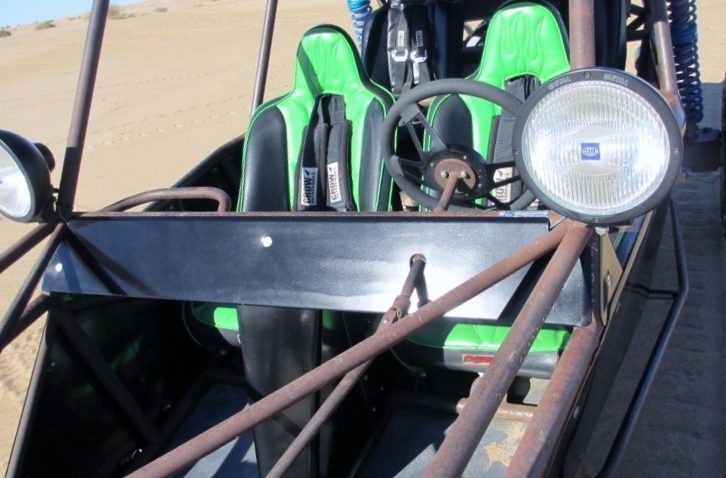
Seats all in. Panels on. All shocks on and charged with nitrogen. With these headers the spark plug wires no longer hit. So that’s something I didn’t have to change in the end.
I had to fight like crazy to get the air bled out of the cooling system. Got it though. The car uses 5/8” studs instead of 1/2”. So I had to drill out the pro comp wheels. Man was that a job. I don’t have a mill, so I had to rig up a way to do it in the drill press. Finally got it. Took the better part of the day just to do that.
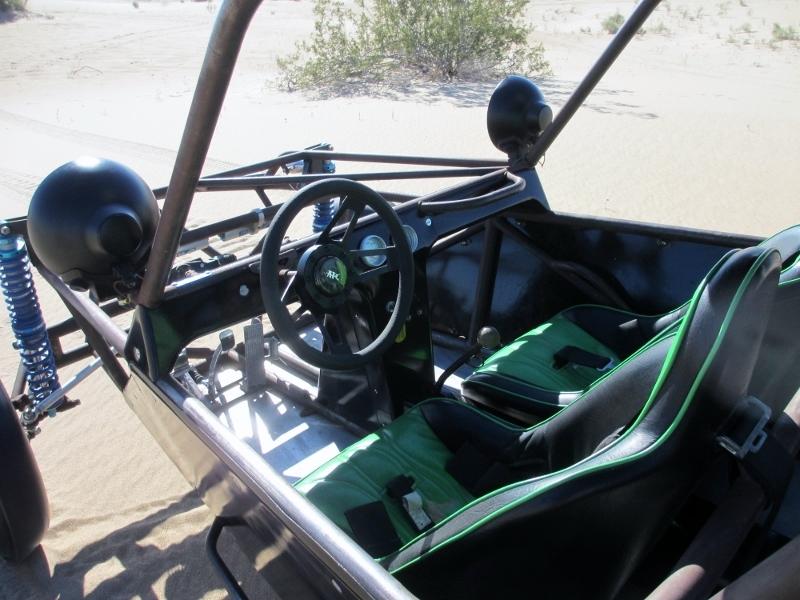
Got in a little seat time around the yard. Feels good.

-
Thanks. I thought so too
-
-
I’ve been thrashing like crazy to try and make this. I don’t know if I’ll make it or not but I sure am trying. Hopefully fluids will be in tomorrow and try to fire it up.
-
Thanks. That's cool. I tried pretty hard to track them down when I first bought it so I could try and pick their brains but the closest I got was being to slow on buying the green 2 seater that was partially done.
-
Ok so I finally have some updates to this thing.
Recent accomplishments-
fuel lines plumbed
90% of skid plate done
exhaust
battery strapped in
sheet metal around pedals
gas pedal mounted
steering shaft linkage simplified
shifter mounted
a few miscellaneous pieces of sheet metal done.
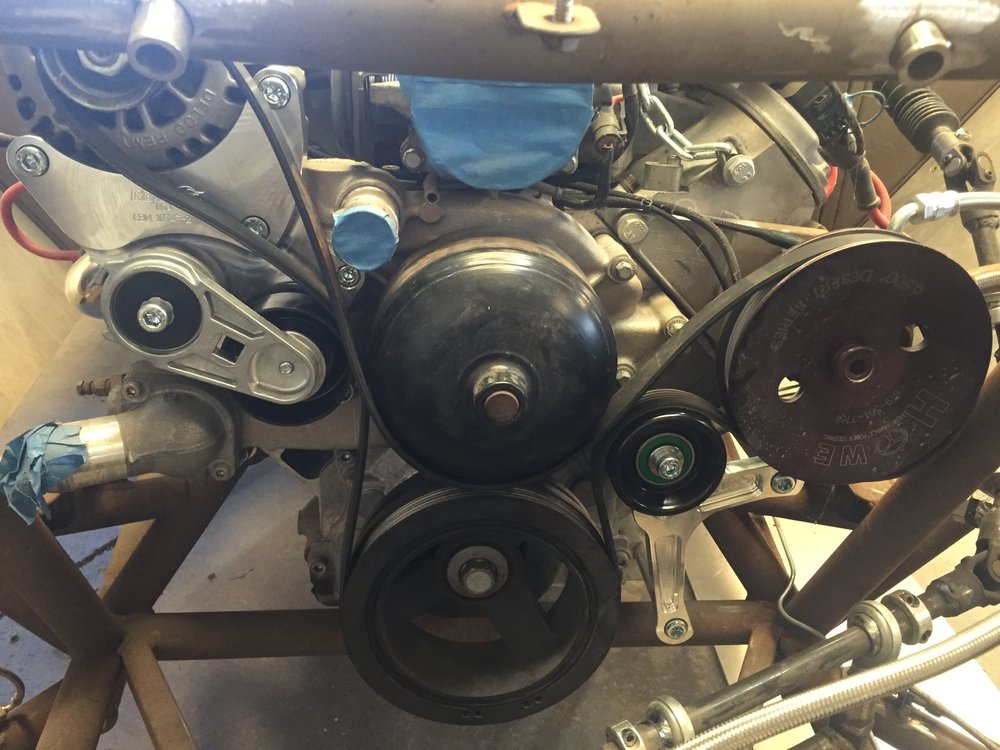
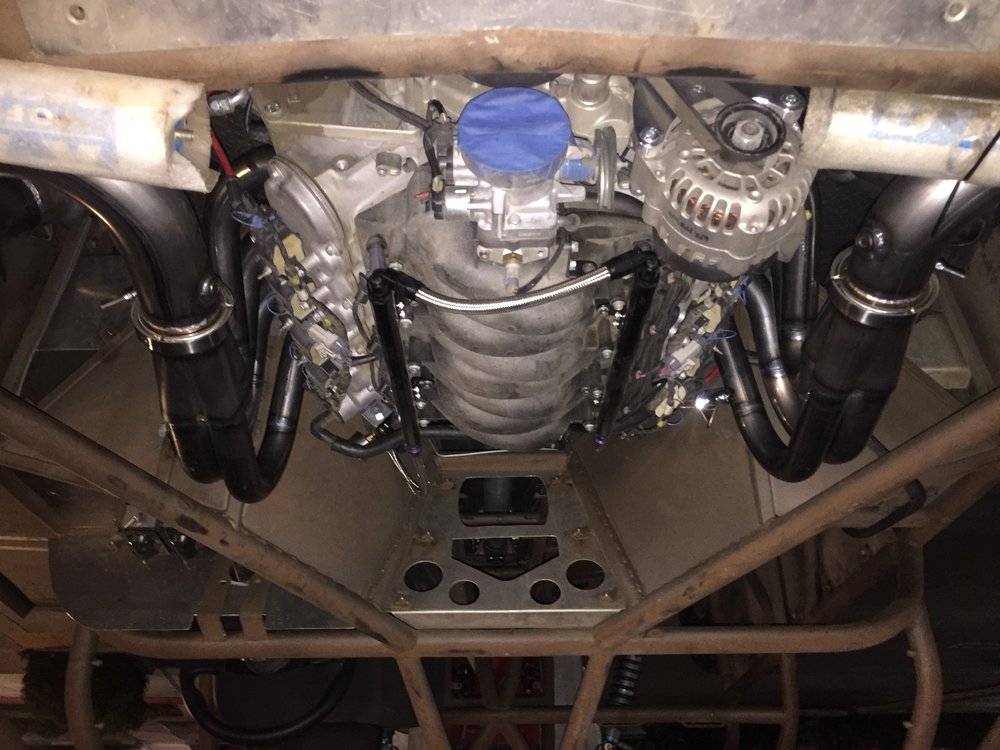
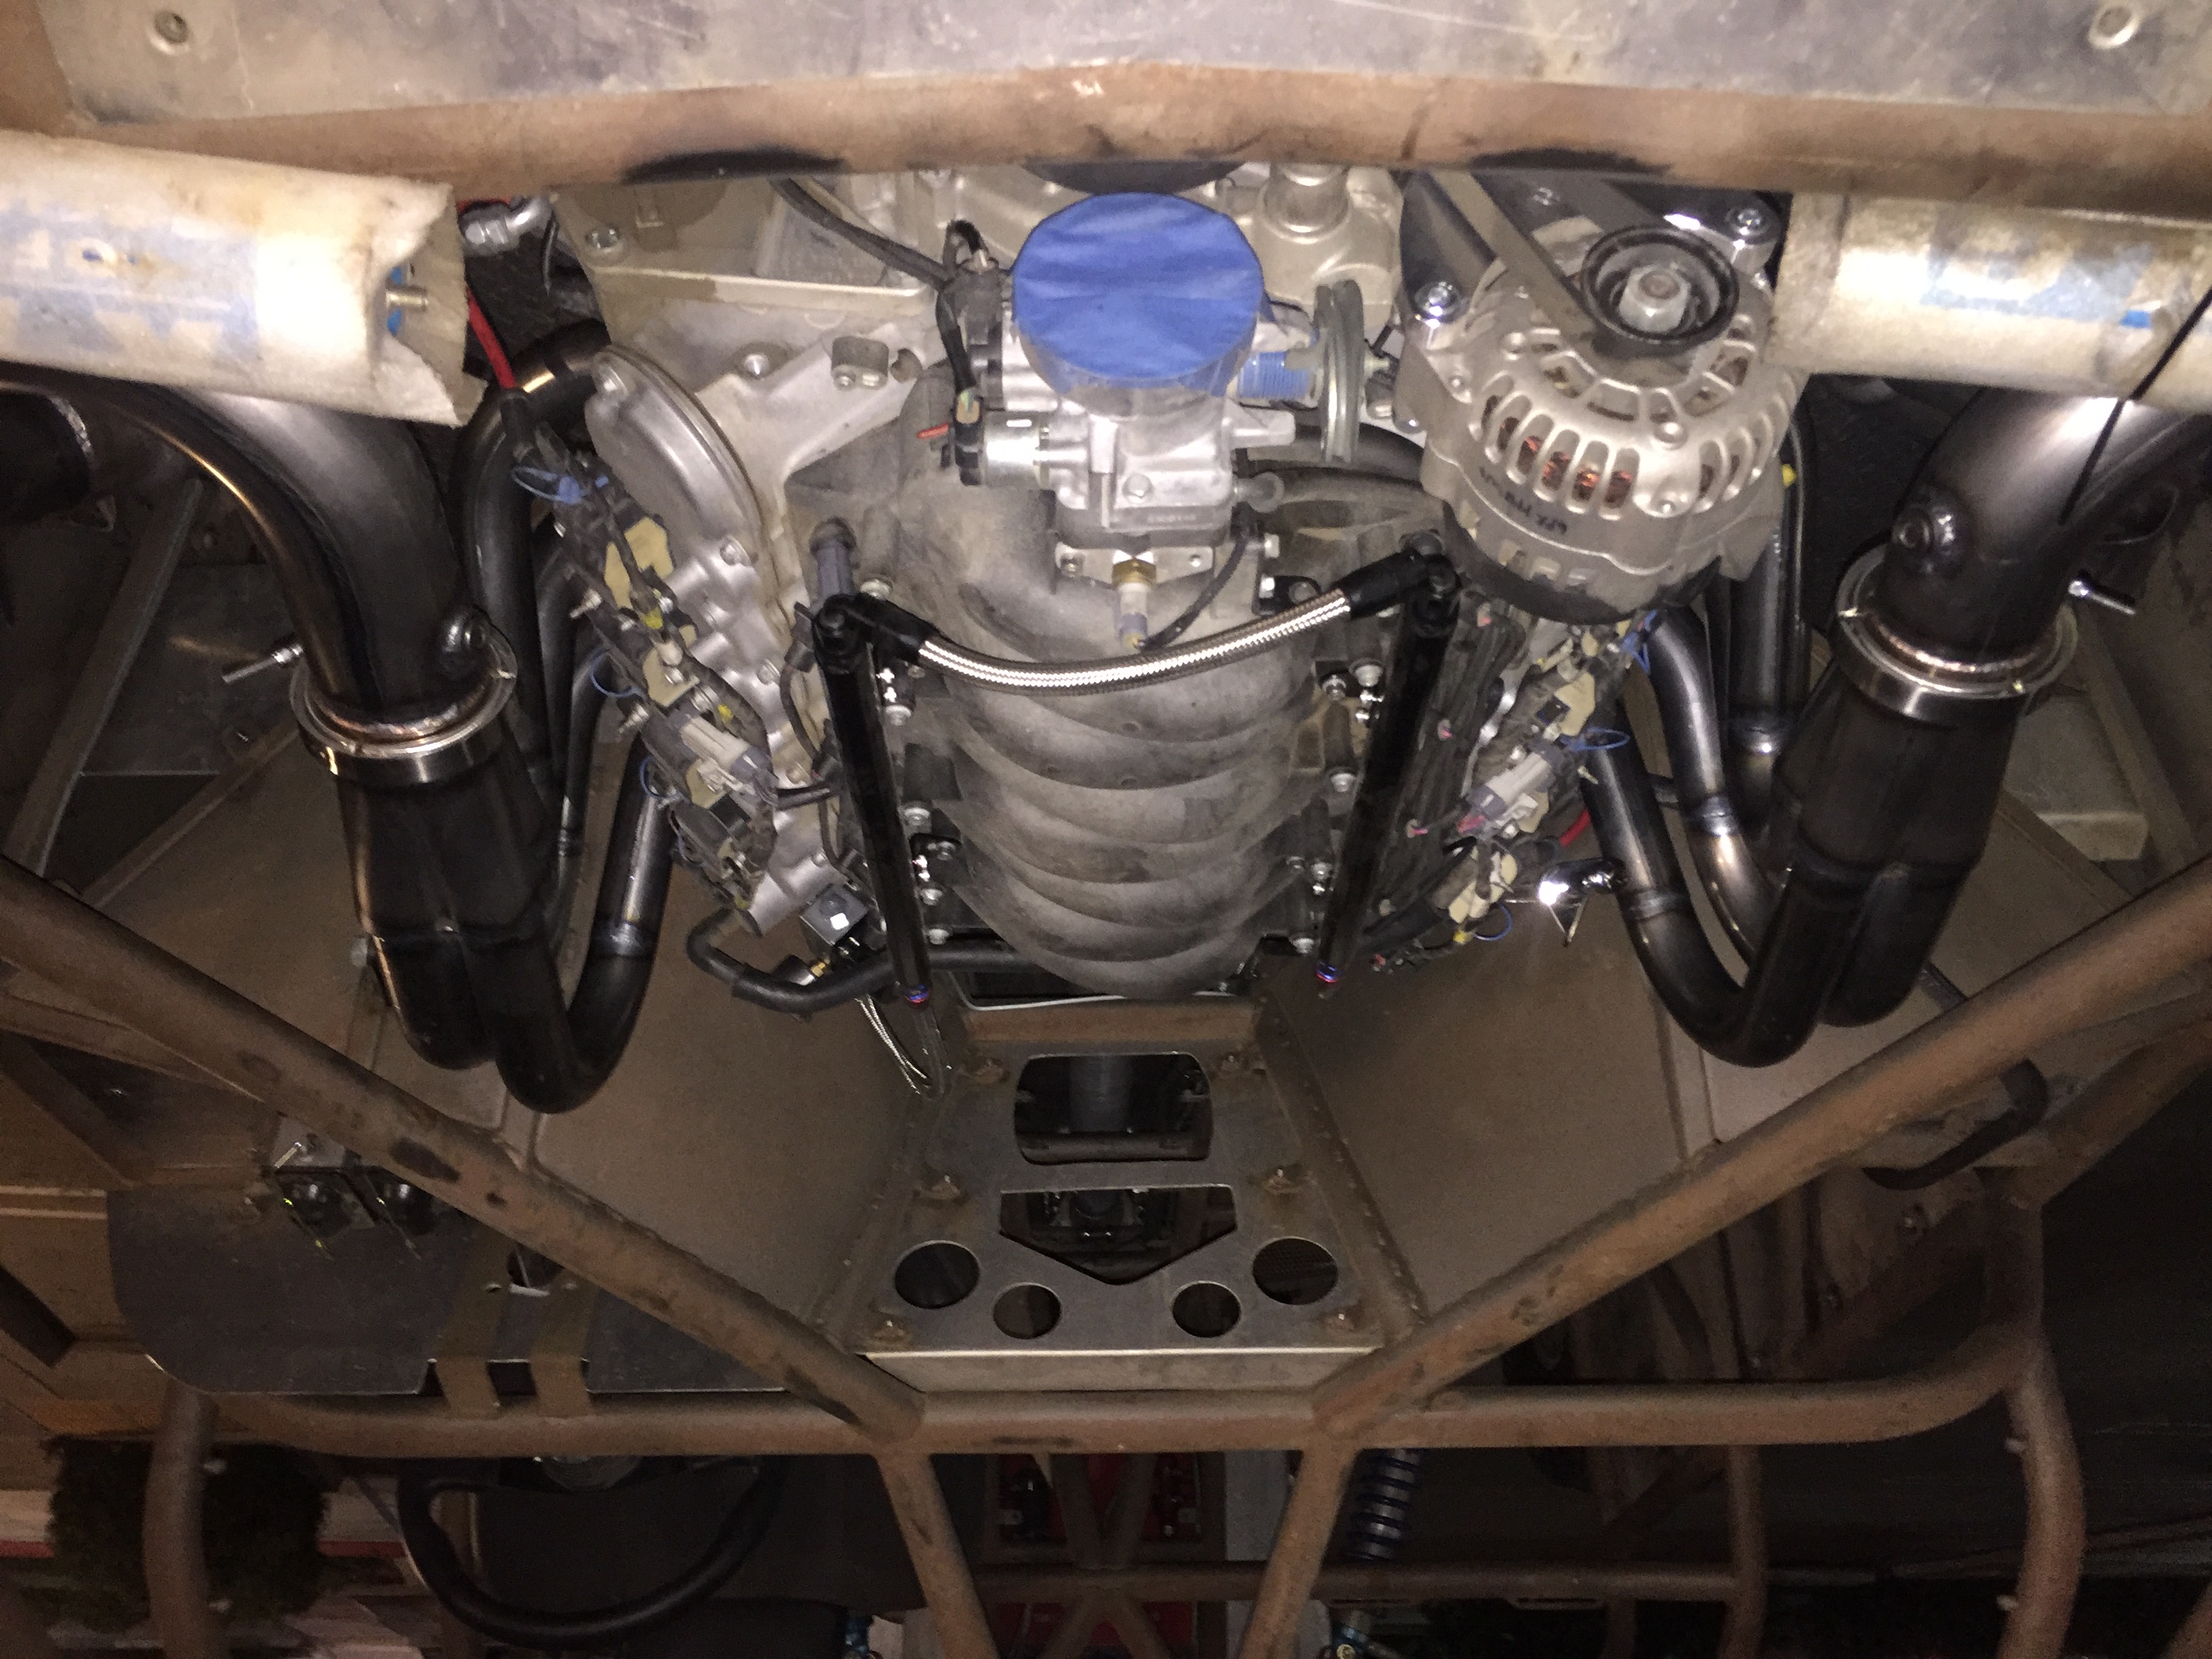
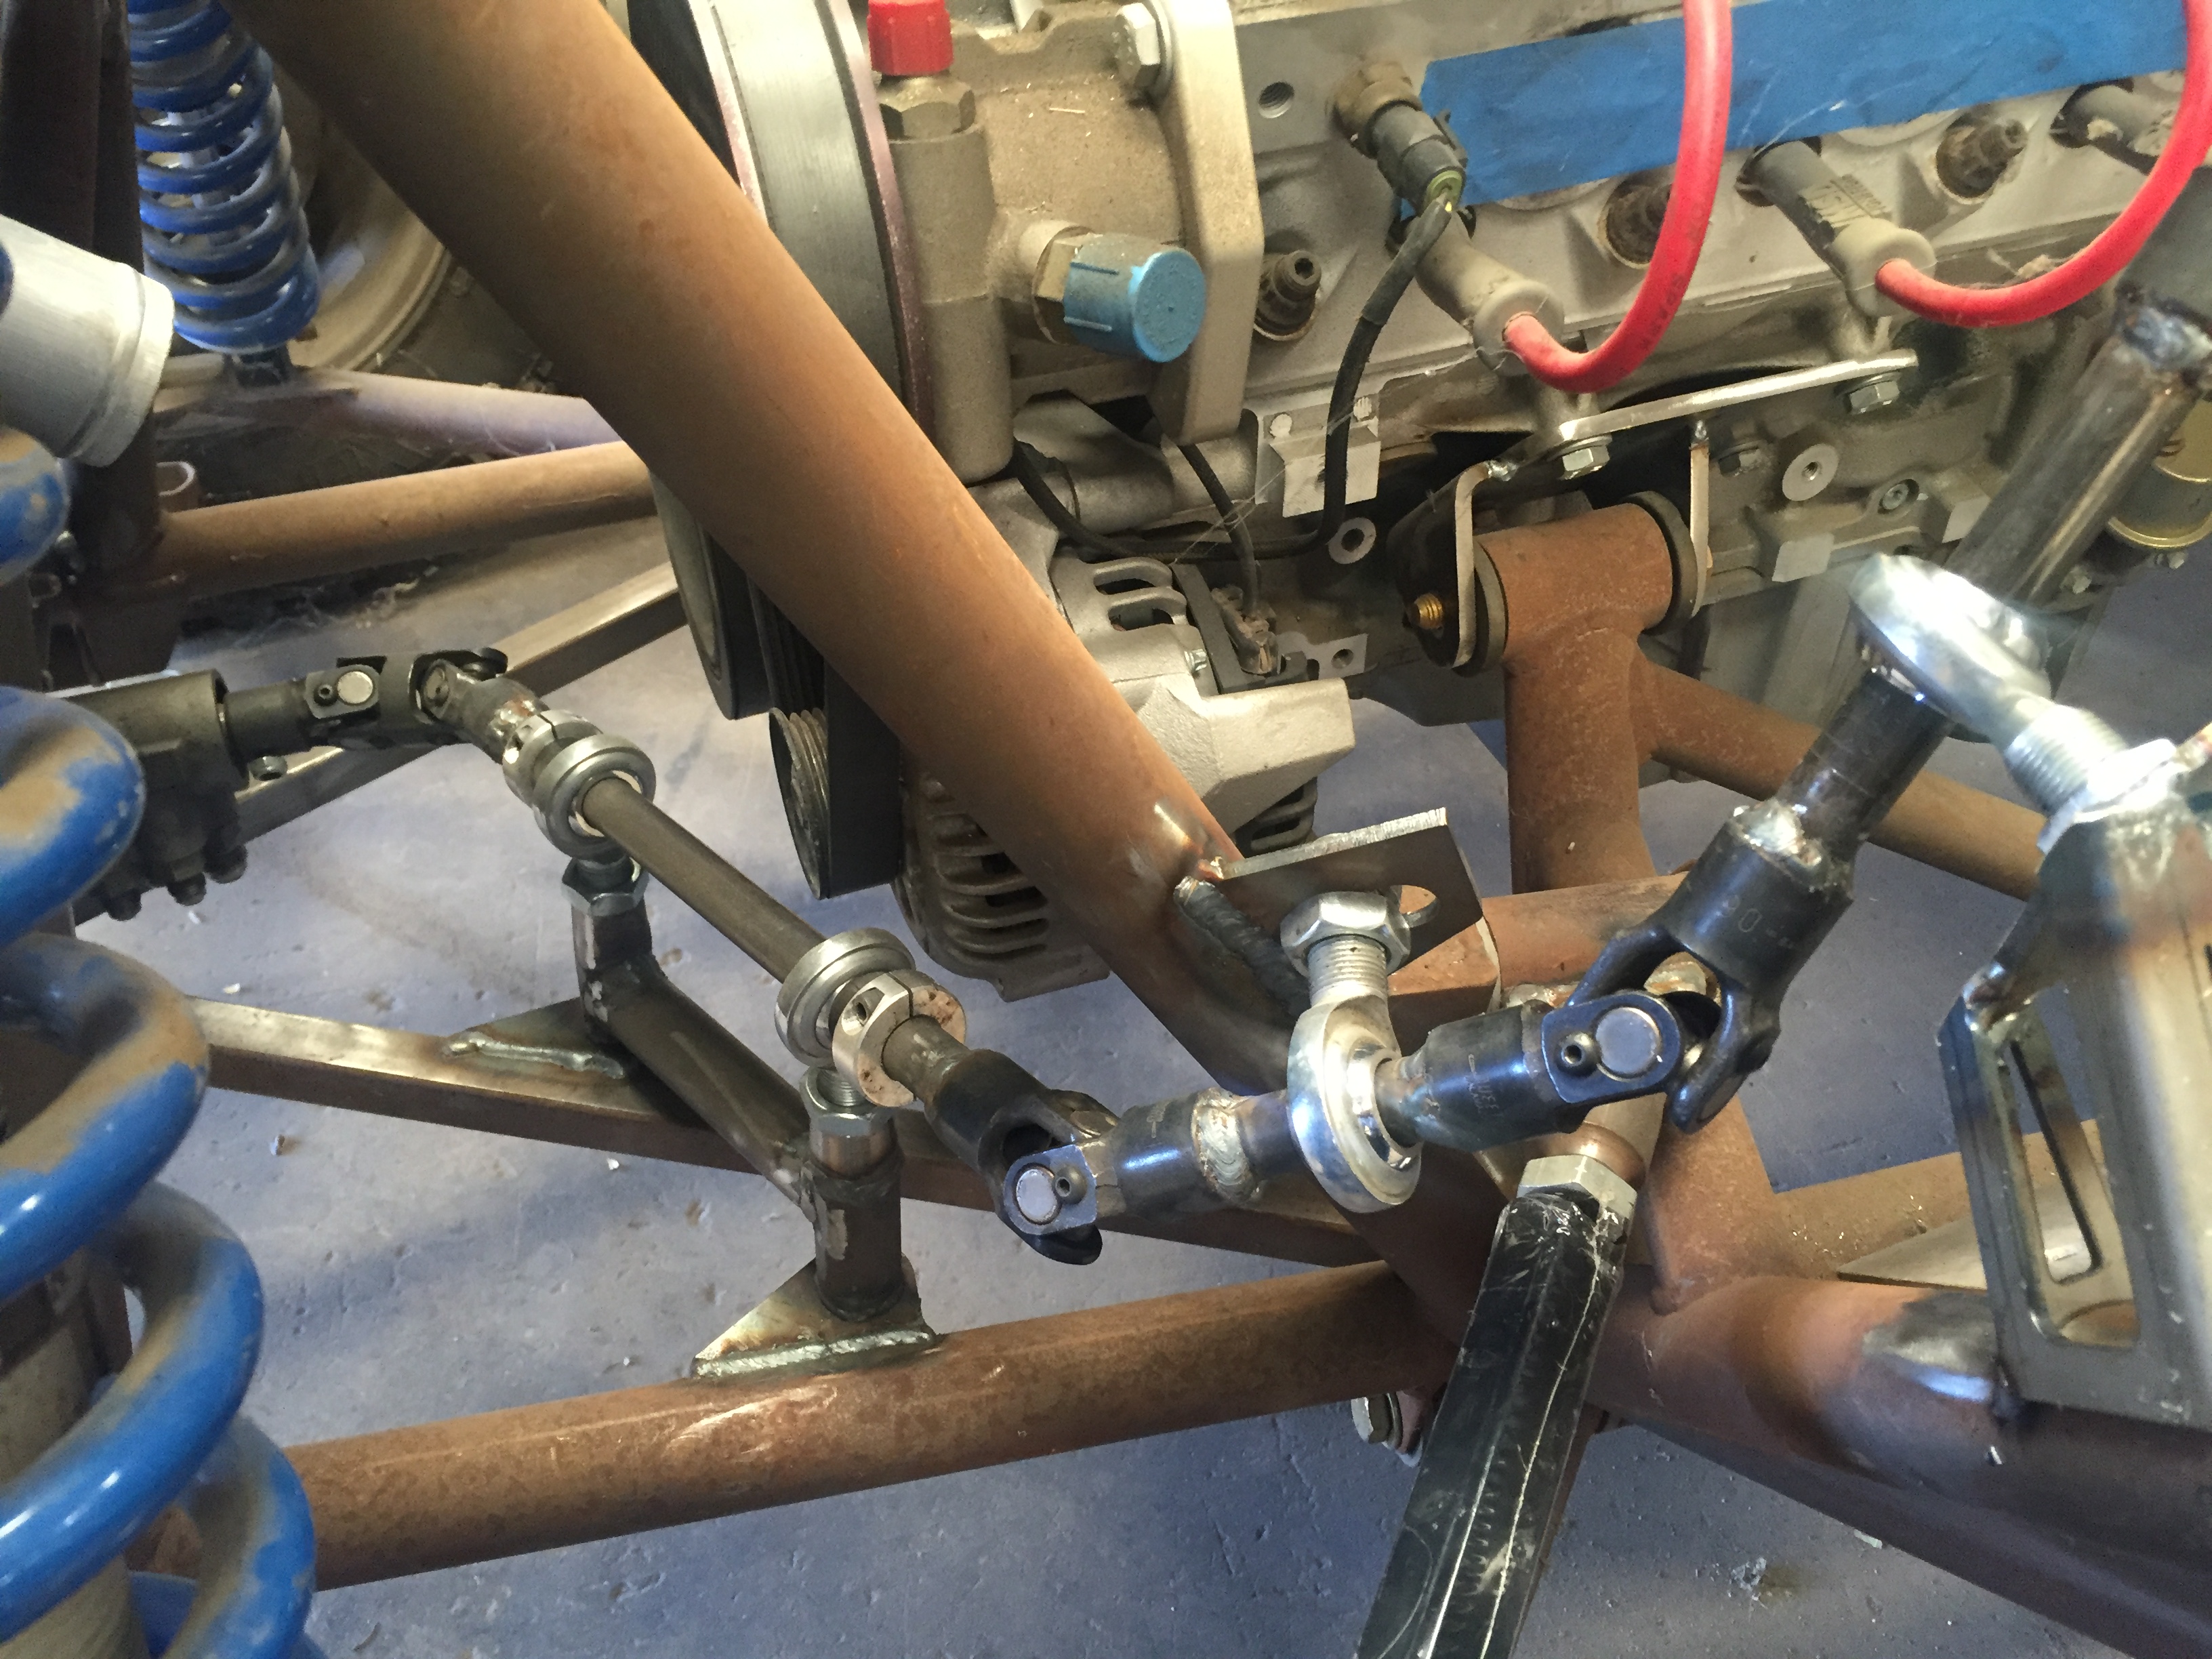
relocated the alternator to upper right side of motor to make some room for the steering and eliminate as many u-joints as possible.

fuel rails and regulator in

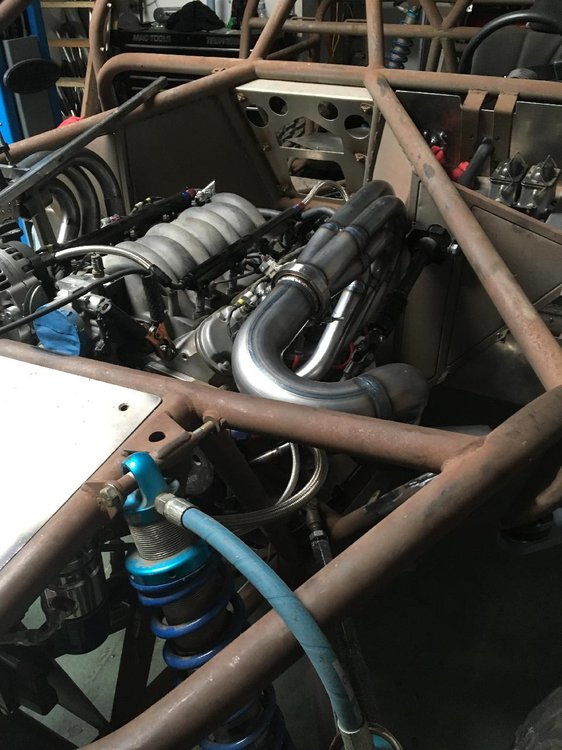
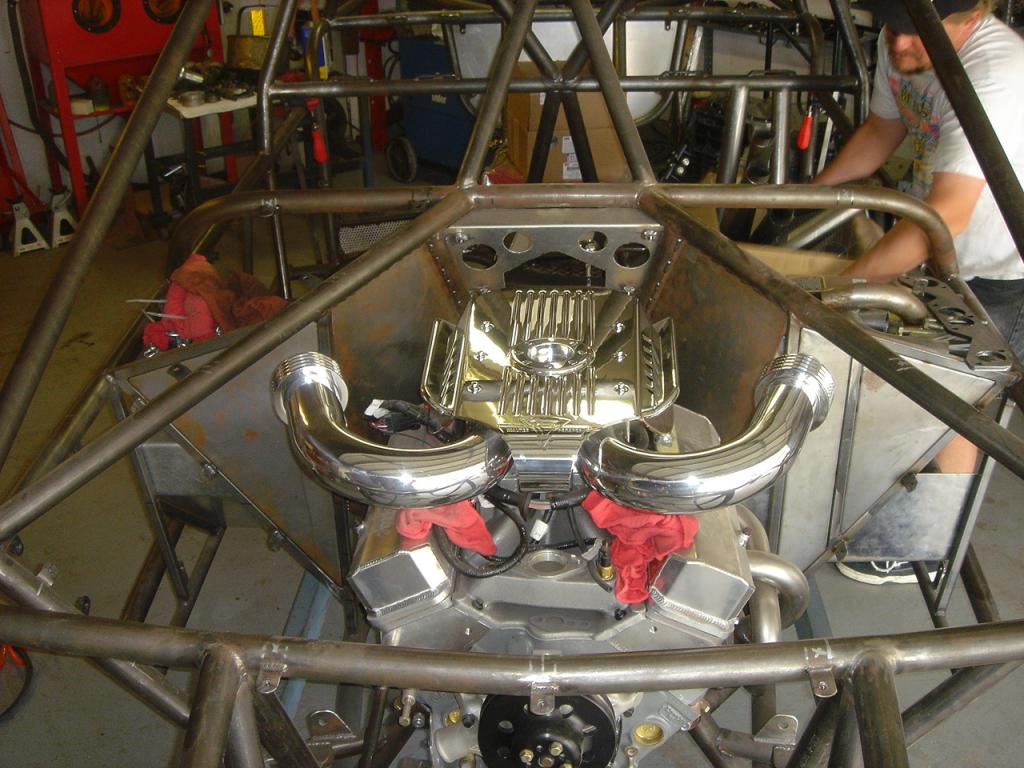
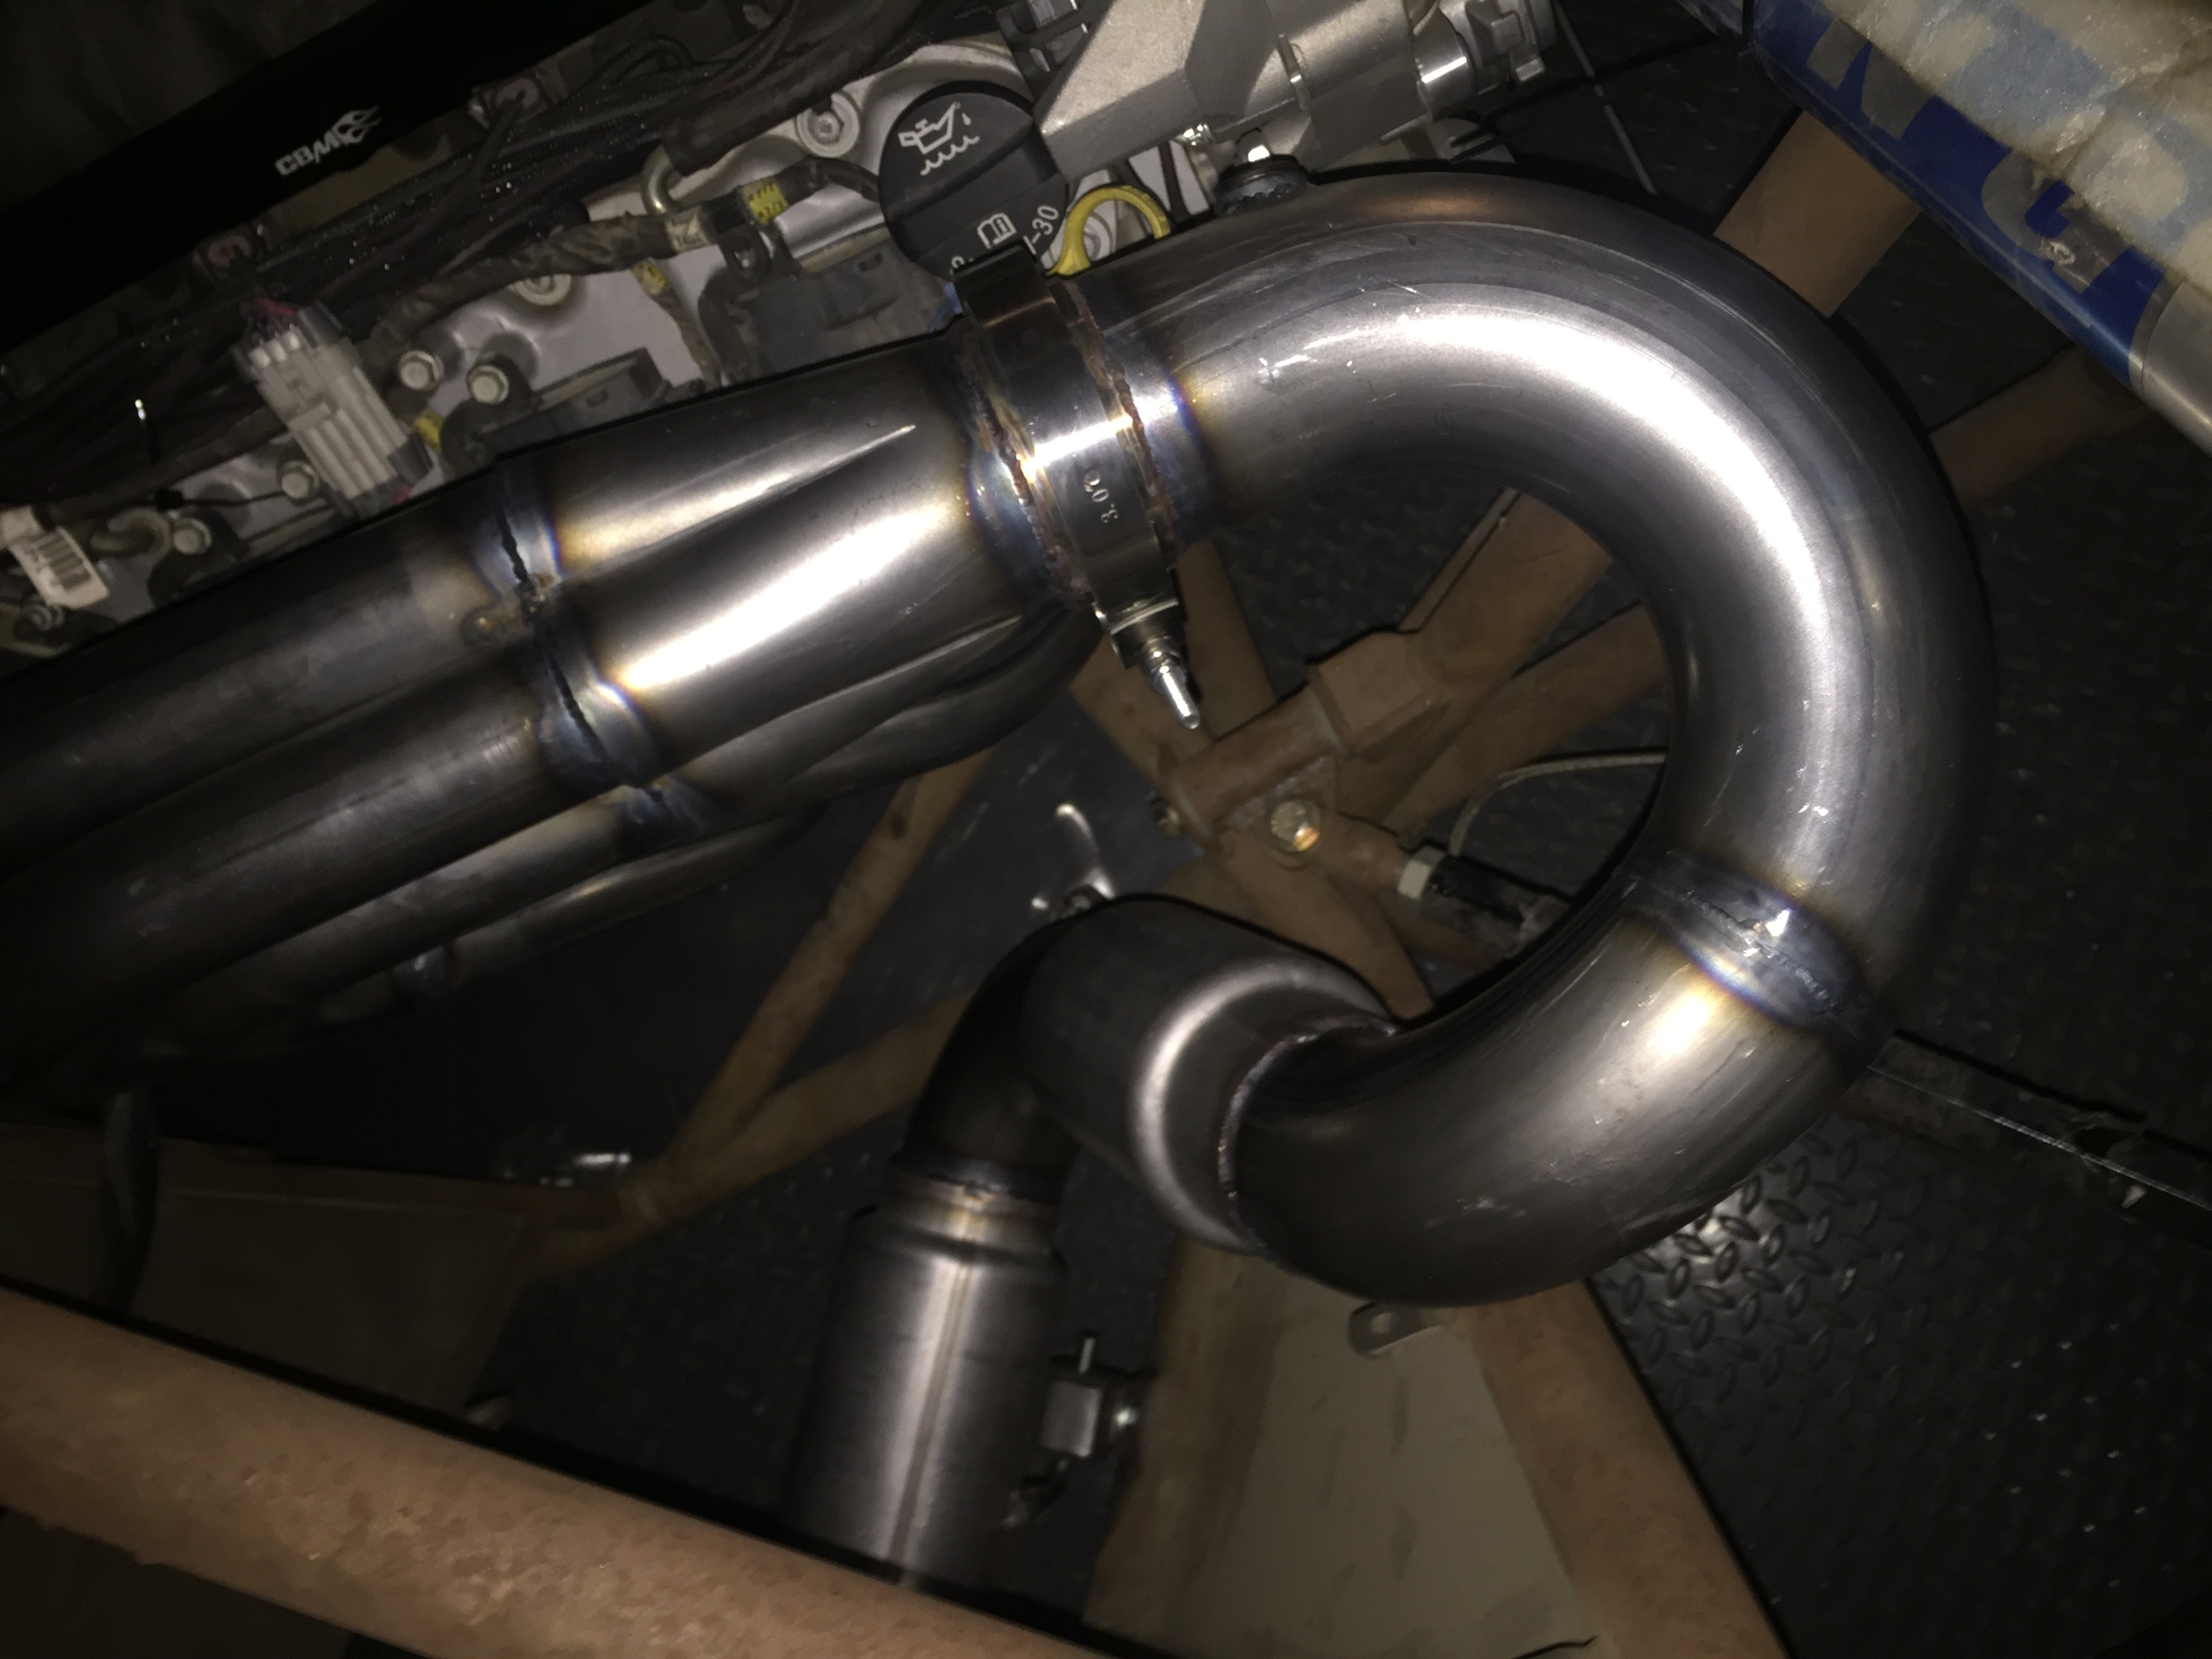
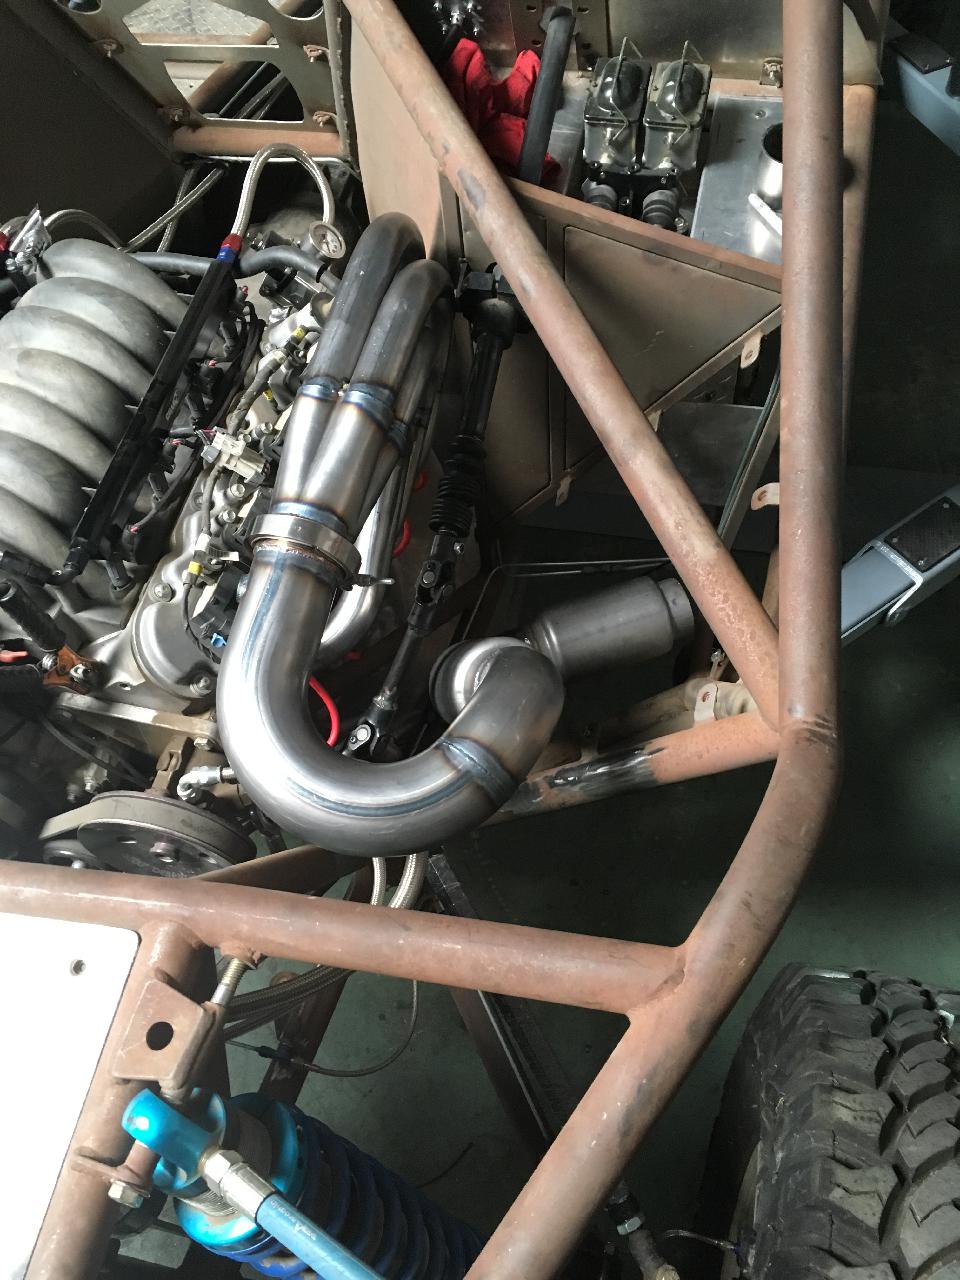
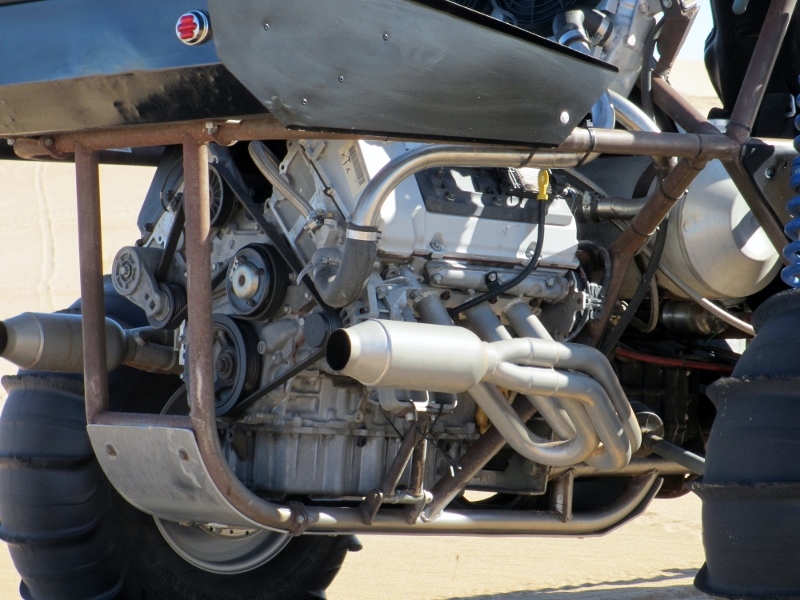
exhaust on this thing has been a big thorn in my side. All of the common buggy stuff just won’t work for this car. Even common hot rod parts proved difficult to fit.
This is the second set of off the shelf headers I tried. I thought the first set would work but when I took the car to a local shop they just laughed and said no way. So thankfully when I talked to Cbm they said they would swap me out a set of center dump headers if I sent the others back. Unfortunately whoever made these must have welded the collector on backwards and it pointed right at the side of the block. I called Cbm back and they test fit another set they had and said they were the same. In the meantime the local shop that came highly recommended by local race guys said they were not going to have time for a few more weeks to get to it.
So I took the car down to San Bernardino to Dave at Hot Head Headers. He got me fixed up! He did a great job and I’m very happy with what he did. Cbm kindly took the headers back, and now I am glad to be done with this part of the project.

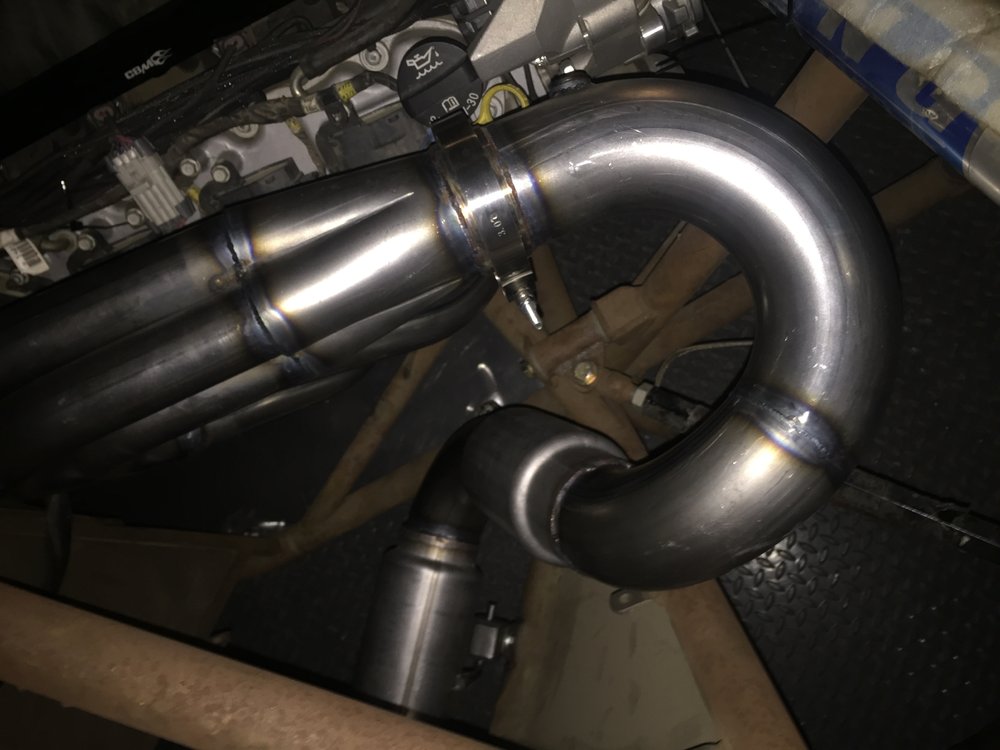

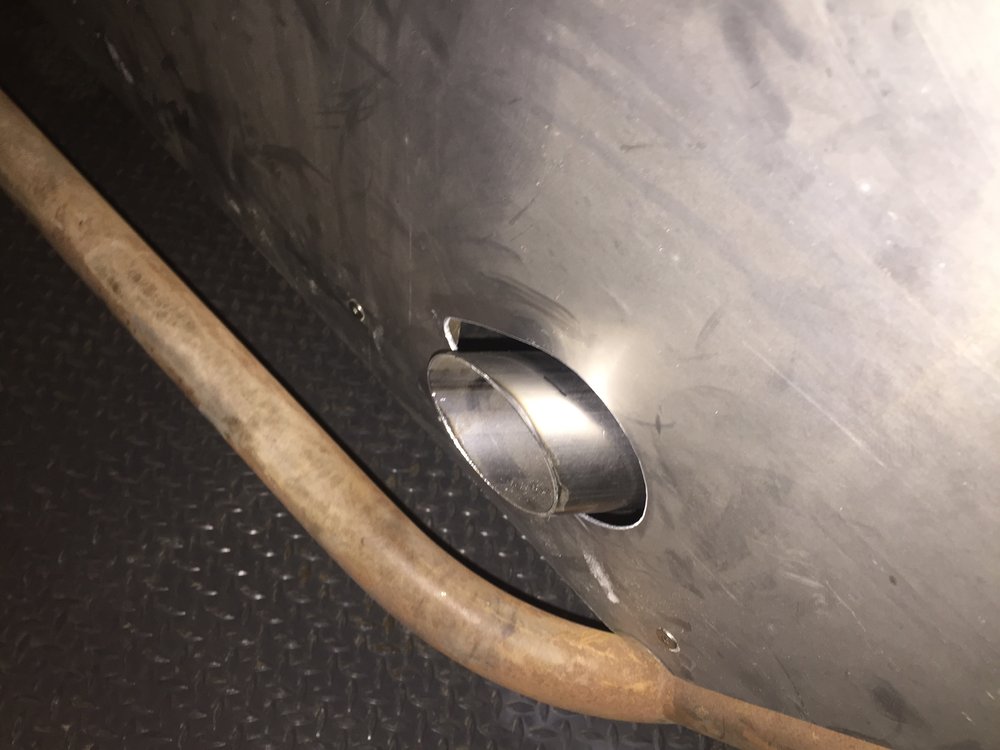
I had talked to a few owners of other V8rails and they all said to try not to run it through the tunnel. One said he almost caught his car on fire. So he changed his. Another said his granddaughter was riding in the back seat and when she got out her behind was smoking. He had to make mods to fix his too. I don’t want to have to go back and change things, so that’s why I asked him to dump out the side.
I am going to be dying at the in laws for Thanksgiving knowing I need to hook up like 10 wires and put fluids in and I can finally here this thing run.
I am trying to make it to the buggy roundup. It will be the maiden voyage if I can make it.

-
Ok thanks for the tip
-
Yep msd's. Is that a common problem with them?
Are pictures not showing in the post about the flex plate? They all show for me.
-
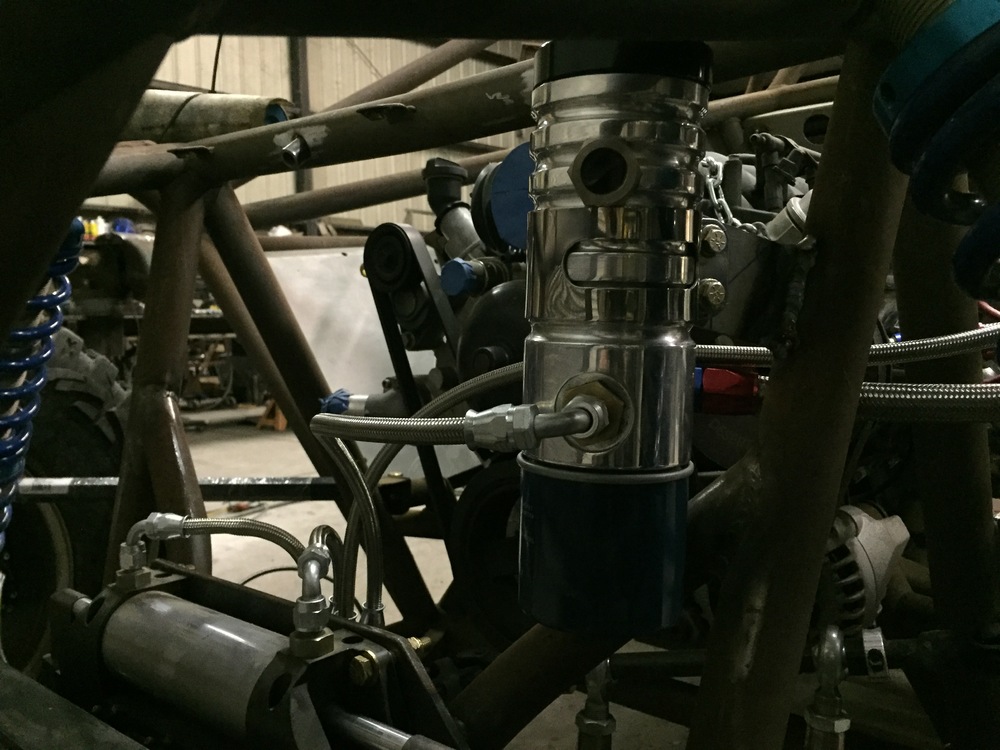
A little more progress.
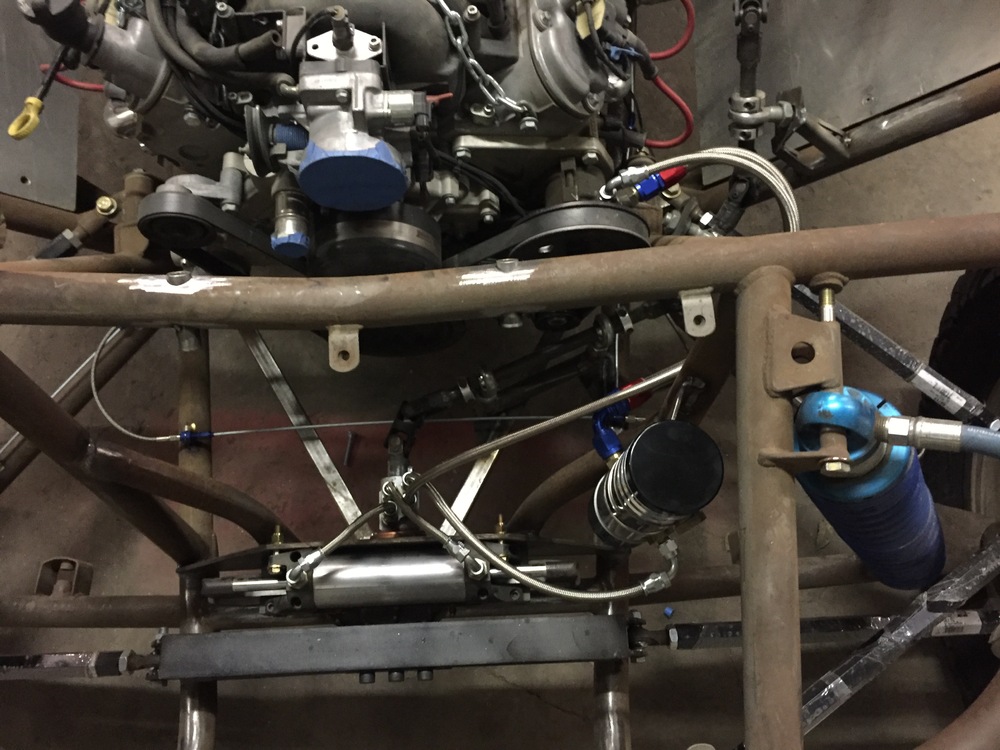
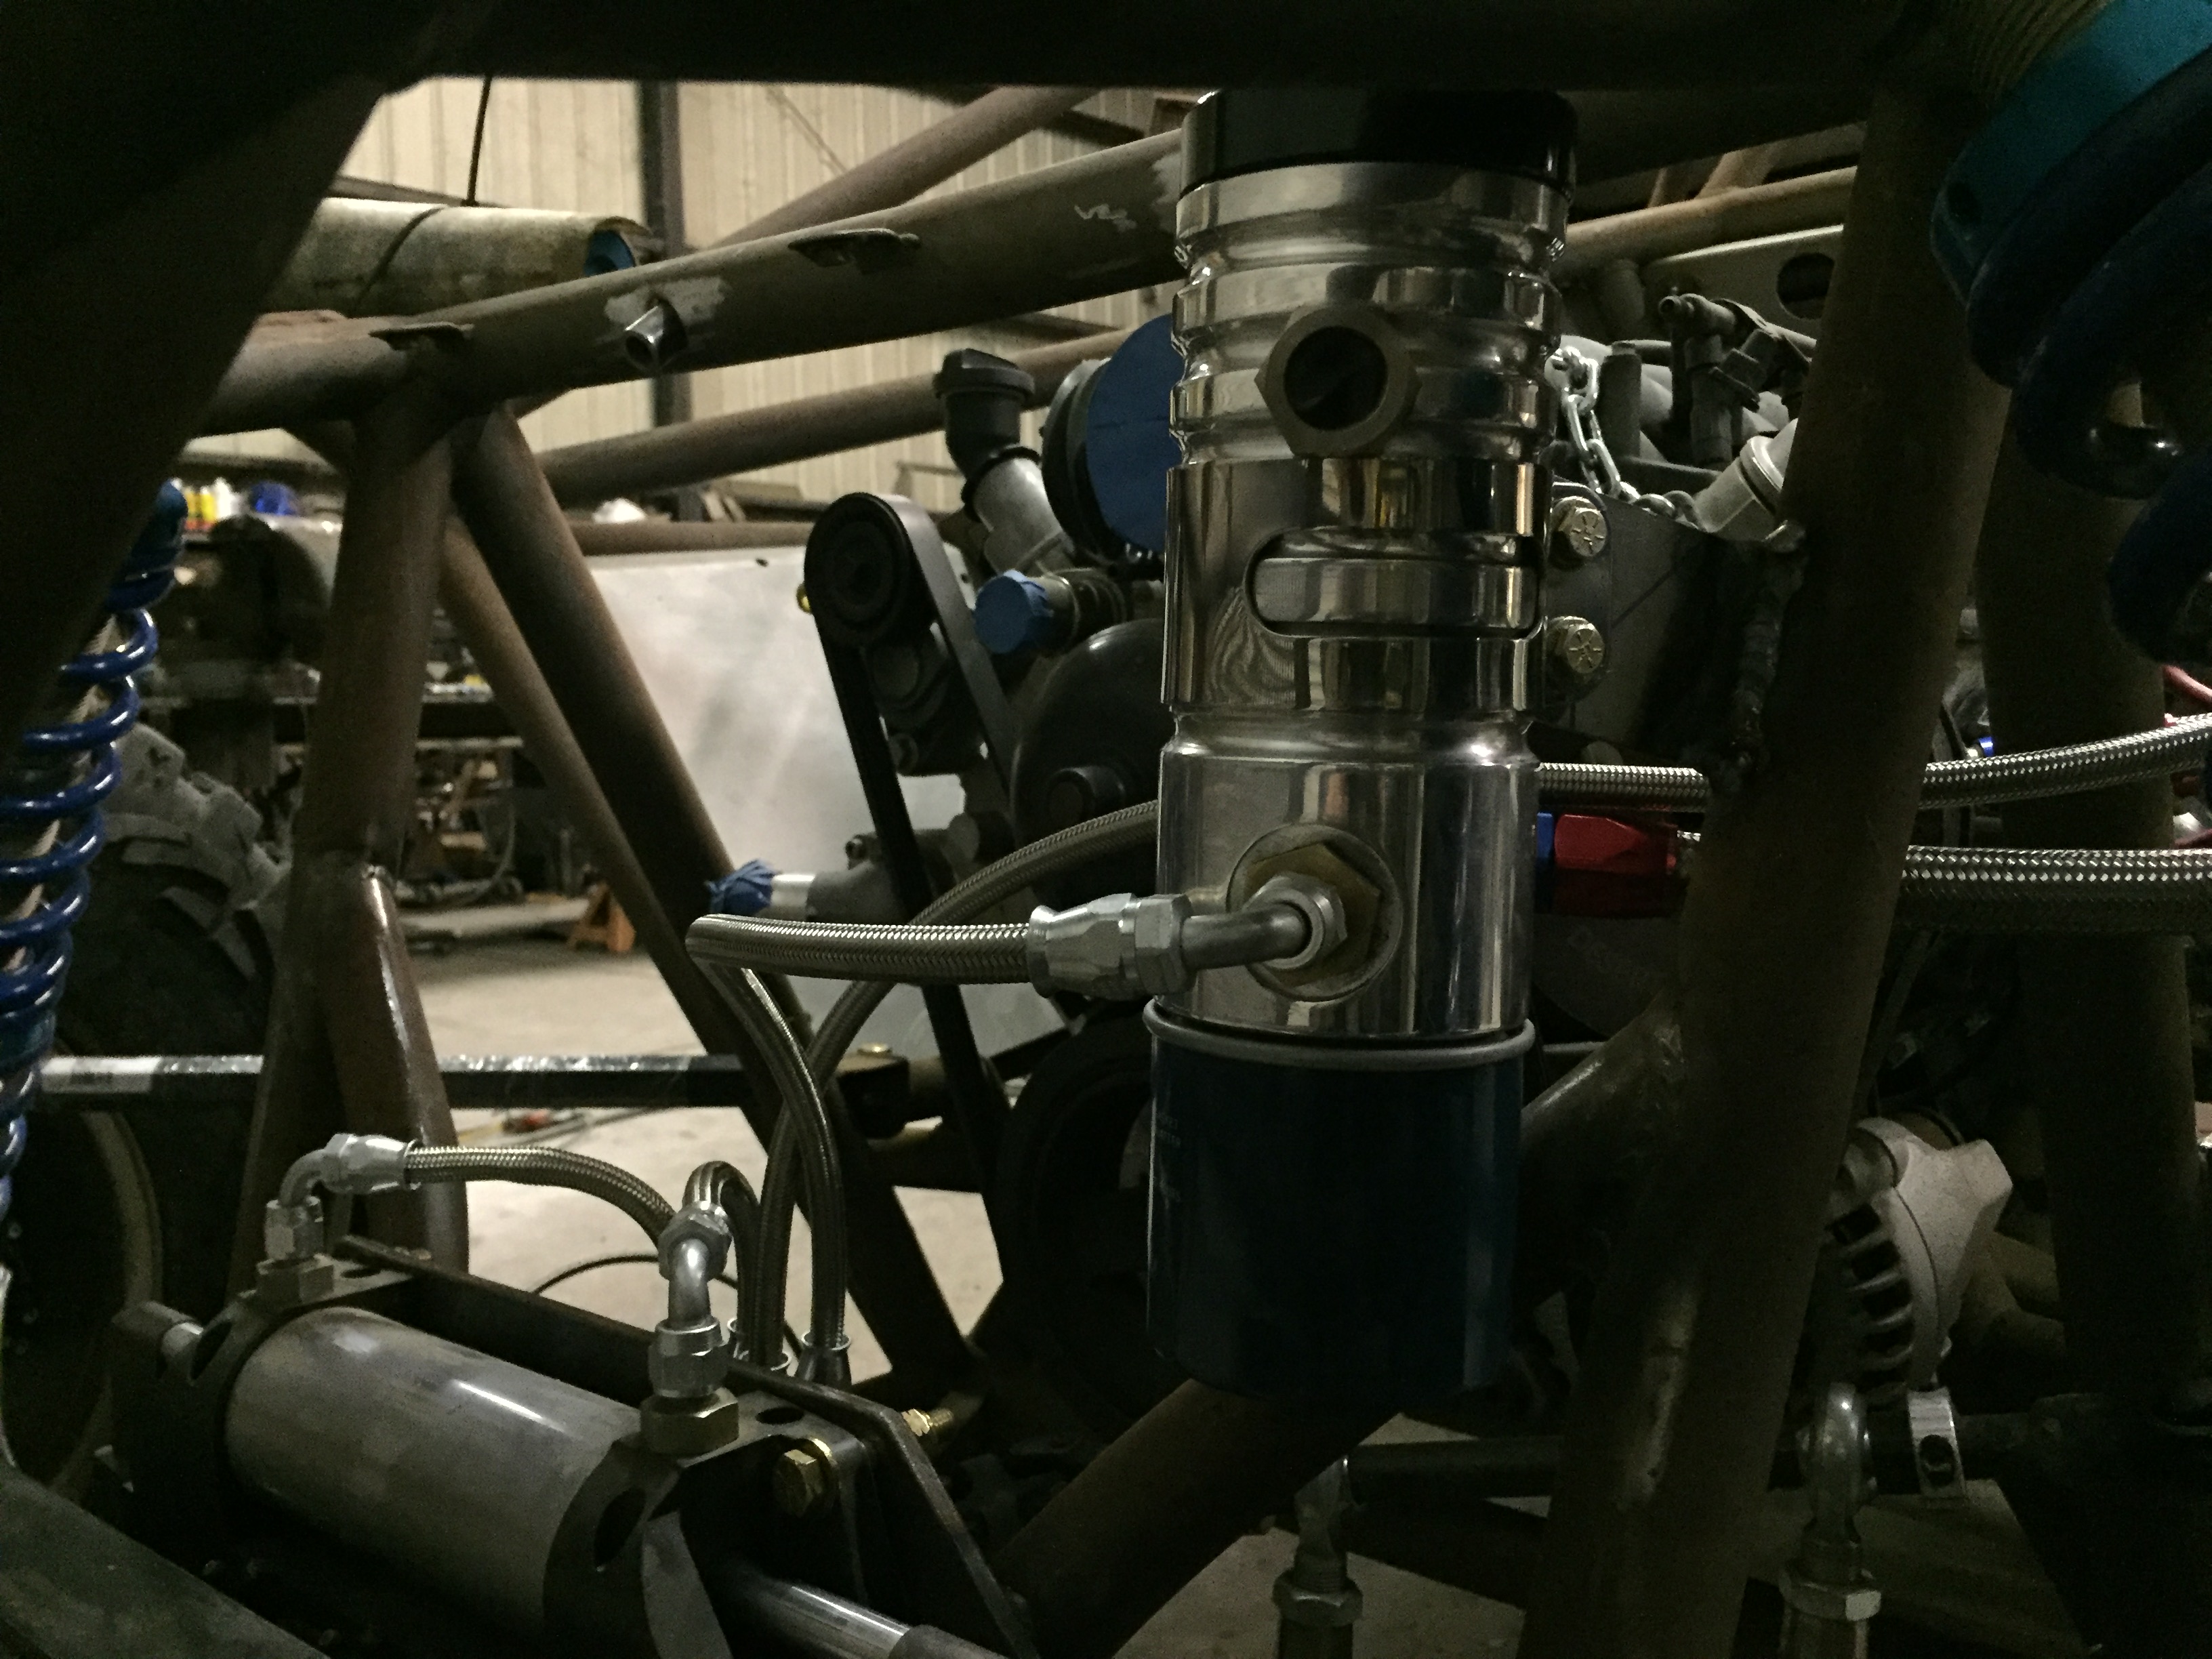
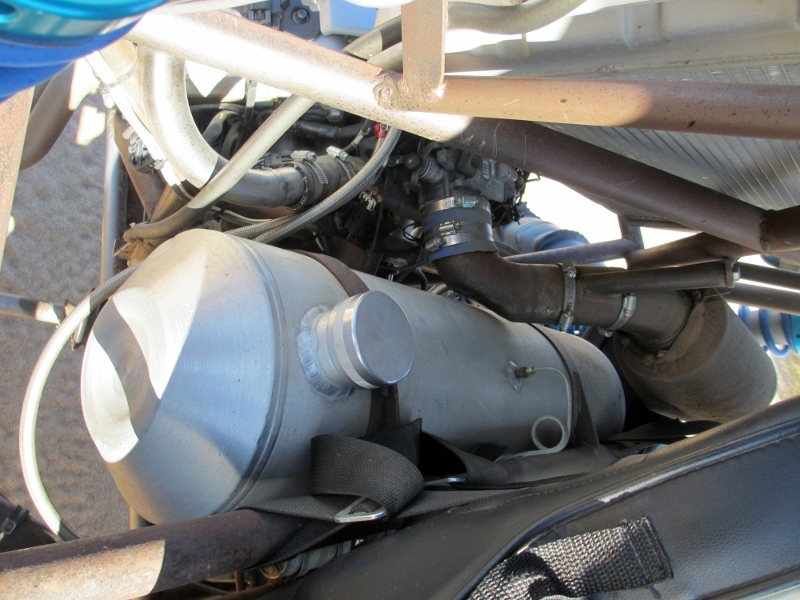
I got this really nice power steering reservoir from Alper Motorsports. Filter and sealed canister with sight glass to check the oil level. No opening the cap and getting contaminants in the oil. I got it mounted and plumbed in.
One more ore piece of the puzzle done.

-
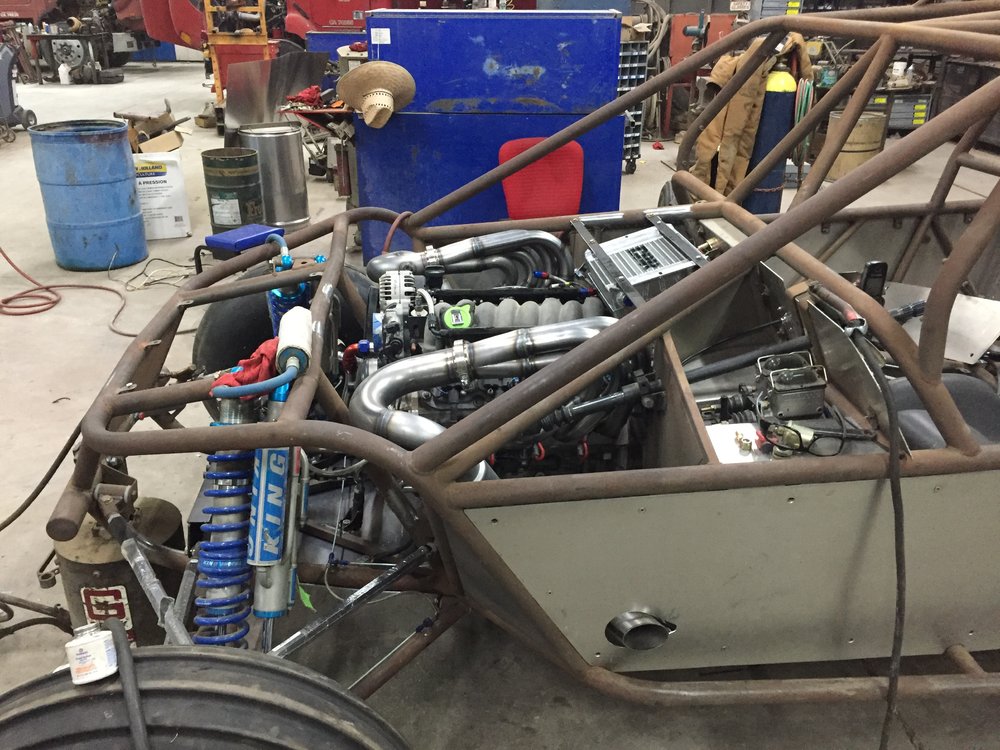
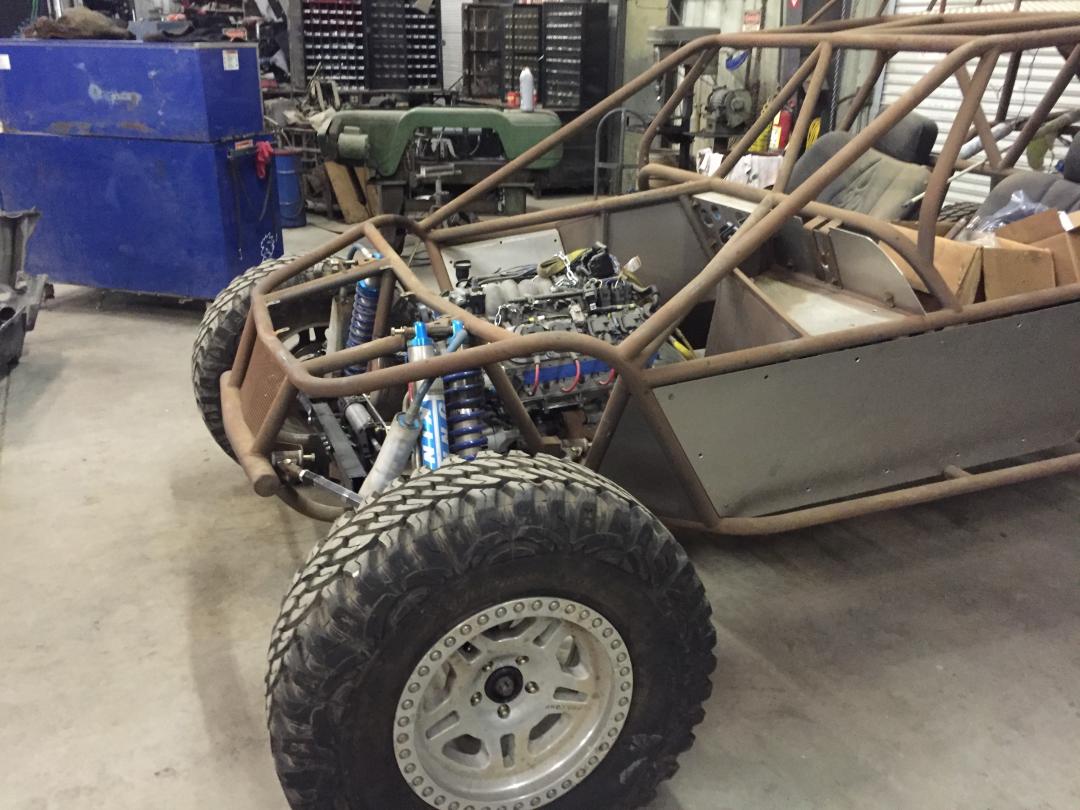
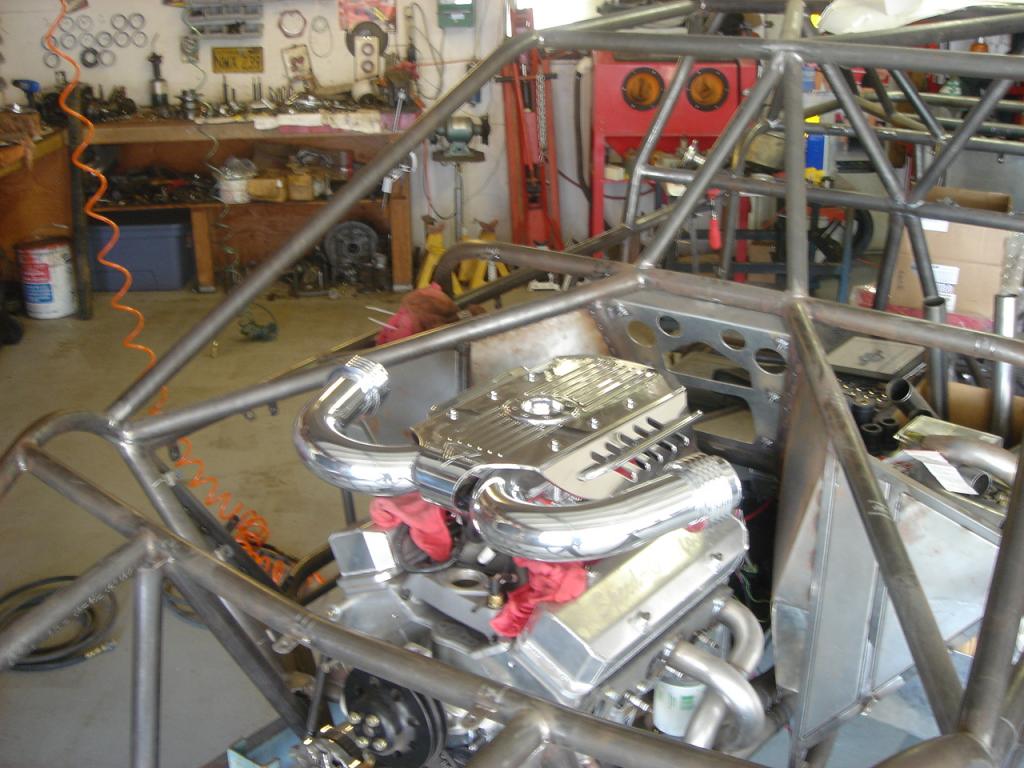
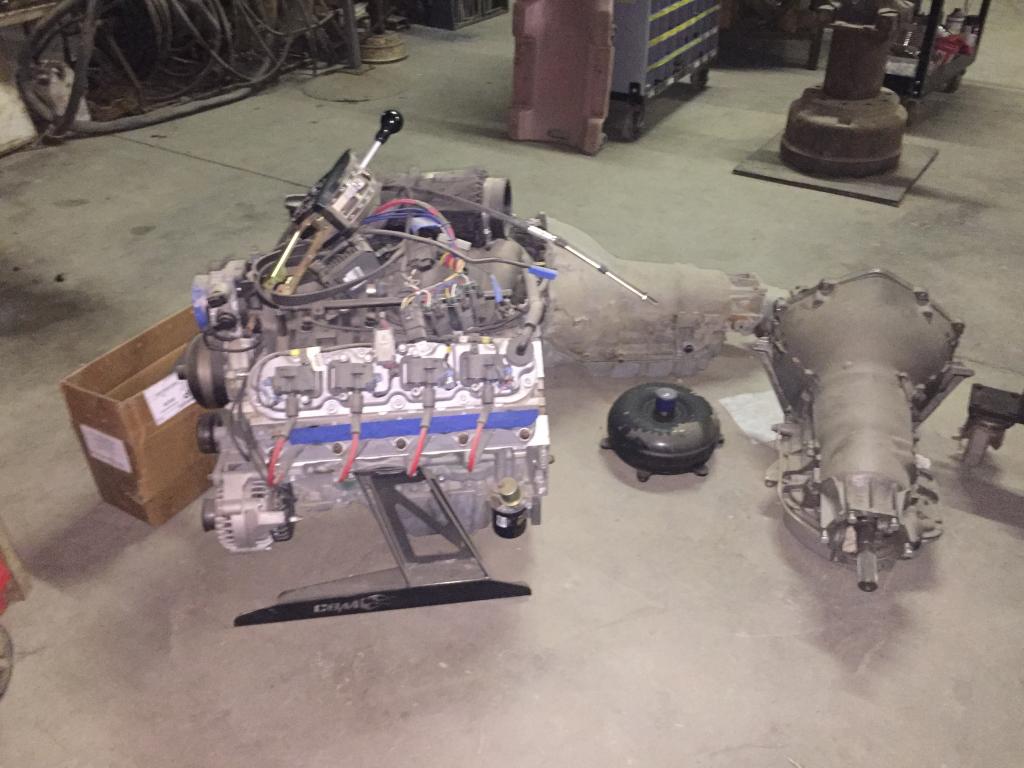
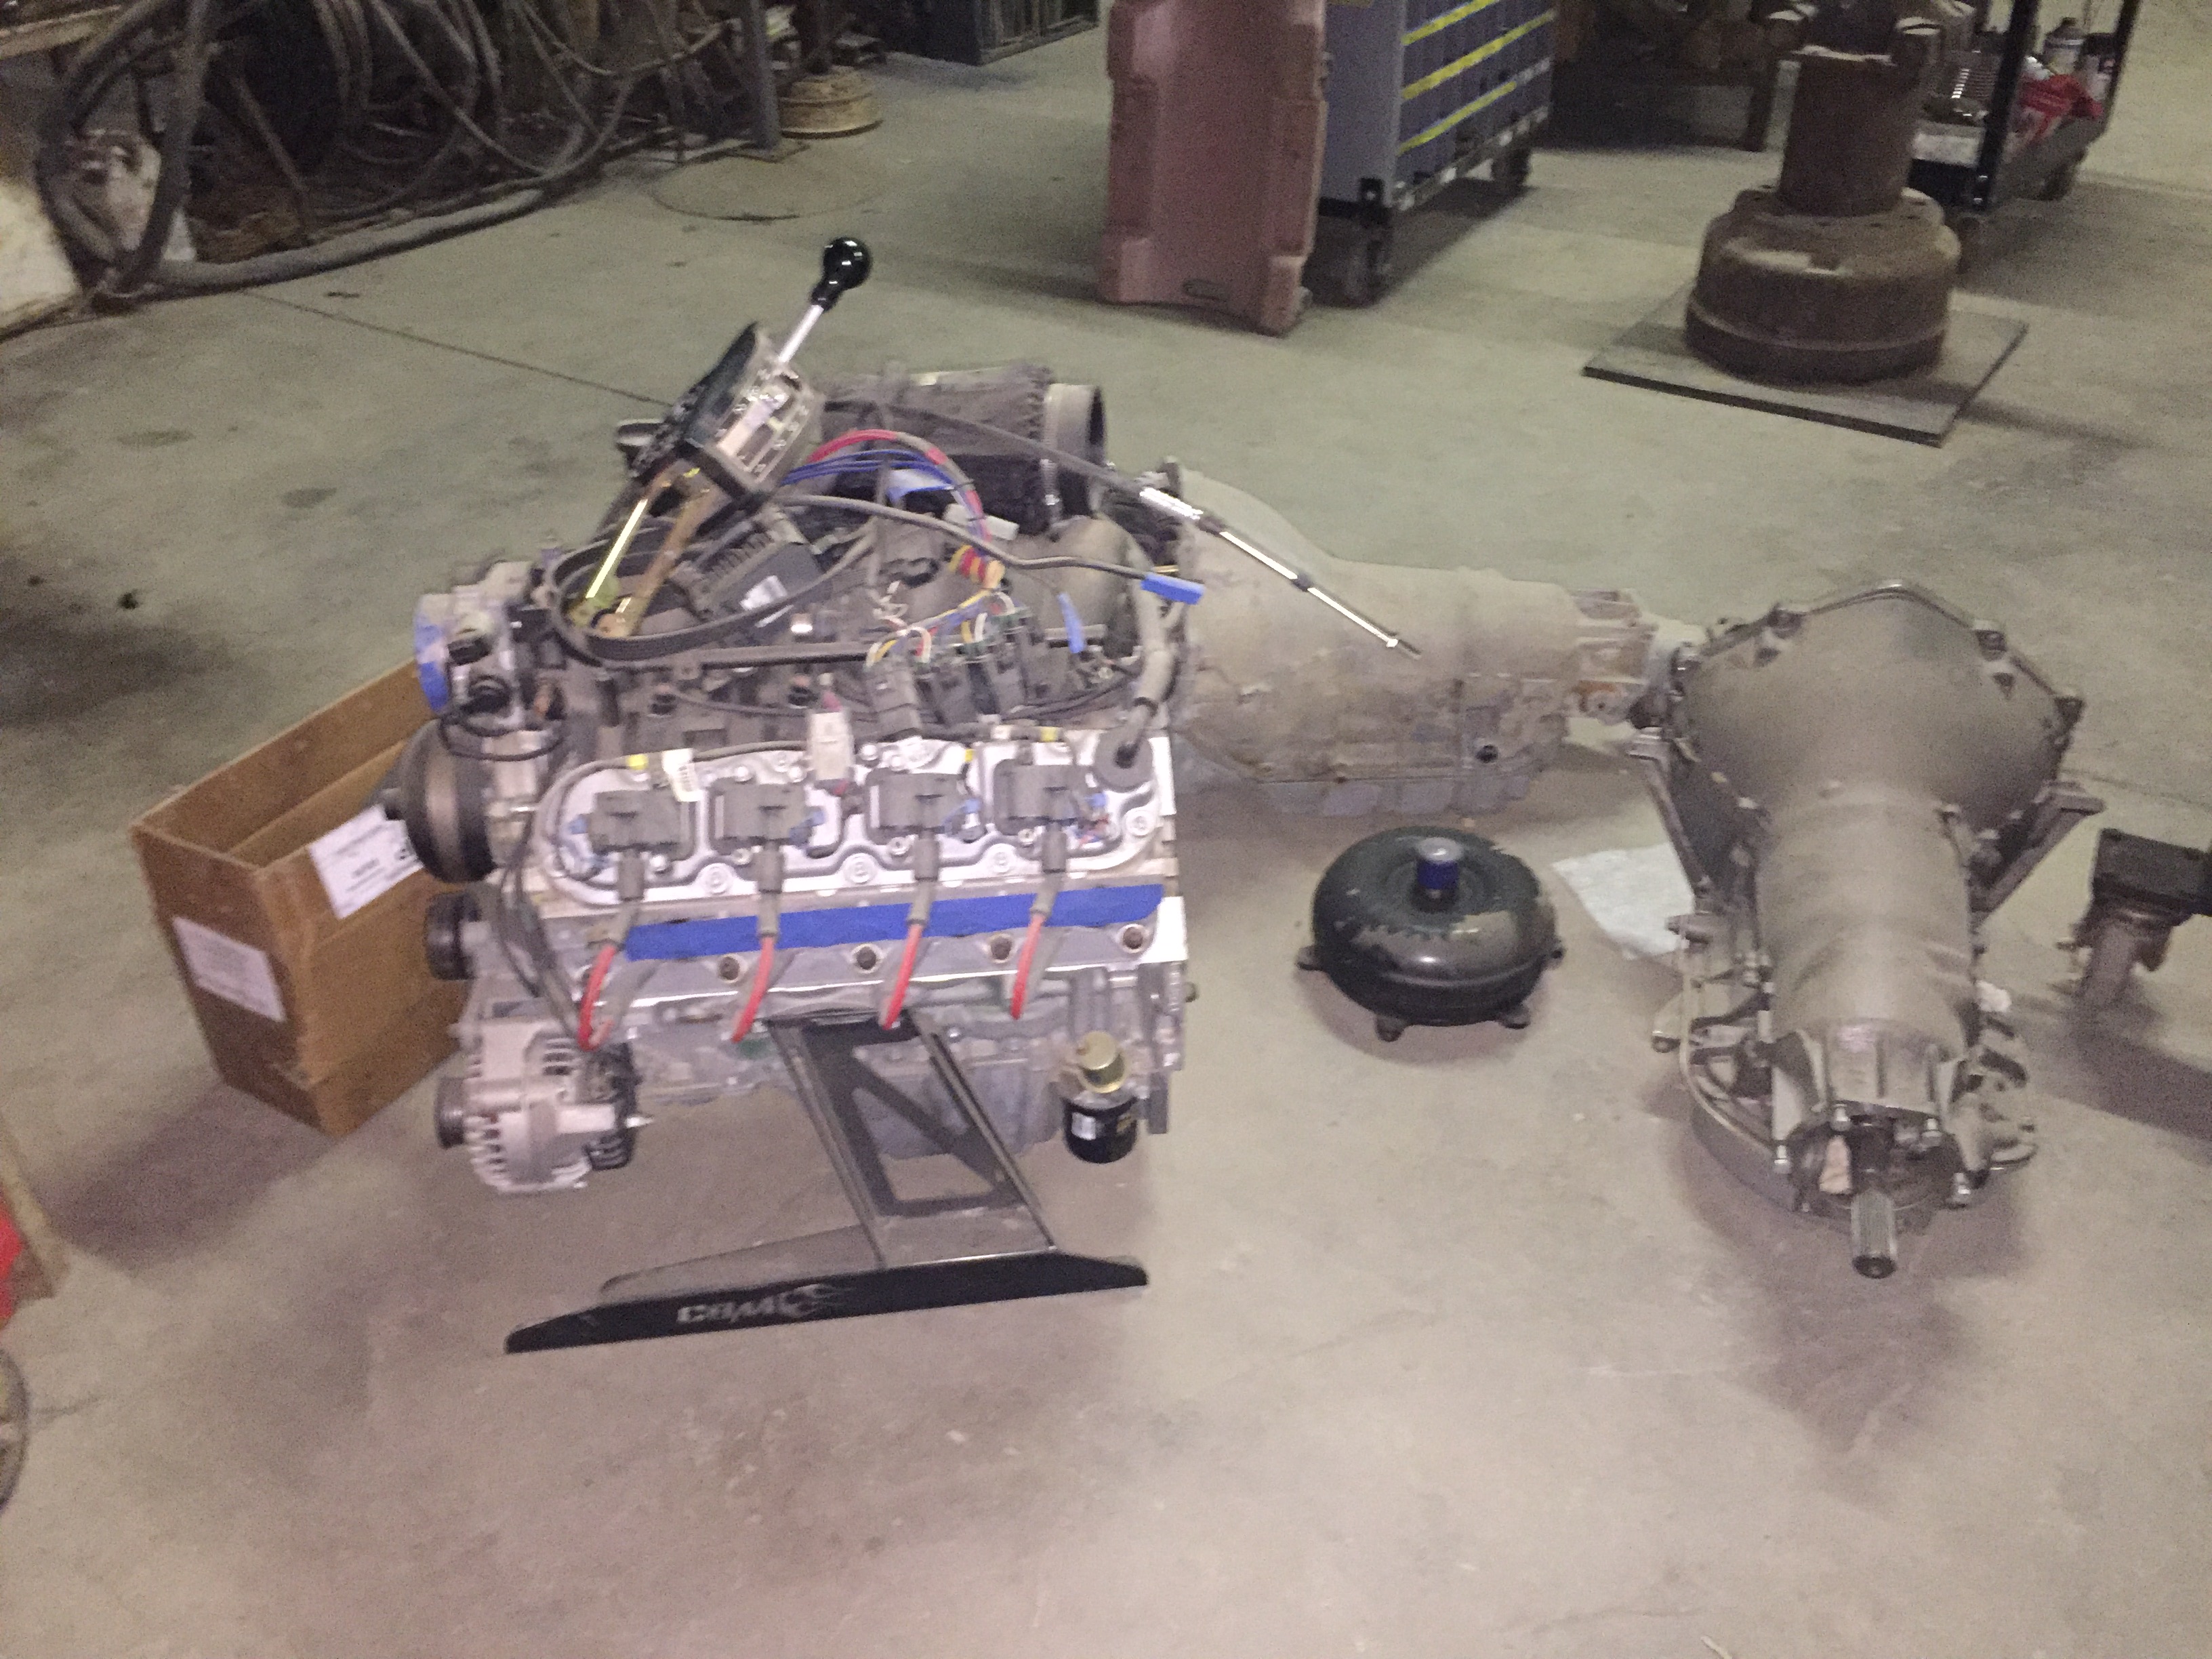
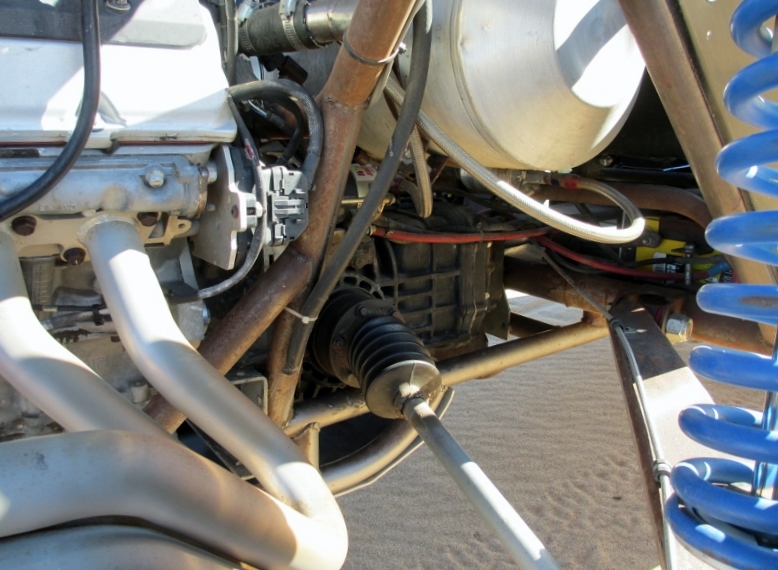
Pulled the motor back out. Got the motor and rear transmission mounts welded out and finished.
Got the flexplate and torque converter in and motor and tranny back together.

The headers are on finger tight (thanks cbm) I really banged my head against the wall trying to find anyone local to build them. I had every intention of taking it to Tom Face but he was out until March/April. A local guy lots of folks recommended is out of the country until March also. So I was very happy to hear from Cbm they had headers. I have a place that says they can get the back half done no problem. They do most of the race cars in town.

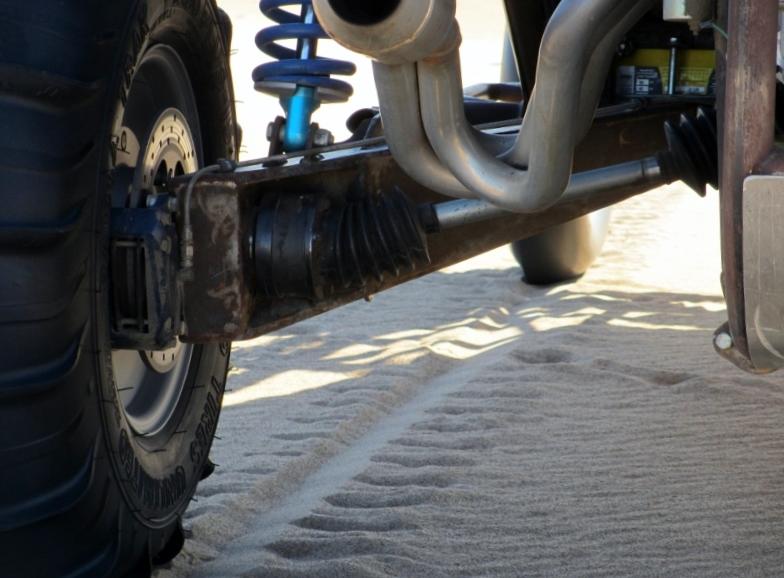
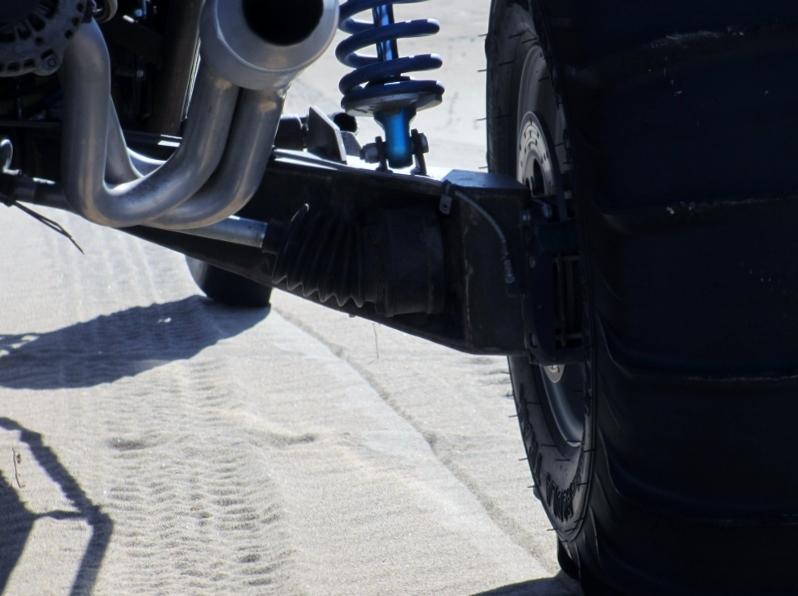
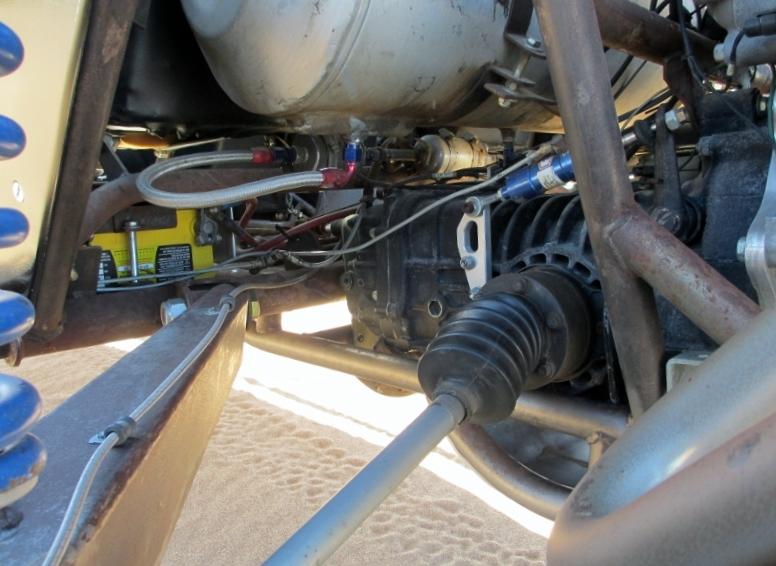
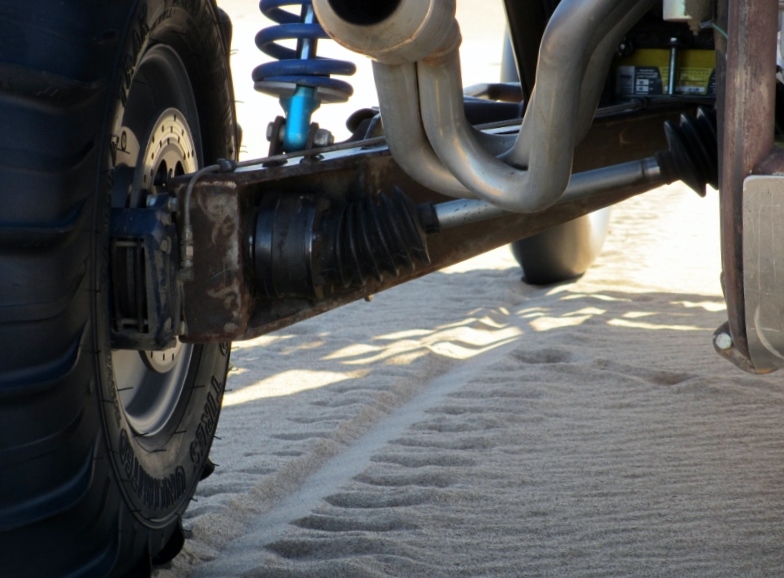
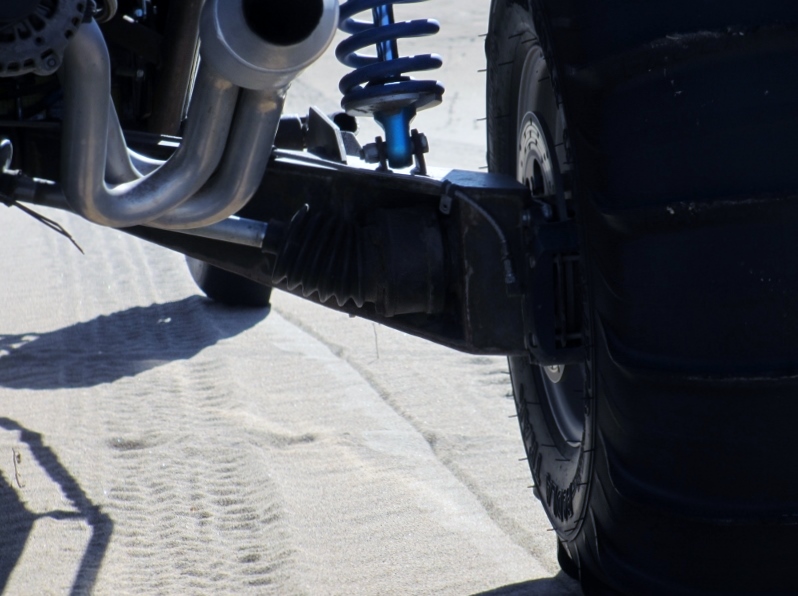
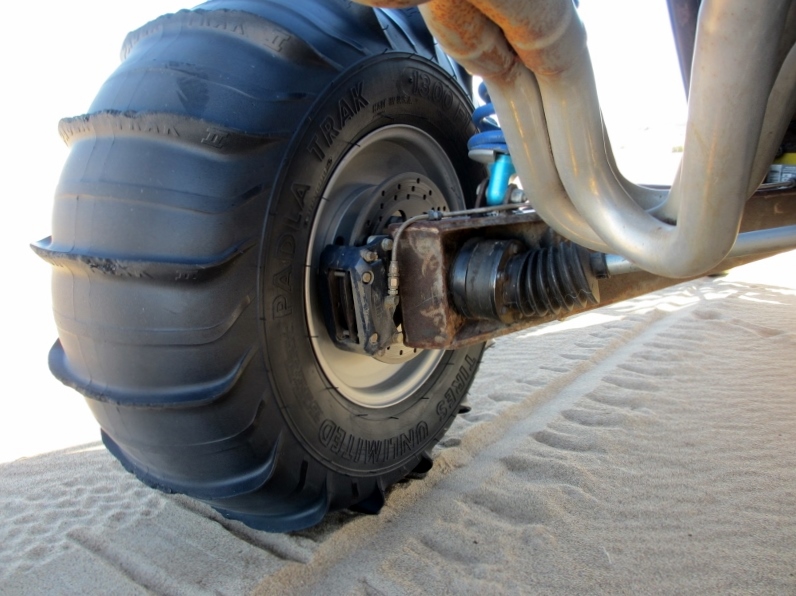
Up next, I got the Cv's (Alper's rcv 934's with grease zerks) installed. Jason sent me the large cv boots that work fine on the quick change side, but on the upright side the boots are way to big and hit the shock mounts. I should have paid closer attention to some of the photos I have of other cars. They all have the small boot on that side. So Jason sent me the smaller boots and I was back in business at least I thought. I used Allen cap screws to hold the cv on. Only problem is the head of the bolt is yo big around and I couldn't get the boot between the head of the bolt and the flange ring. Not to mention there is no getting any securing strap in place to keep the boot on. So I turned the od of the bolt heads off so they will fit.

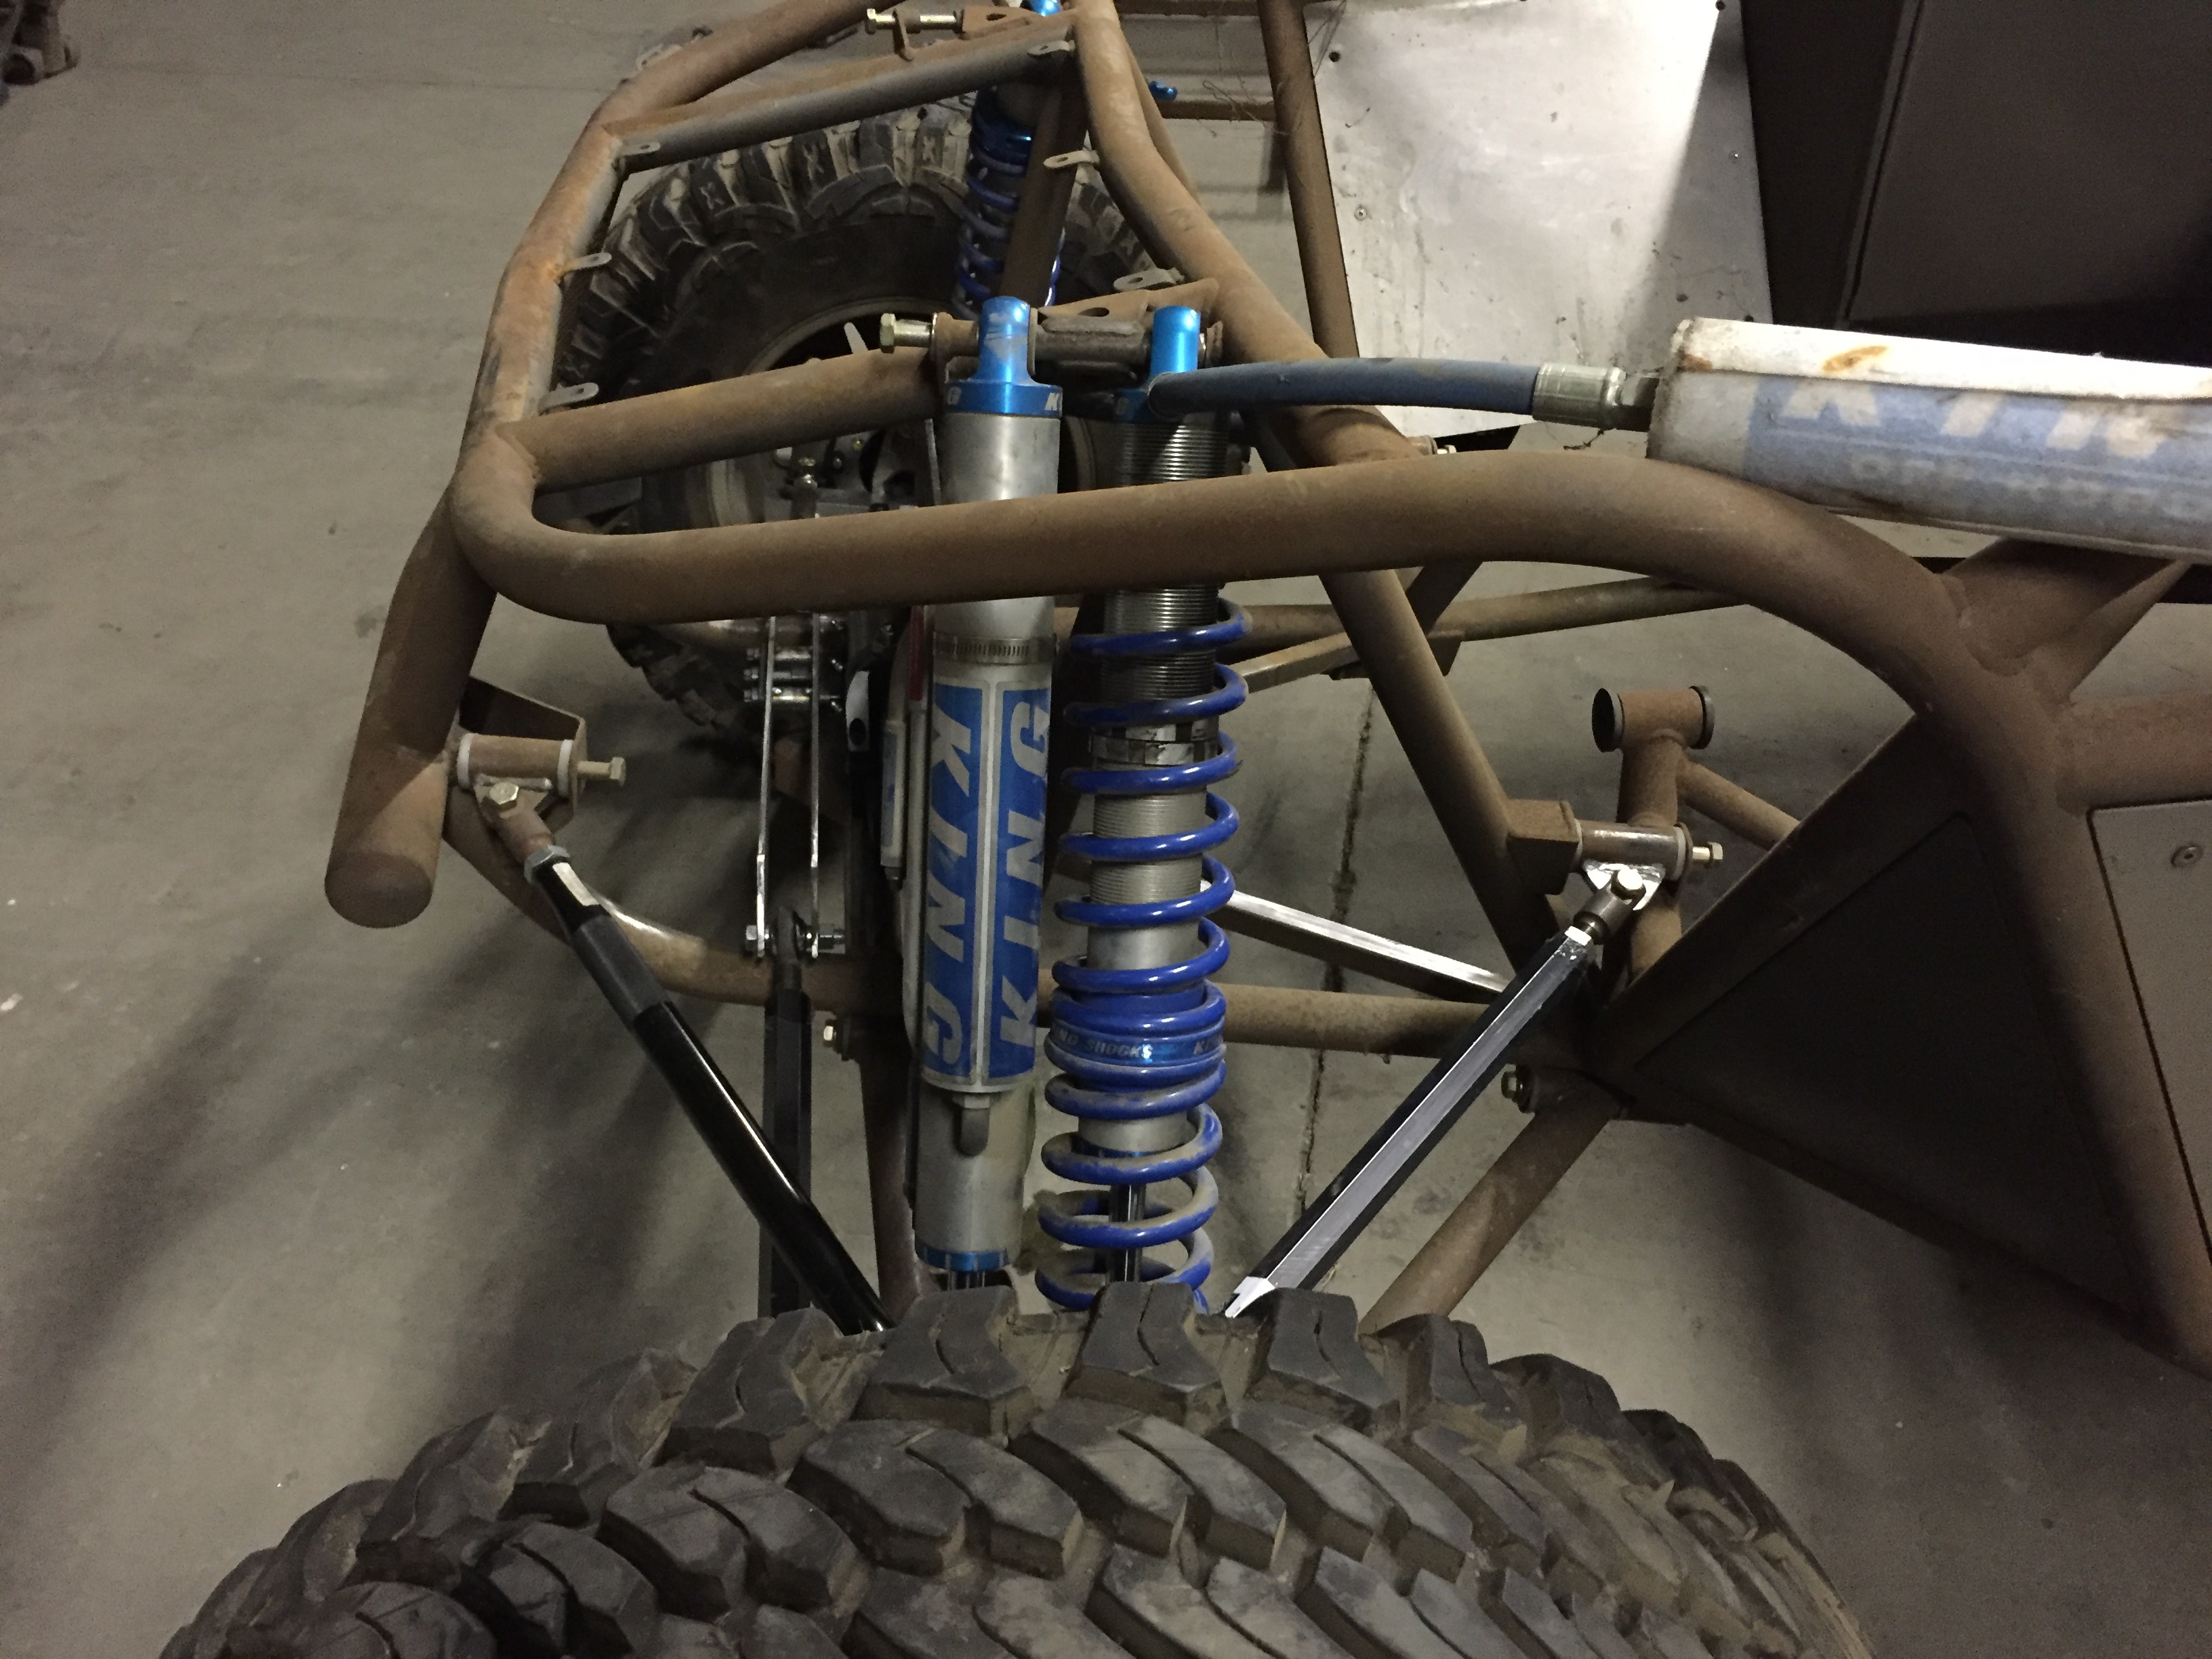
Brakes are on and ready to bleed.


Brakes are bleed and solid.
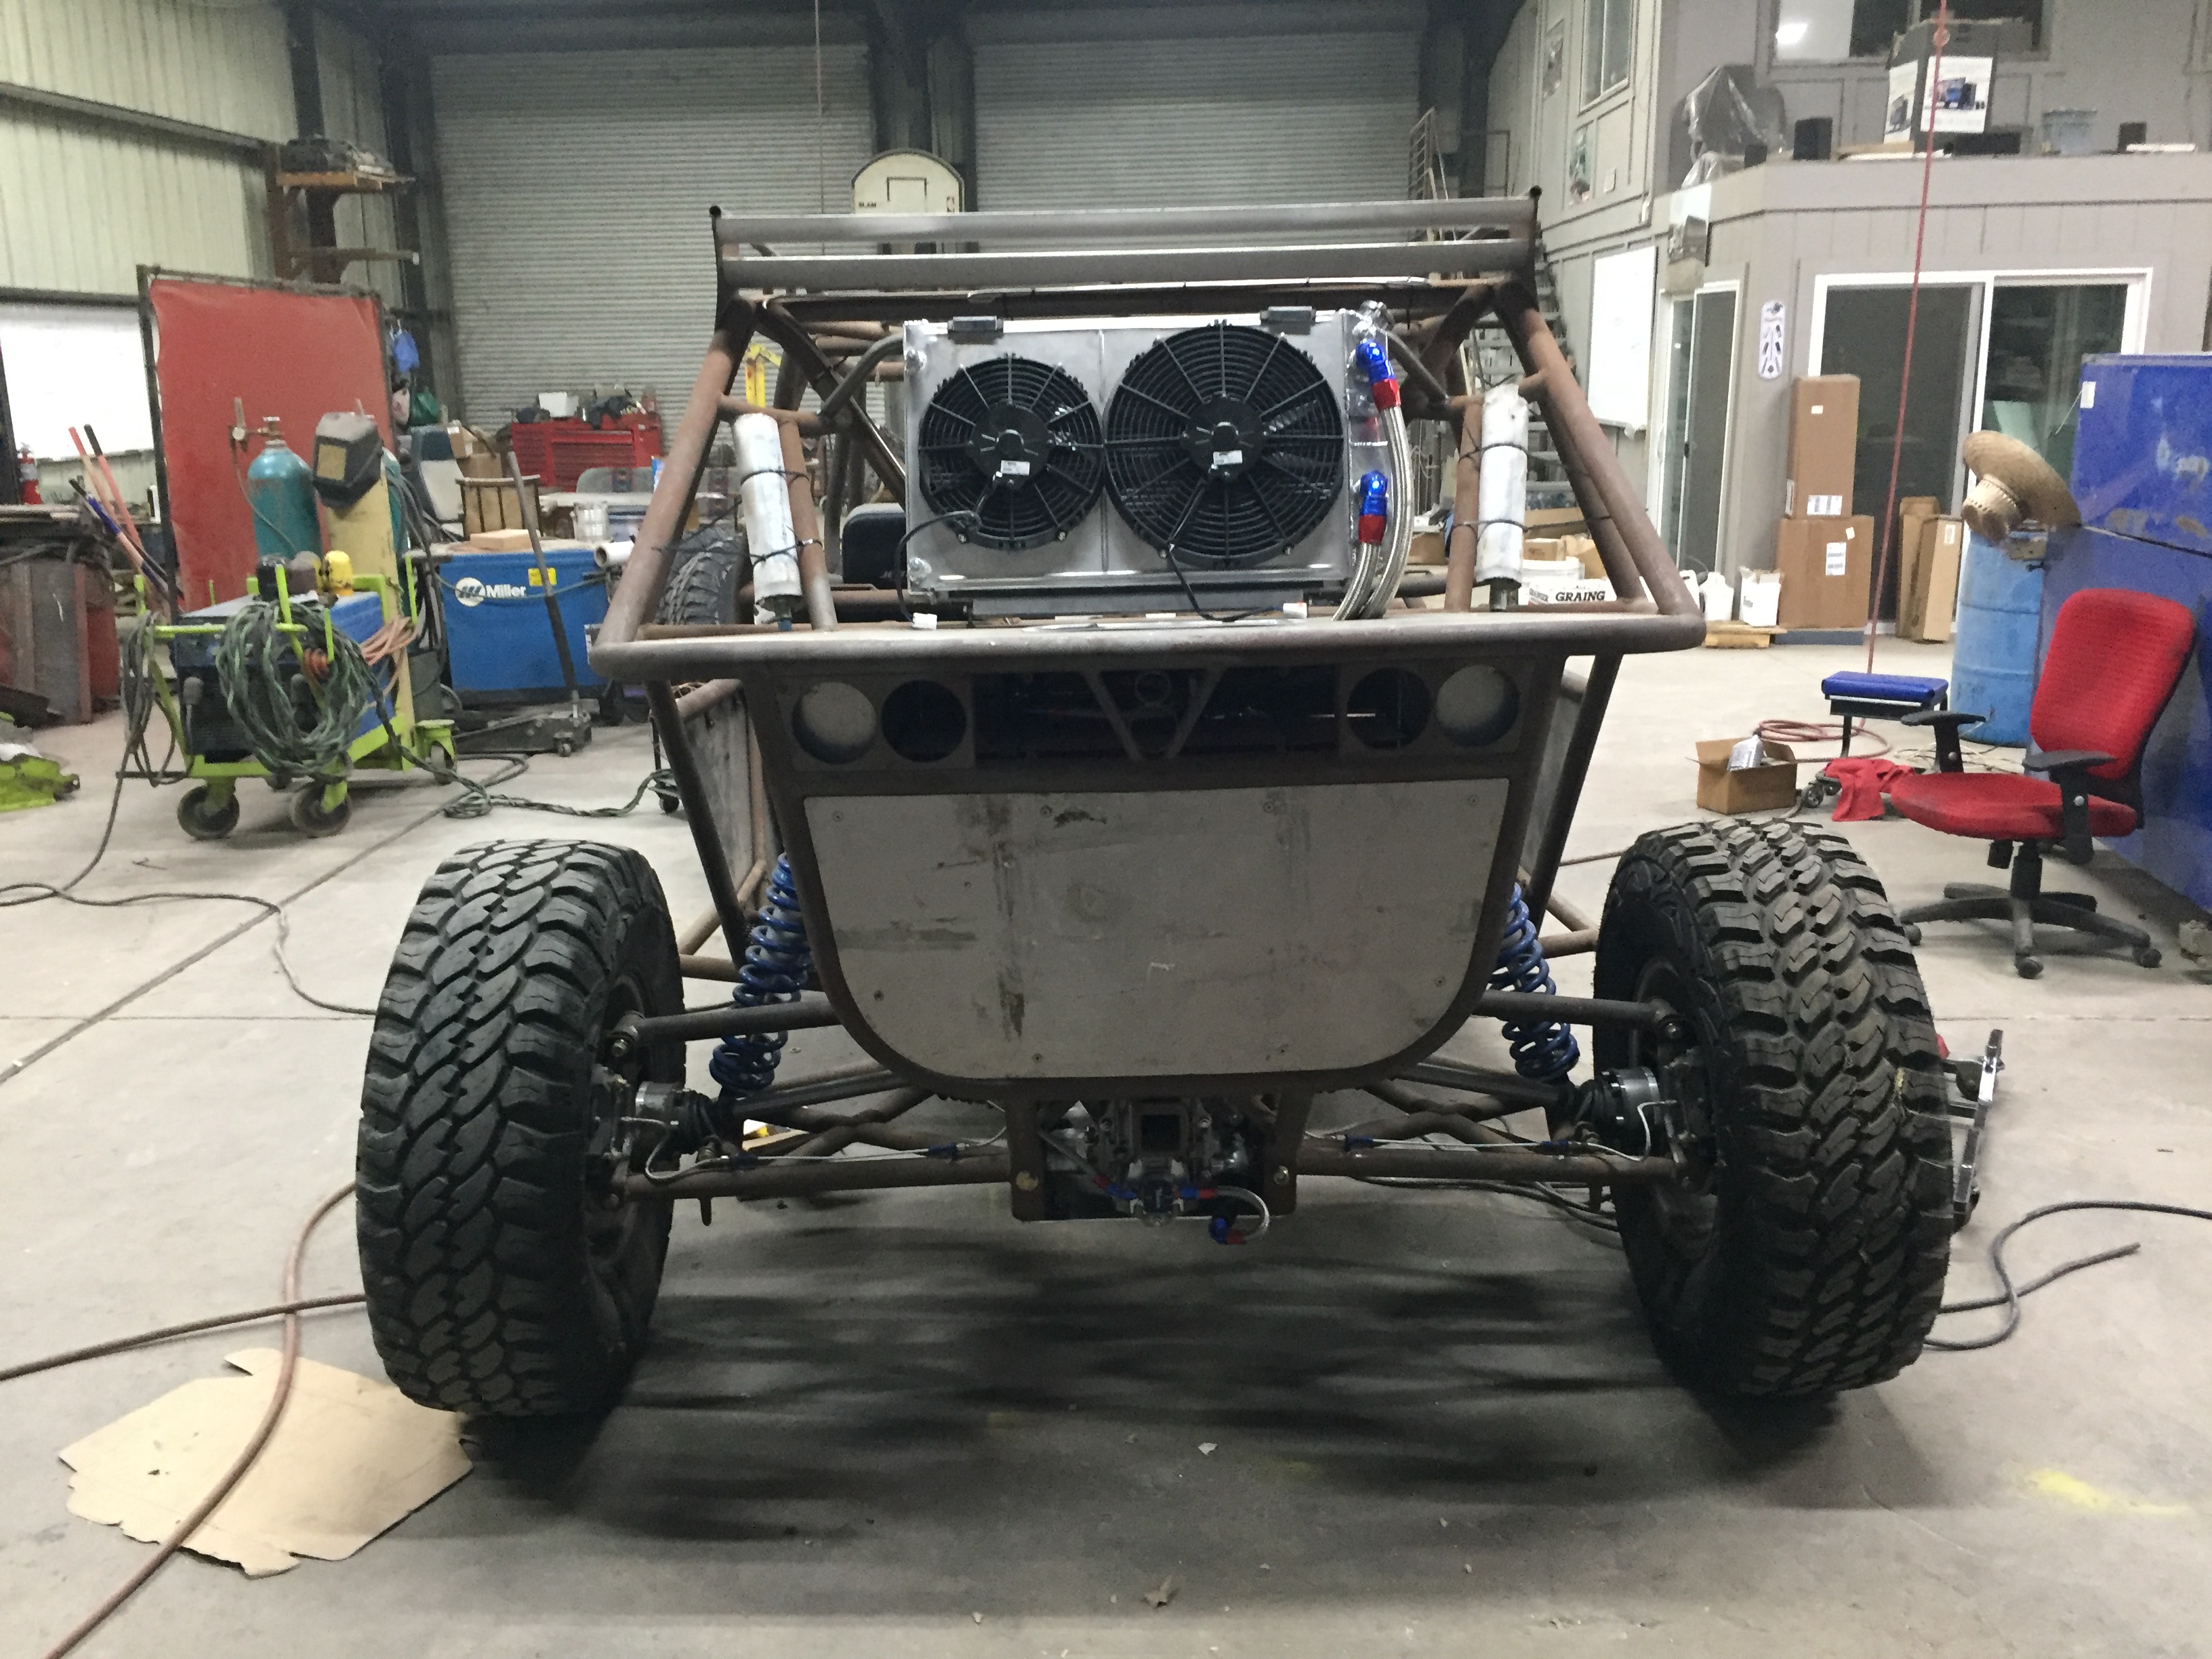
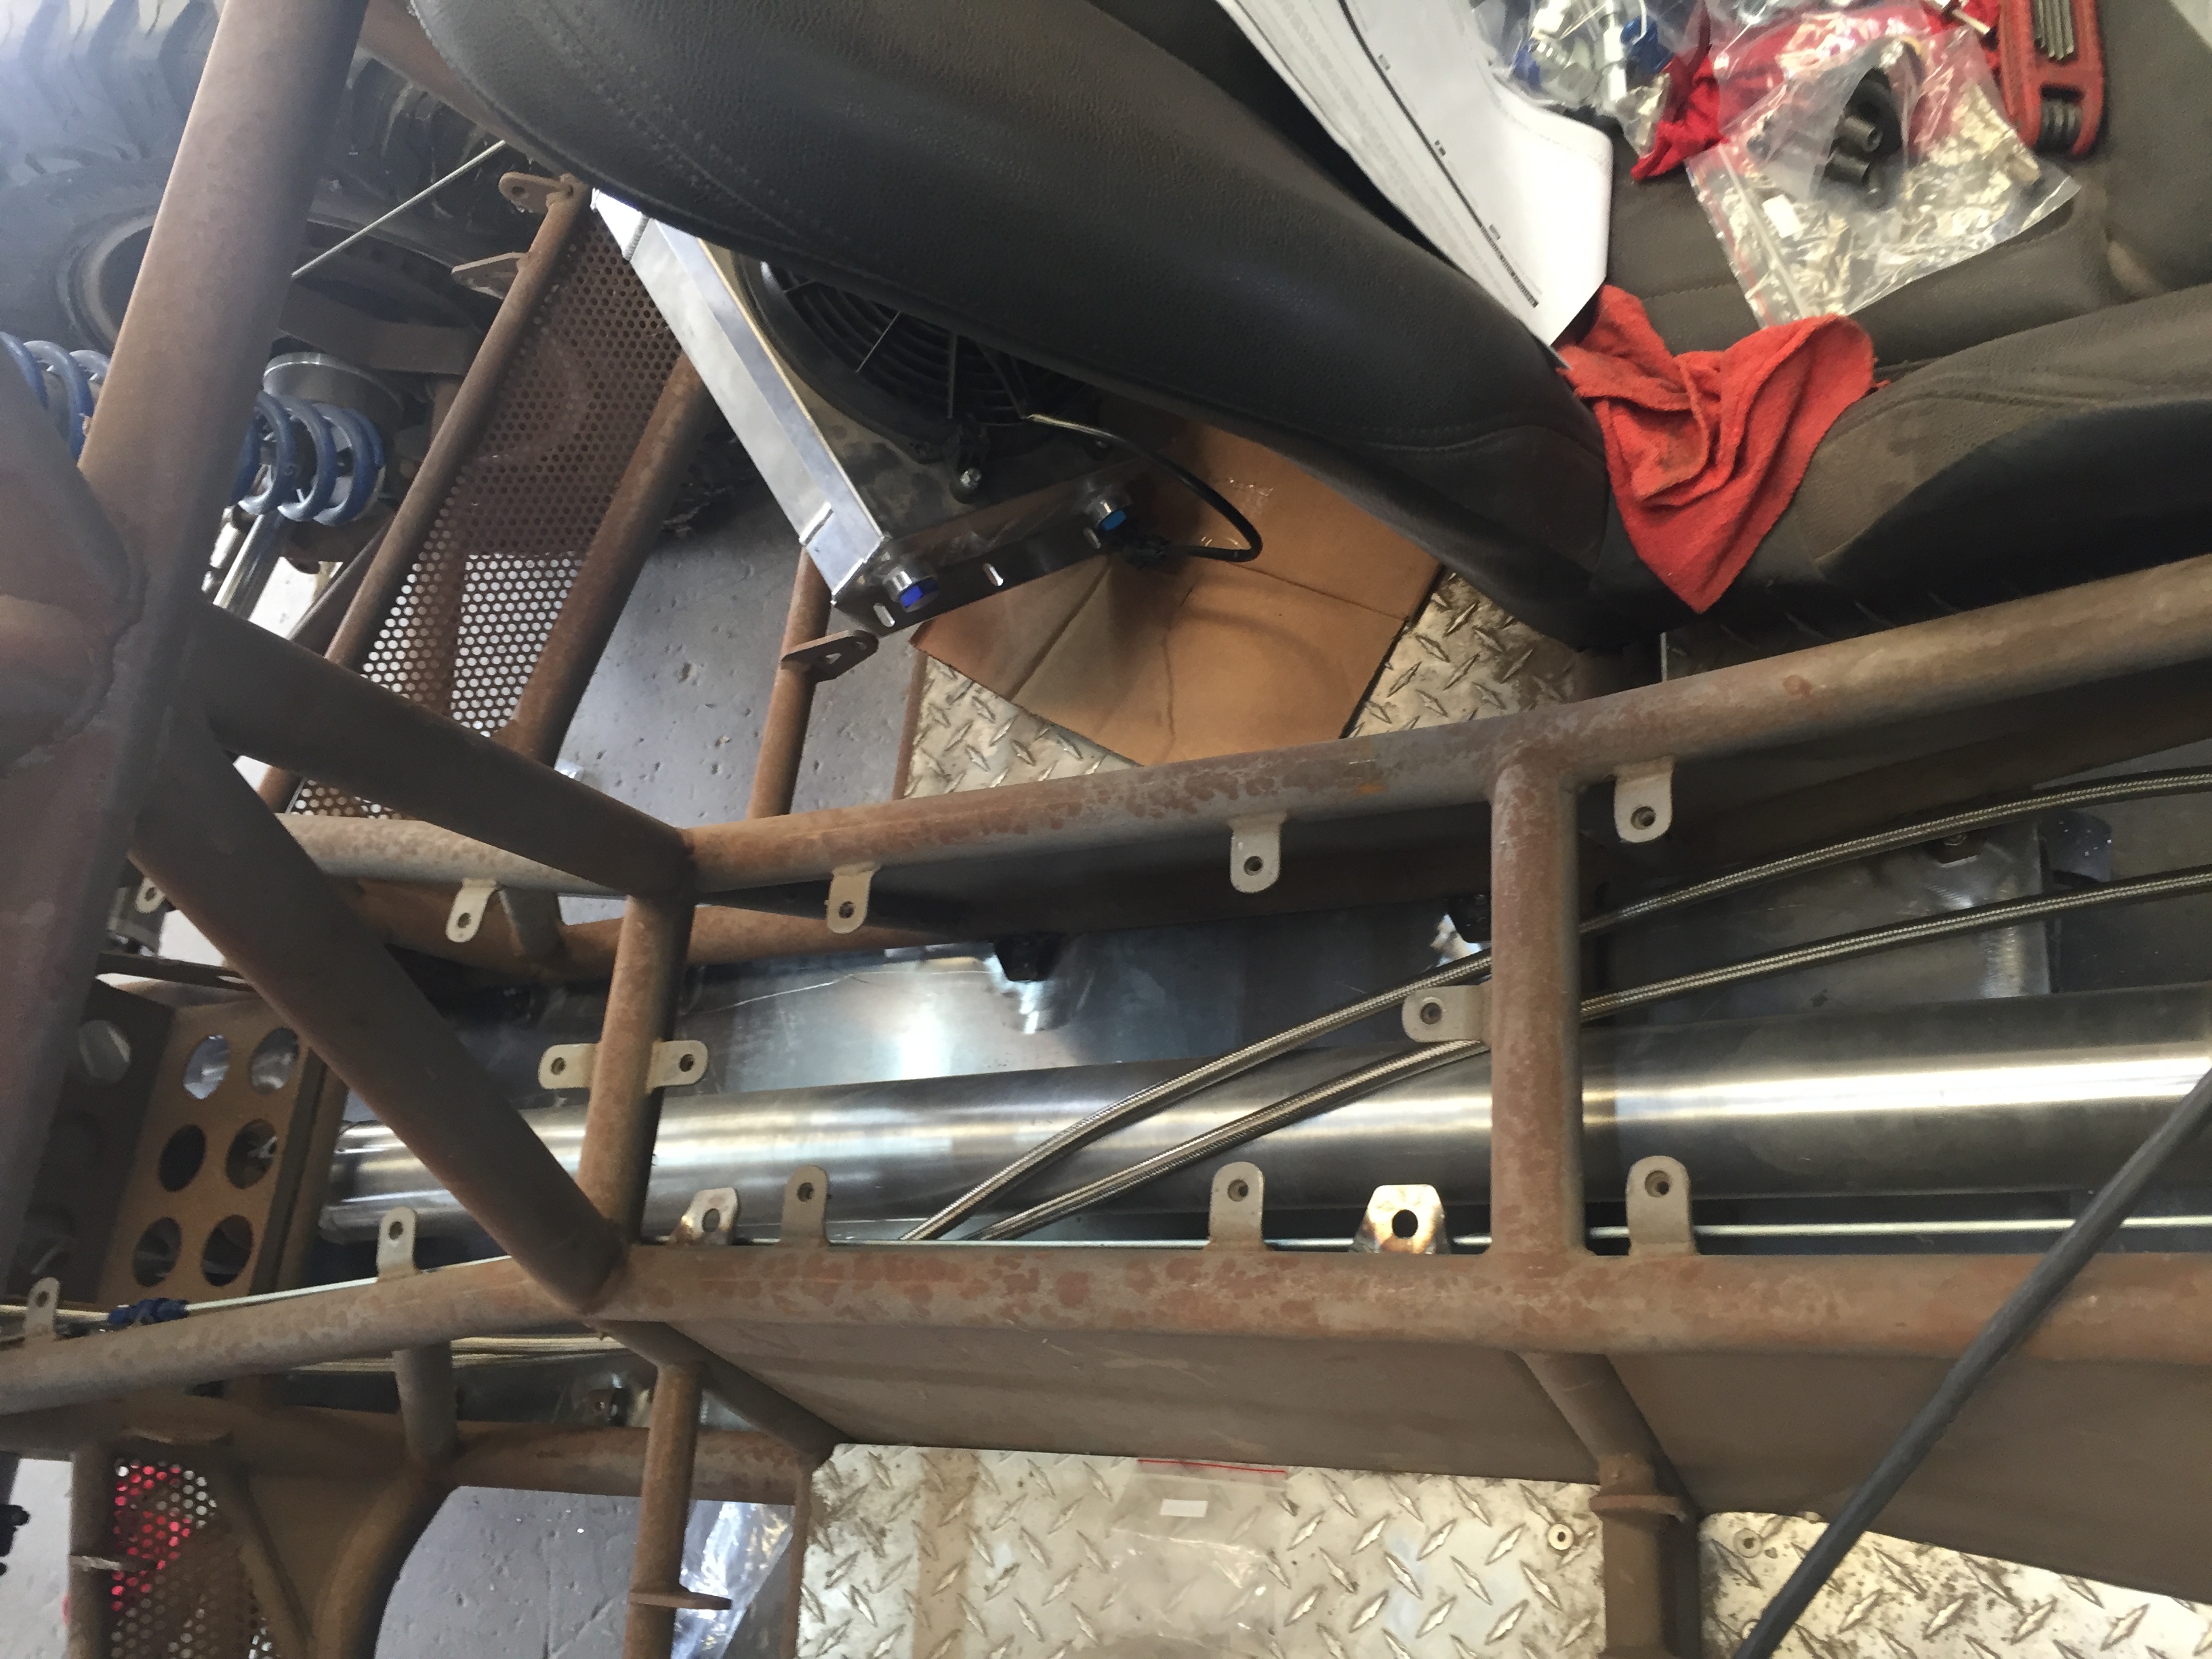
Also working on aluminum tubing that will fit in the tunnel to connect the radiator. I got one bent really close, just have to get the second matched up. They will have -16 fittings welded on each end to accept some xrp fittings to nice braided line.

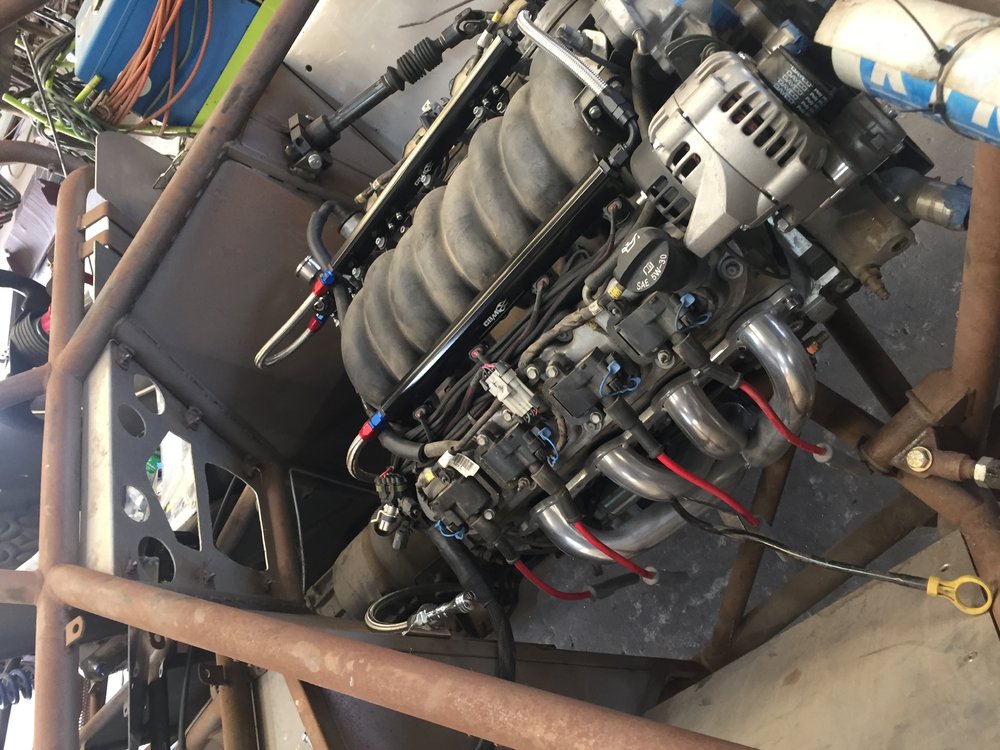
Question for LS motor owners. The plug wires lay on the headers. Is there some way to avoid this? I can't imagine they will survive long sitting on a hot header.
My dads car (cbm ls3) has like a foil cover on the wires.
-
Time to update this thread again. I have done a few more things.

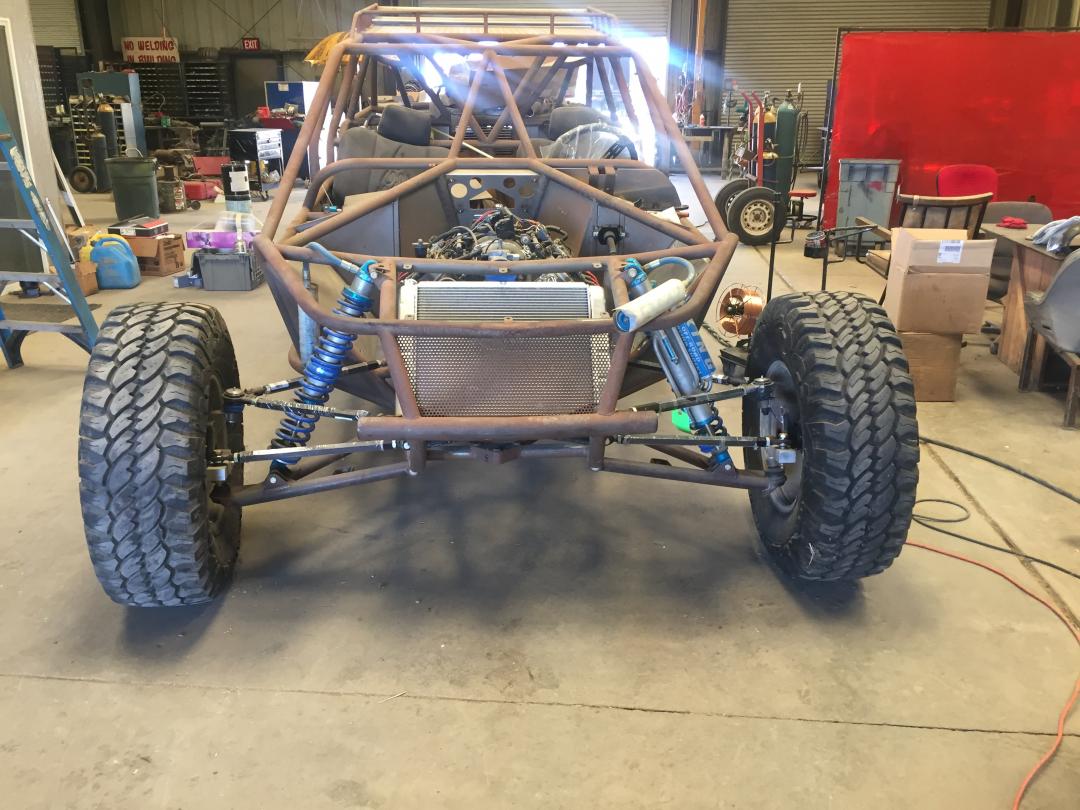
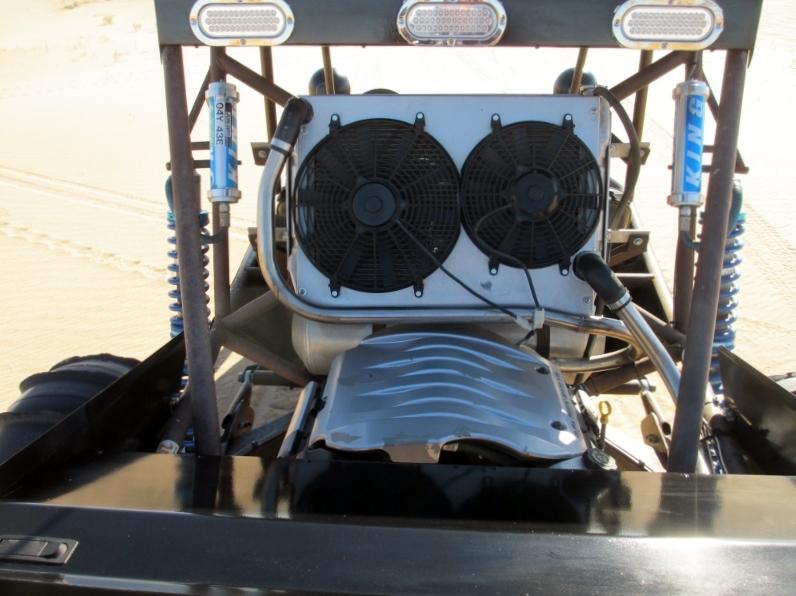
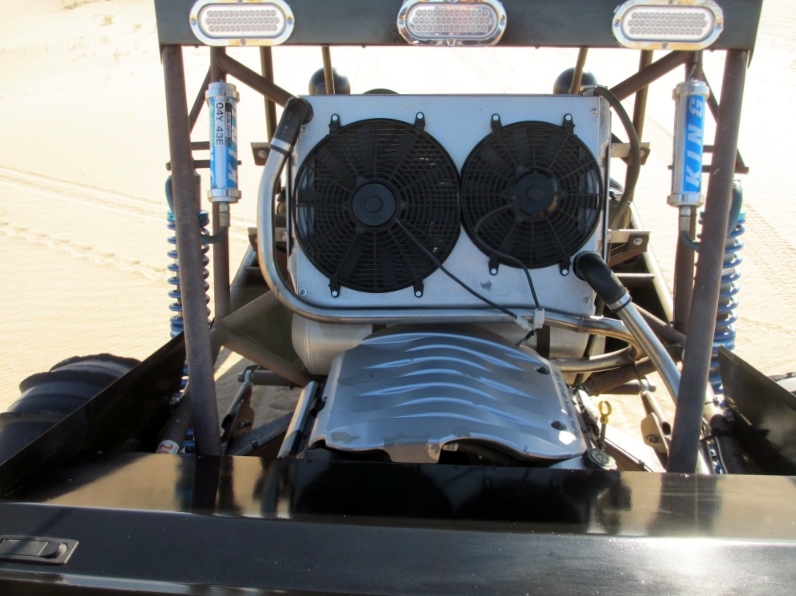
This radiator did not fit. So I opted to go with a champion cooling radiator. Man they have what appears to be a really nice product. Sad part is after fighting for 2 days to try and get the radiator mounted up front I finally broke and decided to mount it in the back of the car. Simply not enough room in the front of the car. And with how flat it had to lay I was really worried it would not cool.

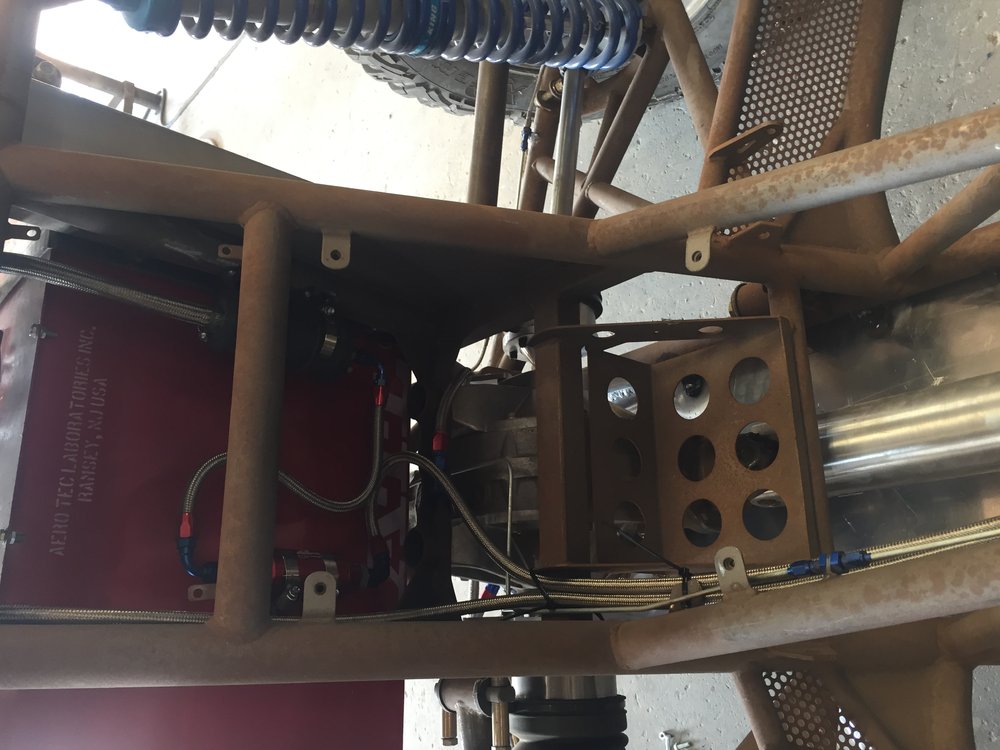
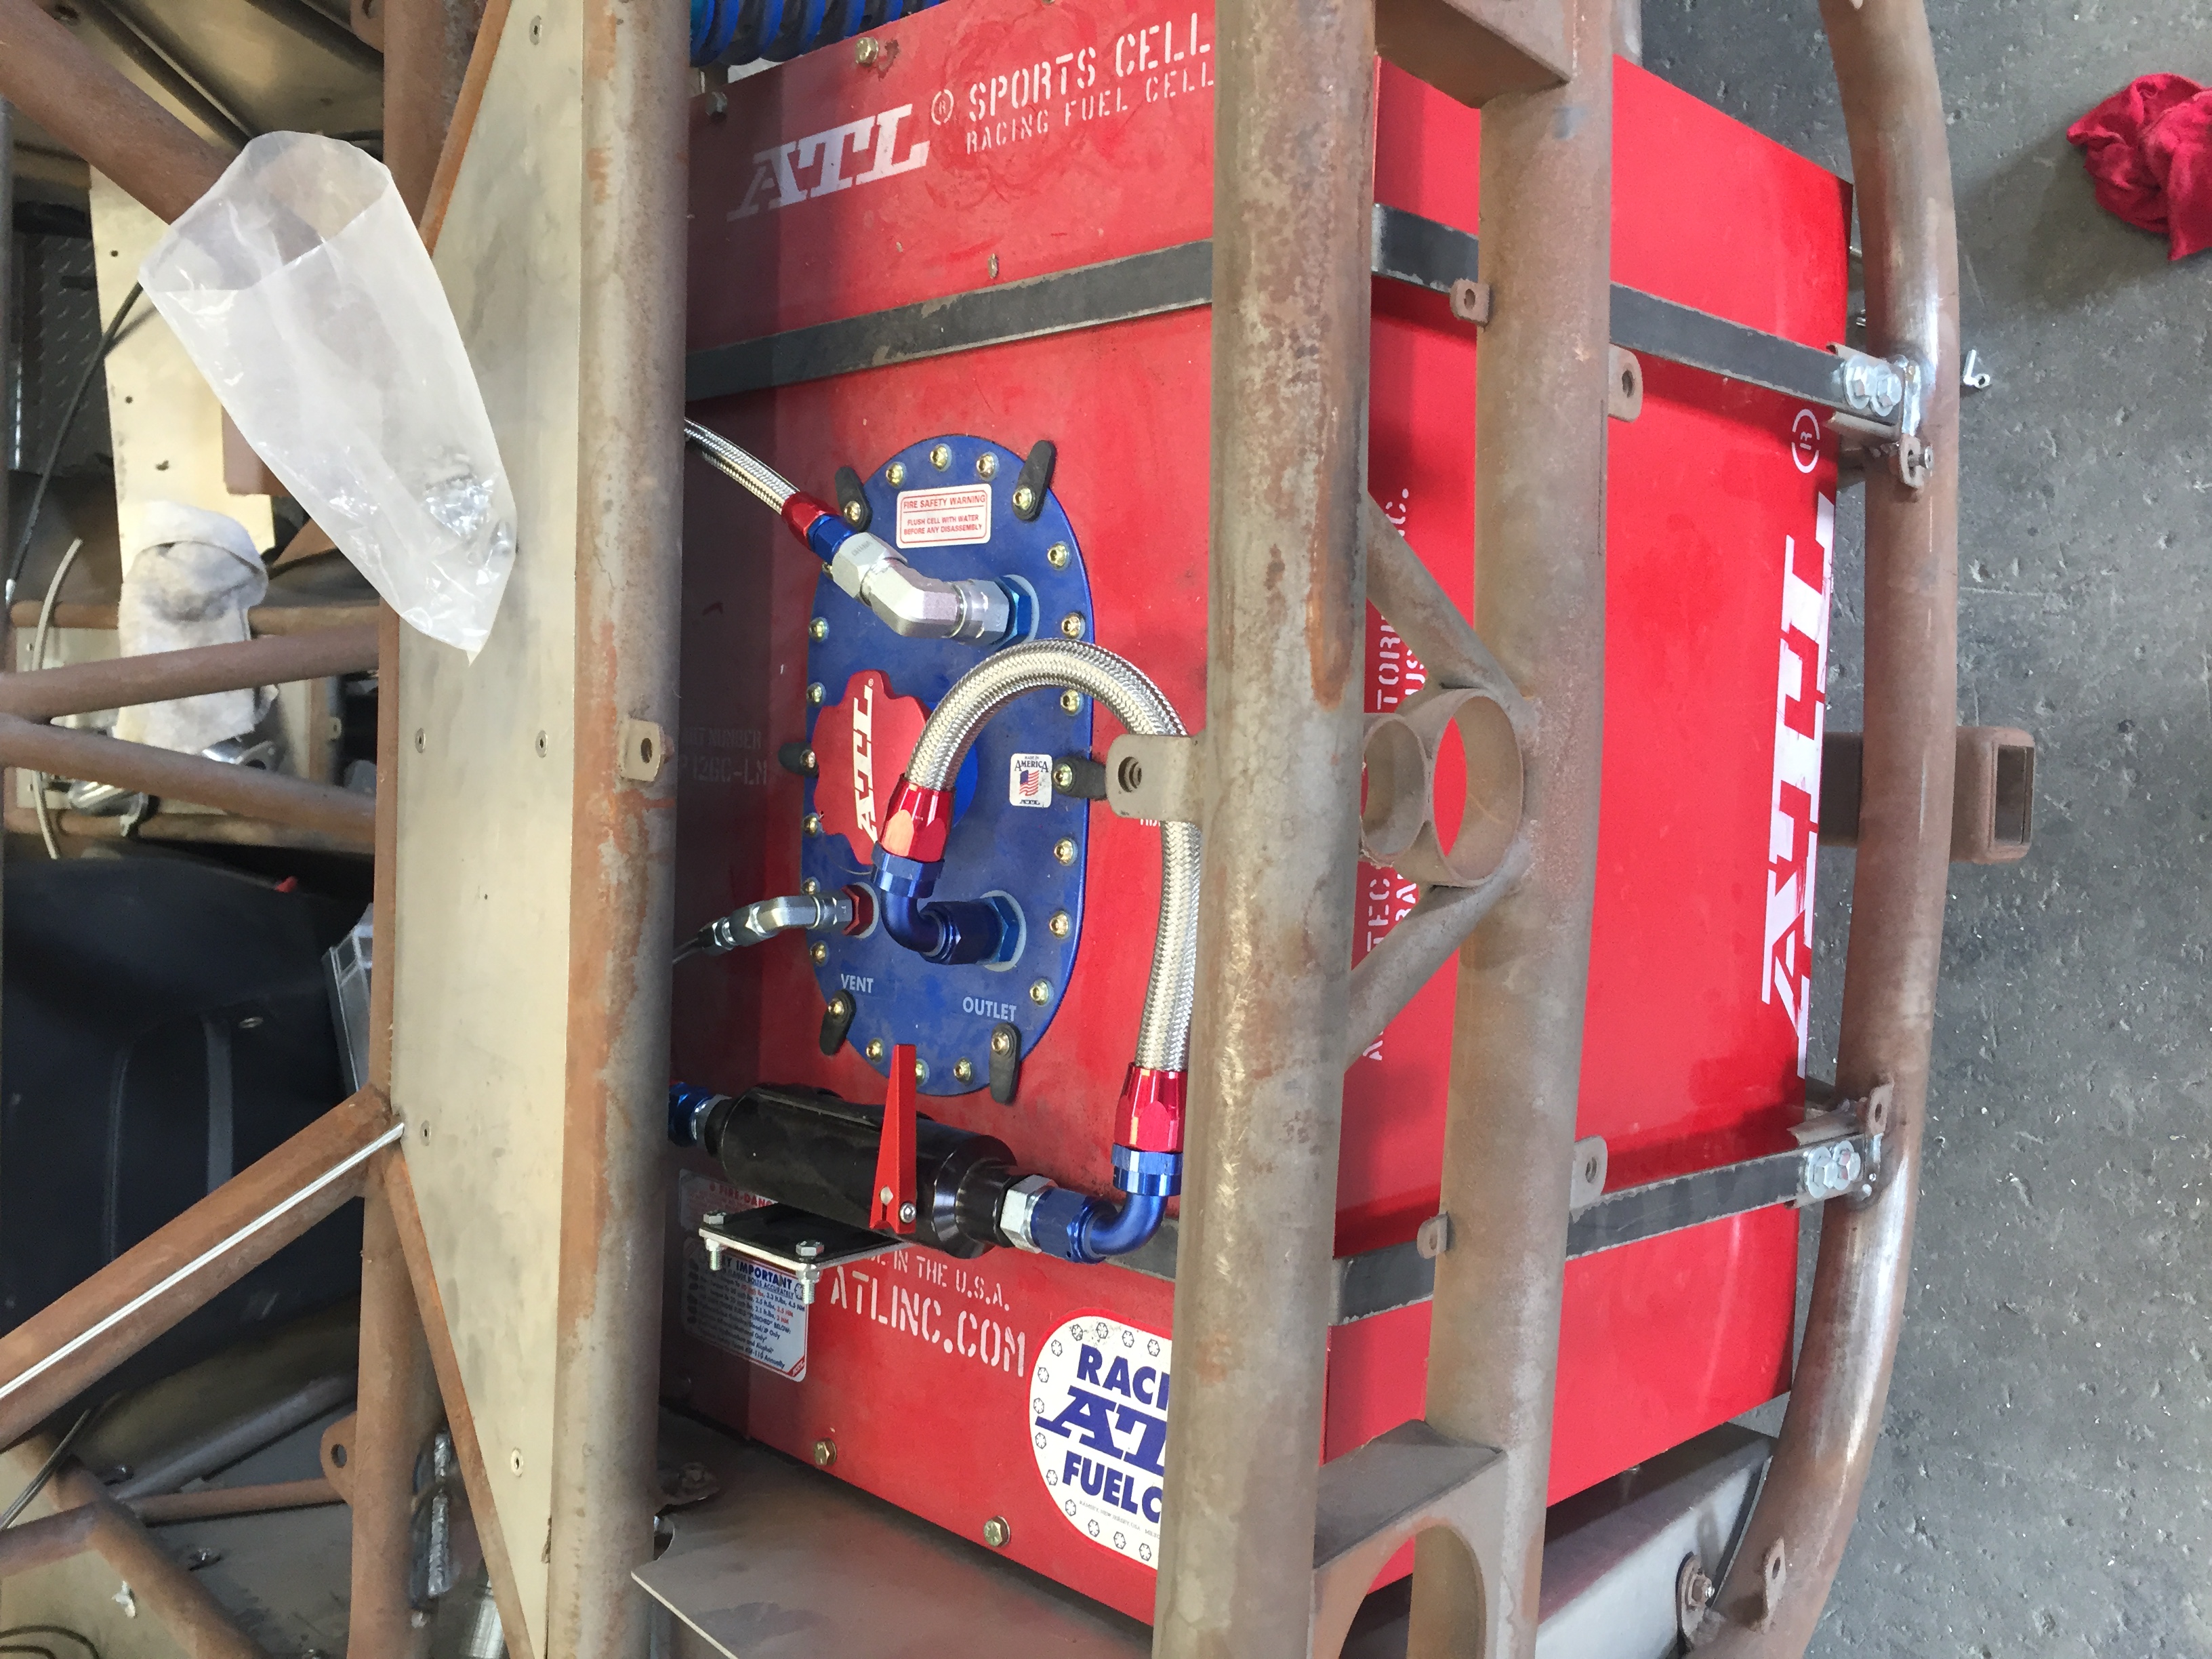
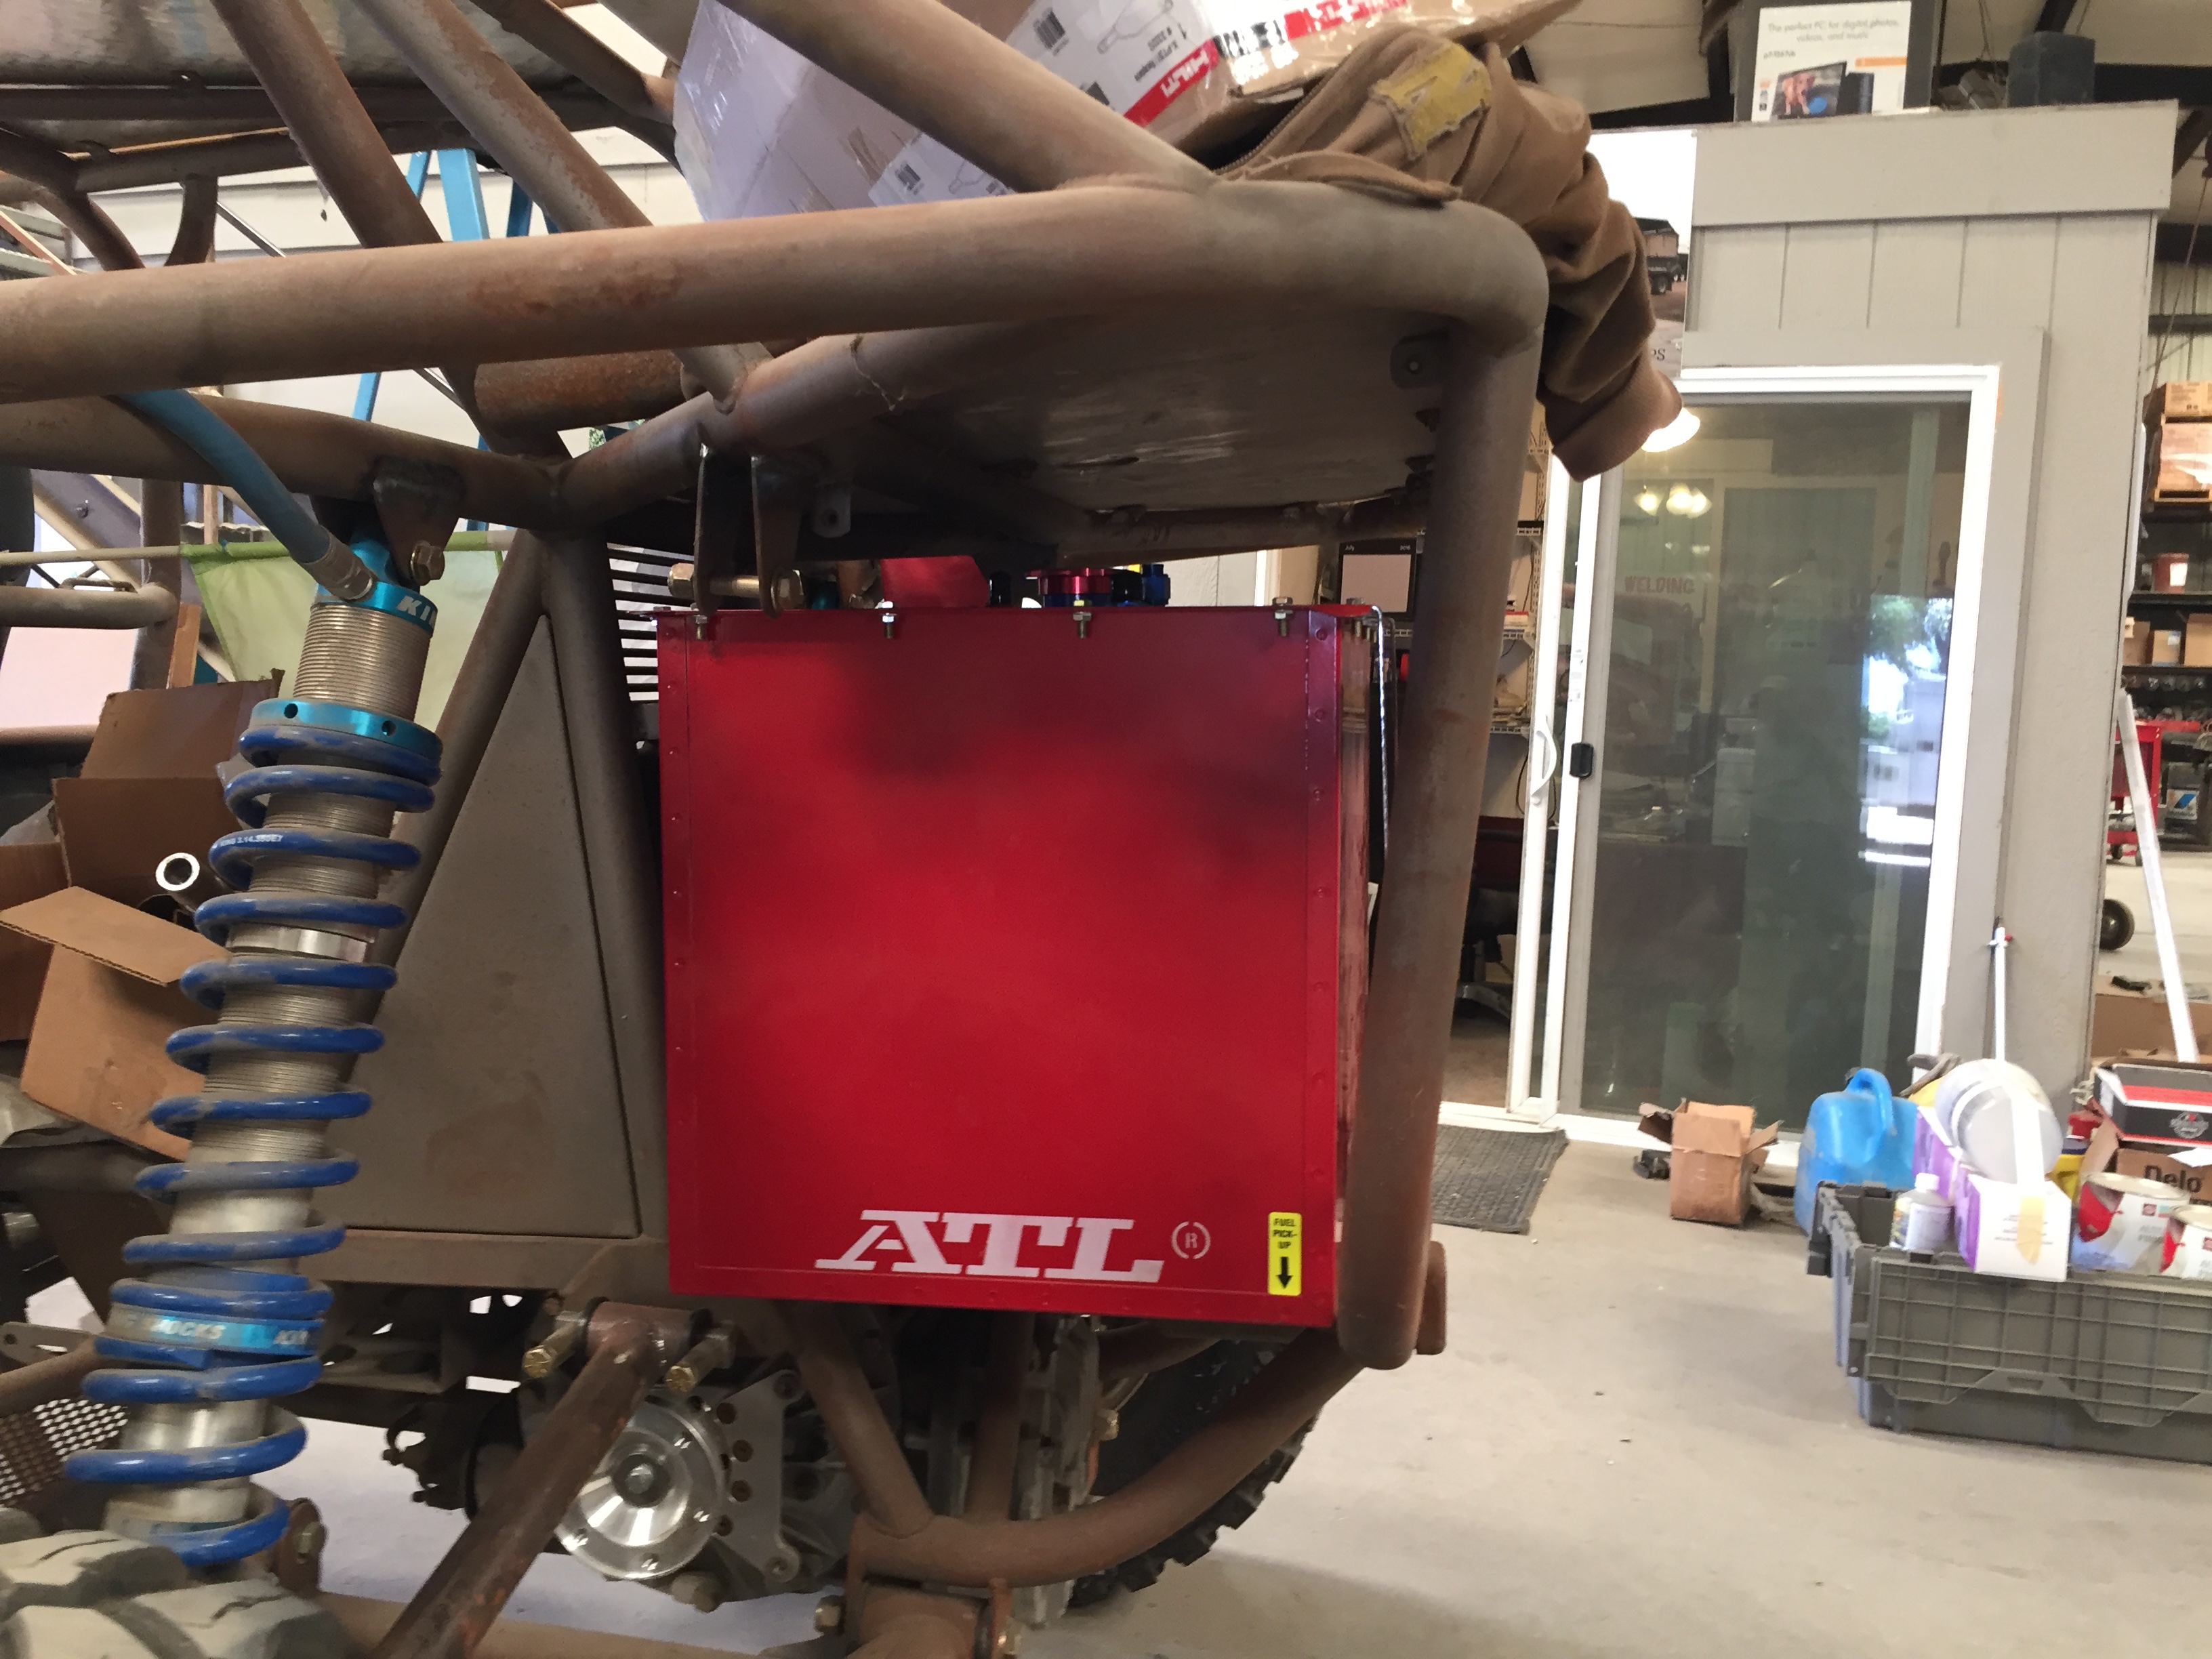
Fuel cell all tucked away.
The radiator will sit above the fuel cell. In the "rear window" if you will.
-
Beautiful!!
-
Looks good!
-
Interesting build. That was an actual v8rail frame you modified?
Thanks for the encouragement. I tinkered on it a little tonight. Waiting for cv joints to arrive and I should be able to get the rear end close to finished.
-
I thought I should update this thread.
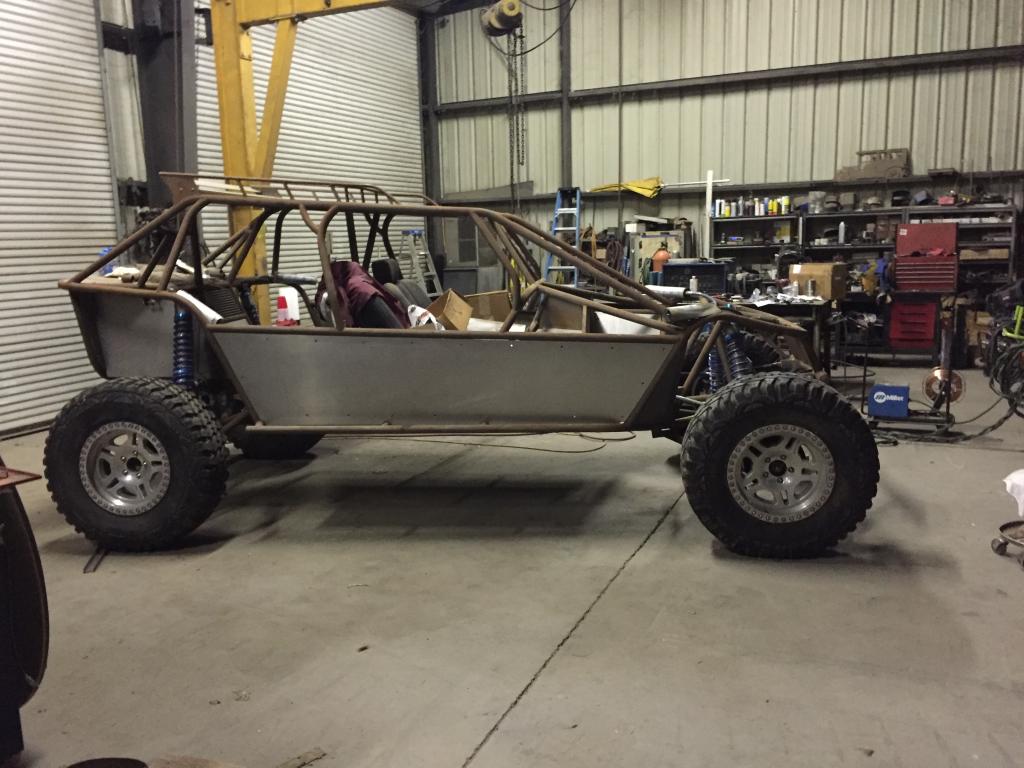
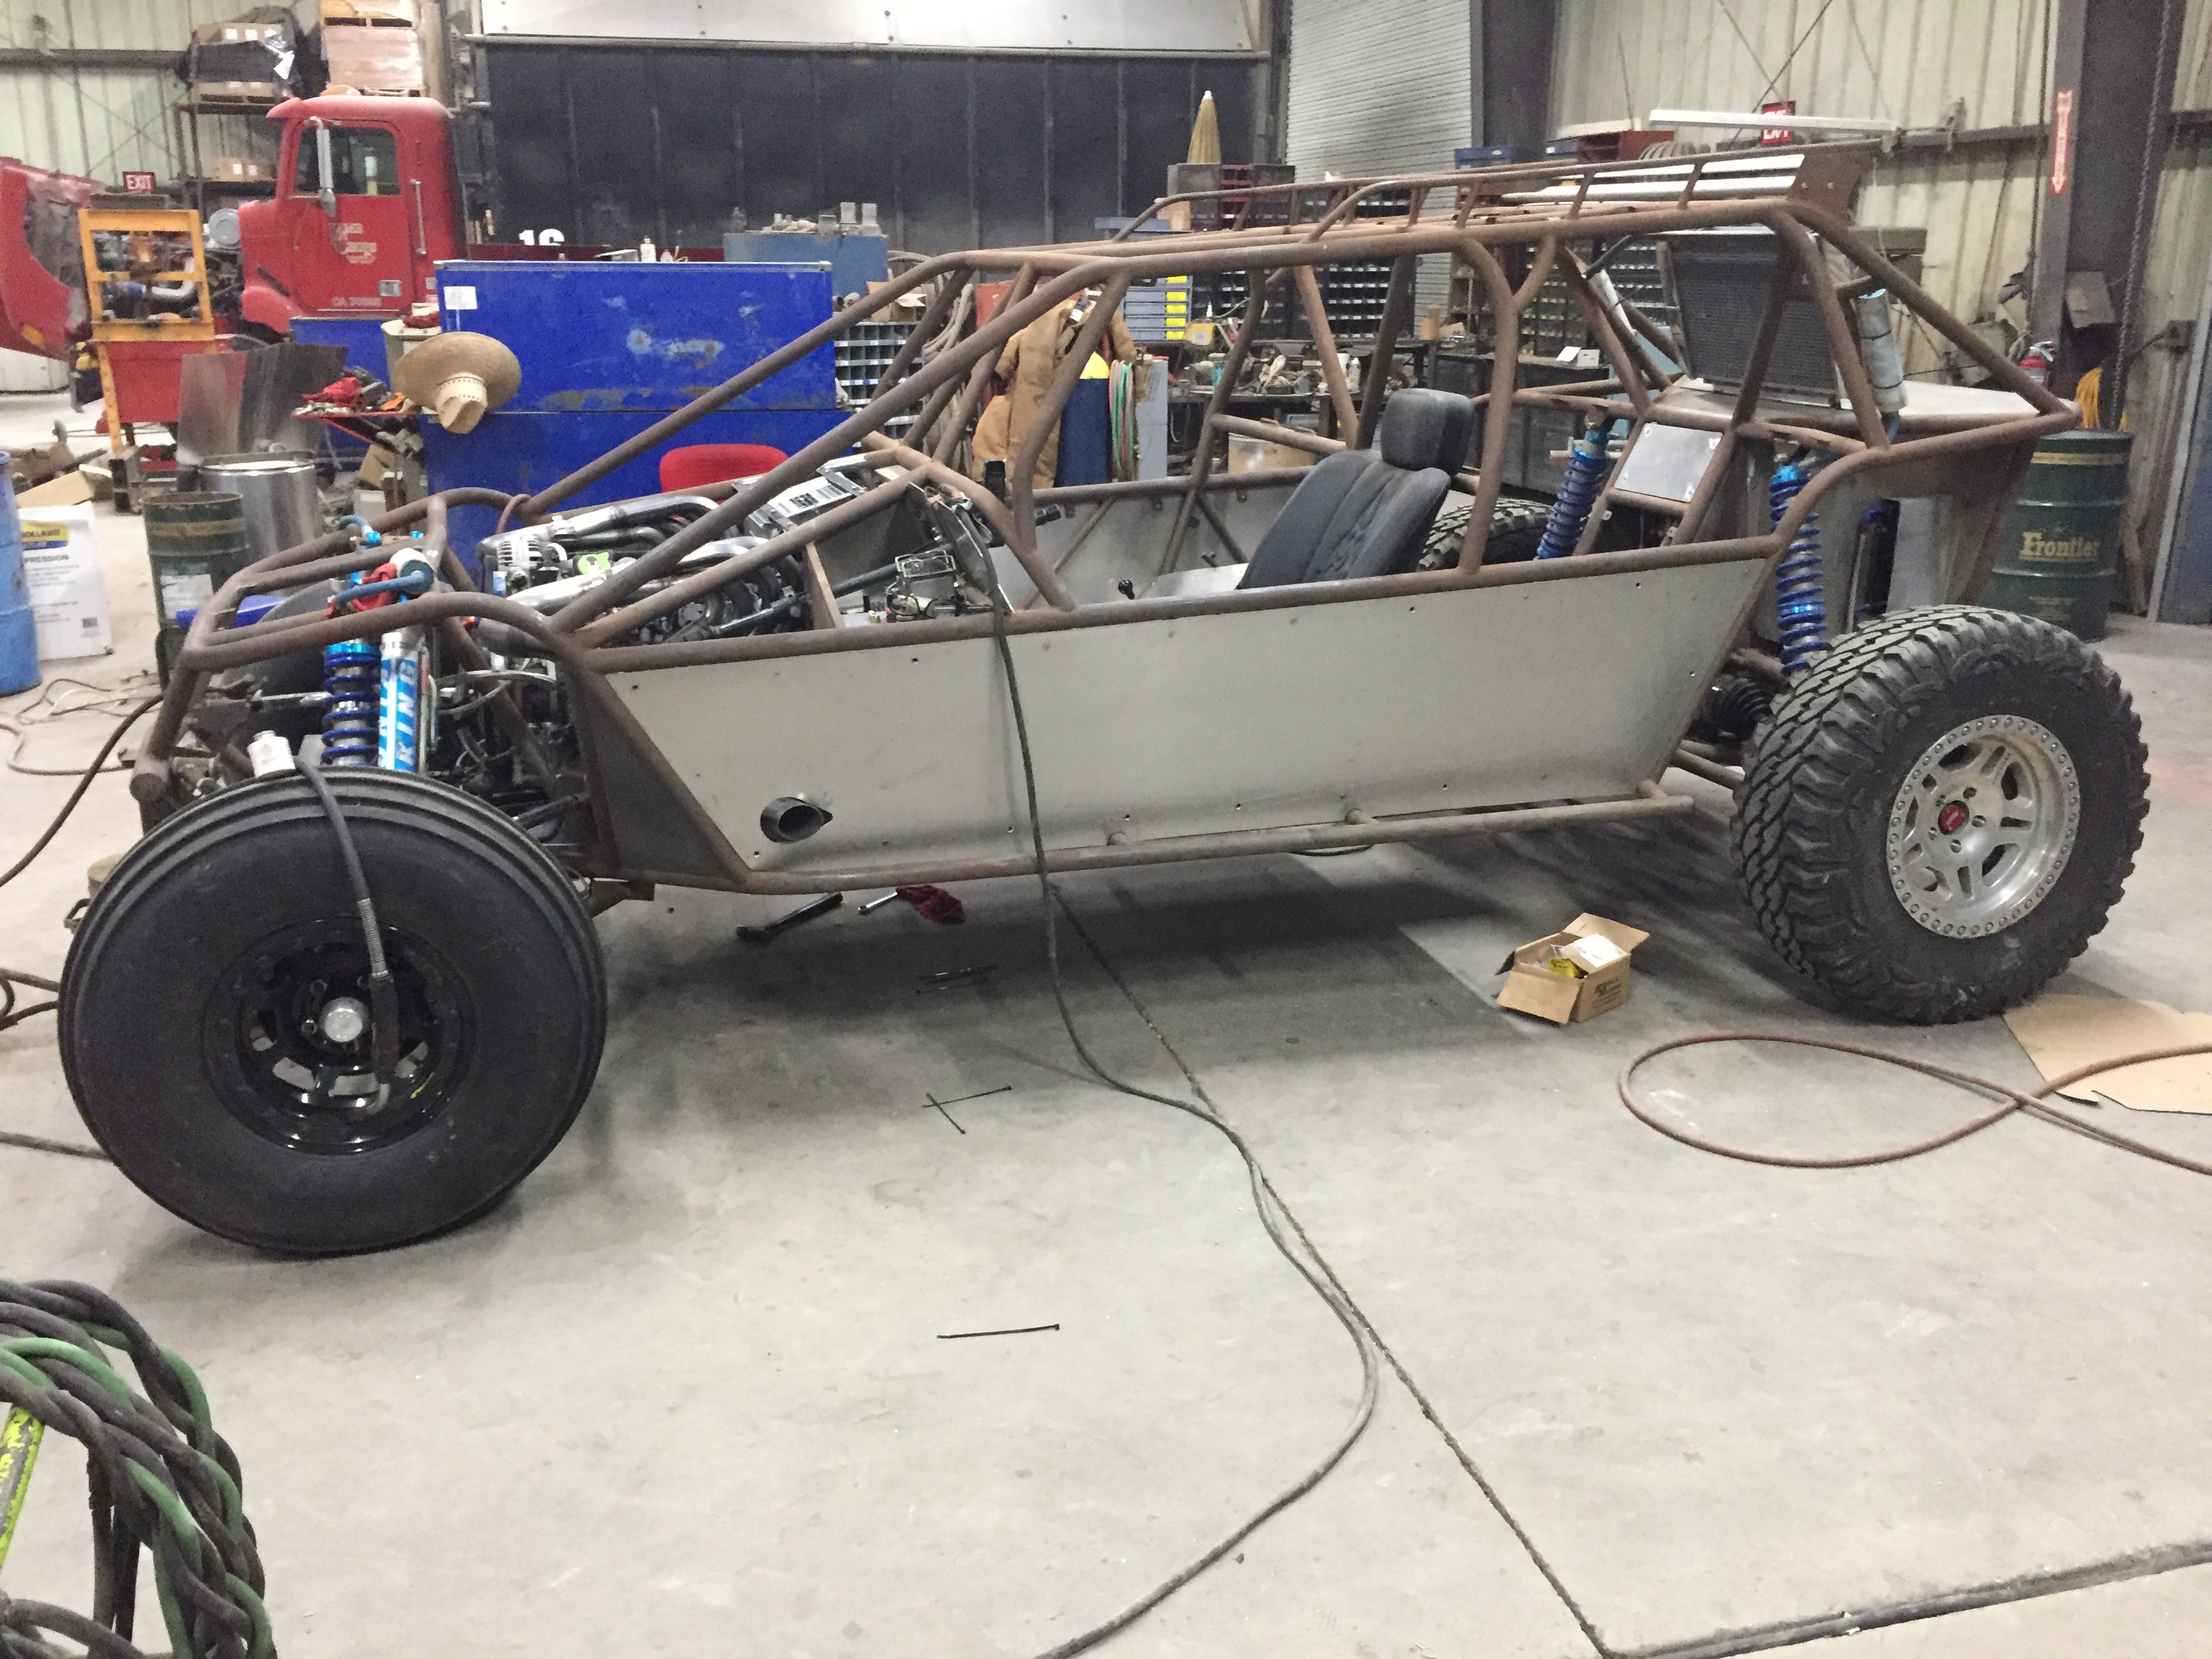
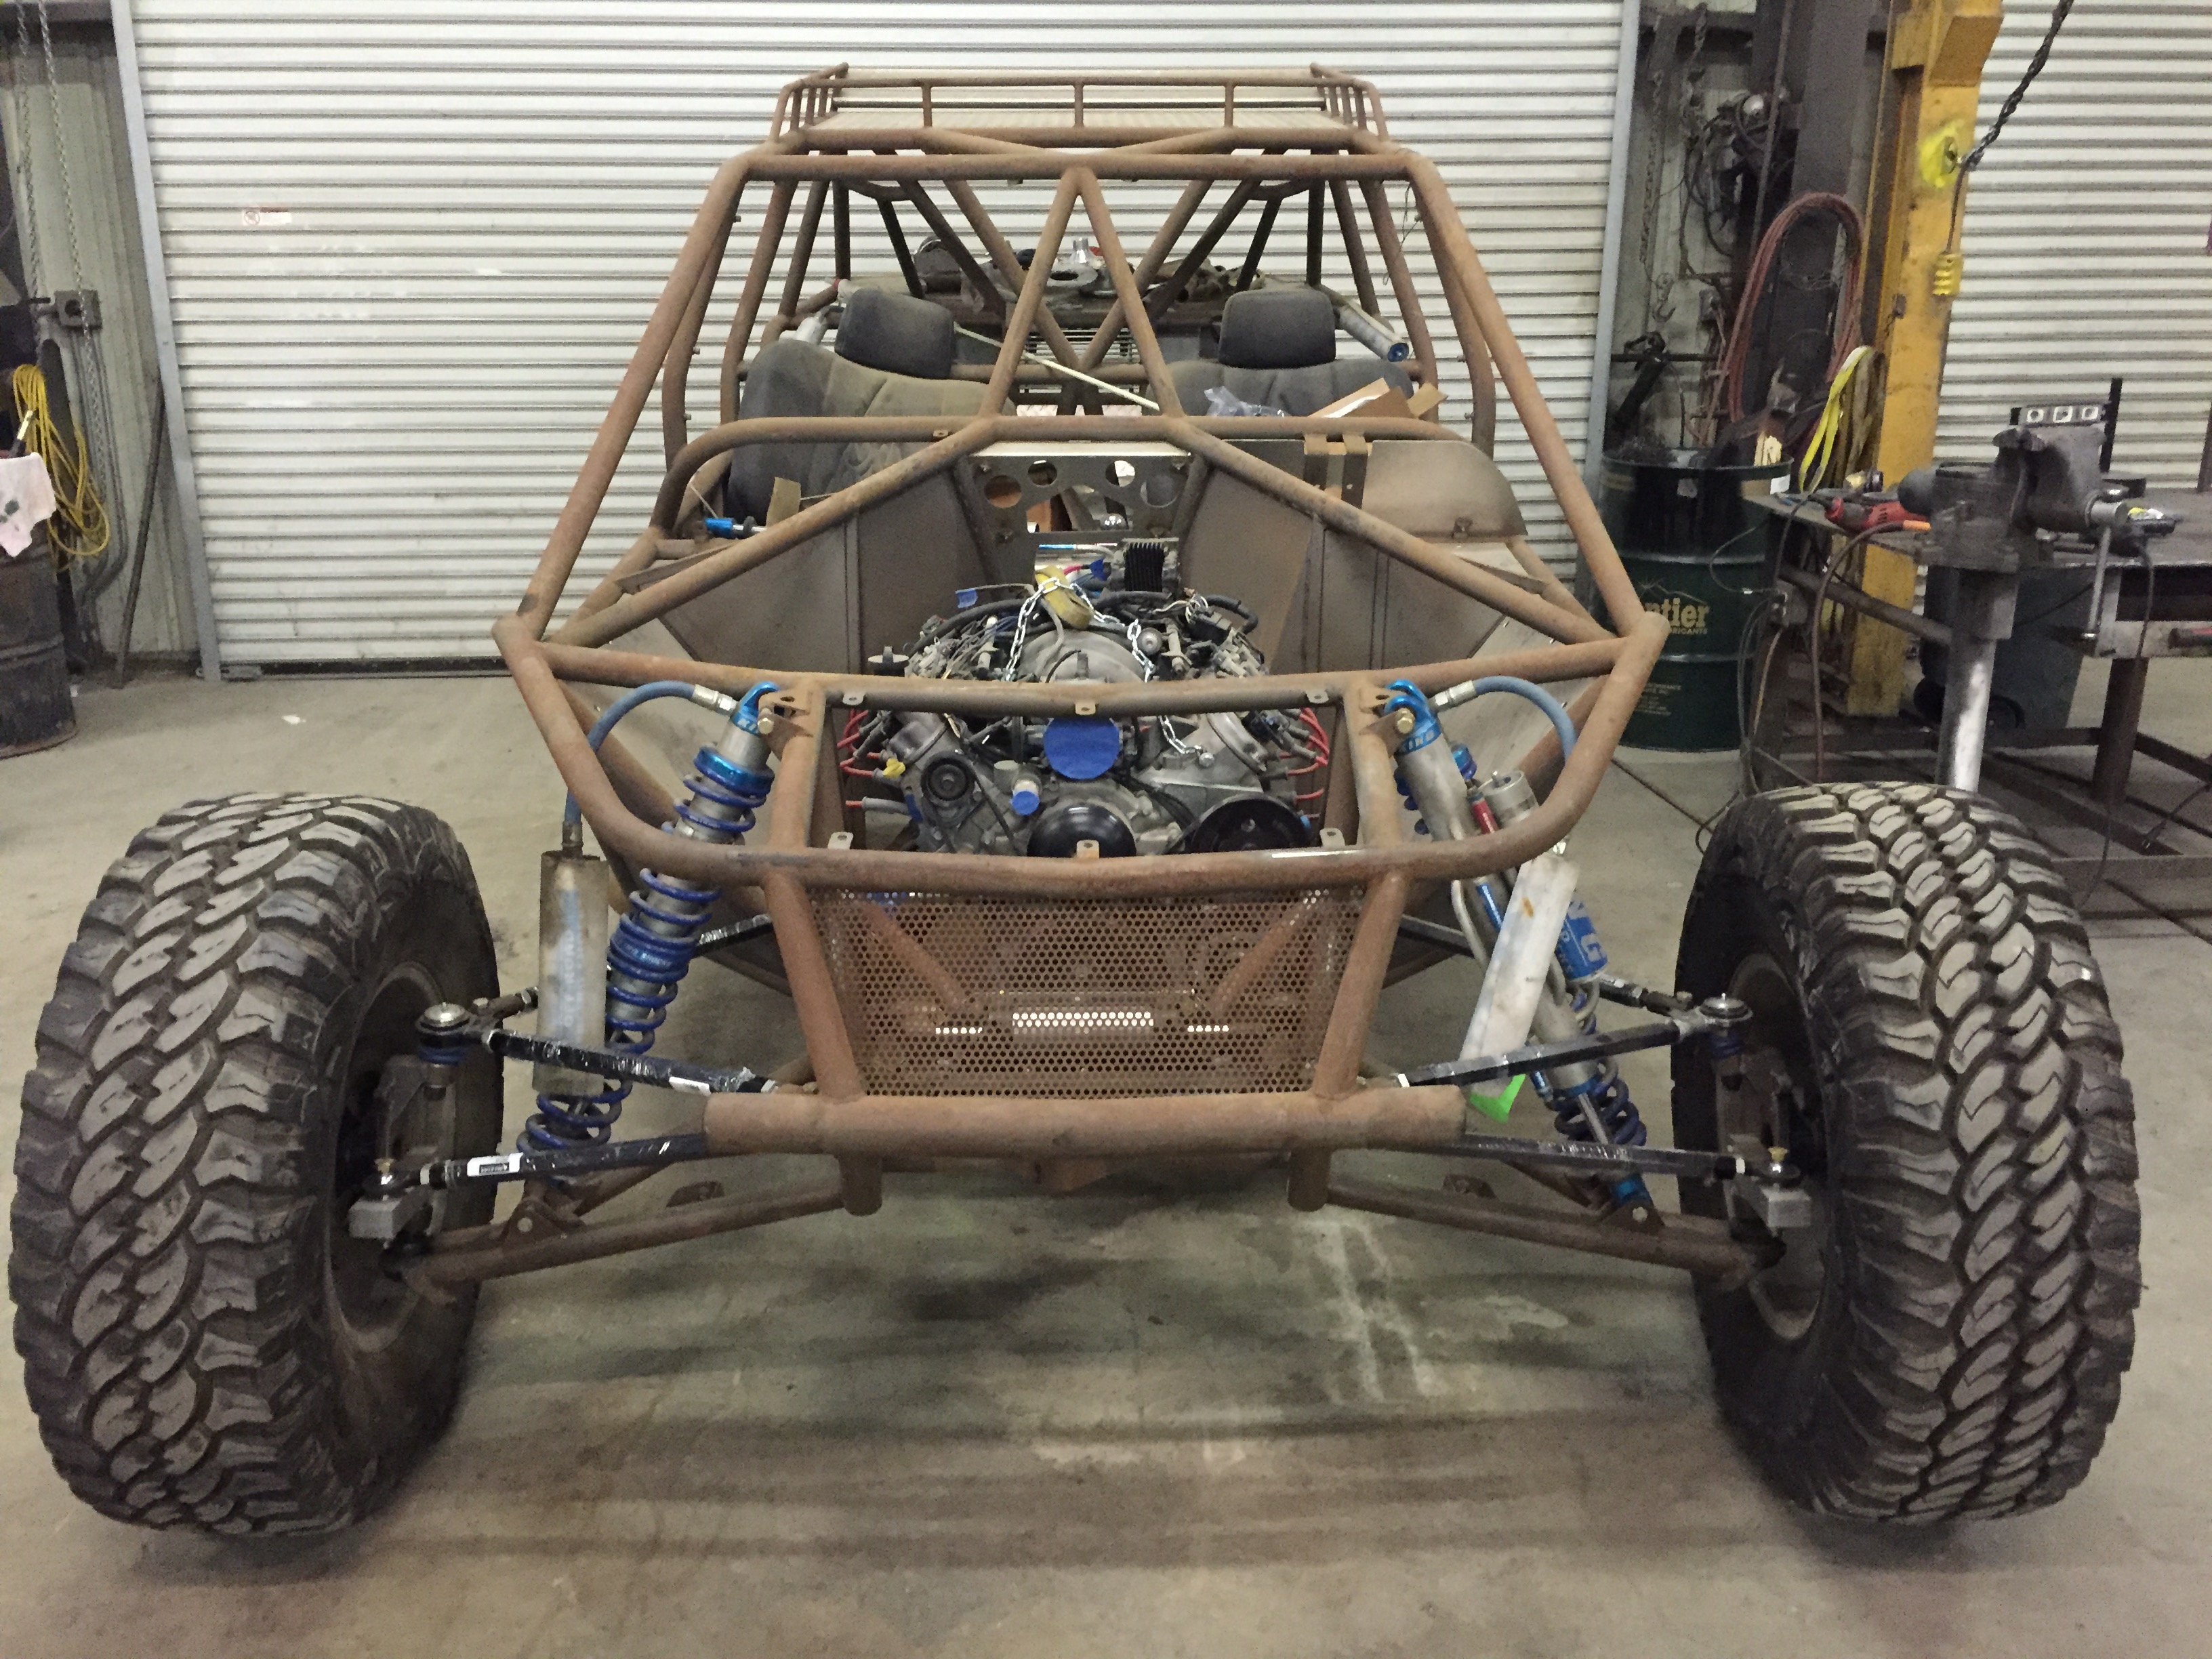
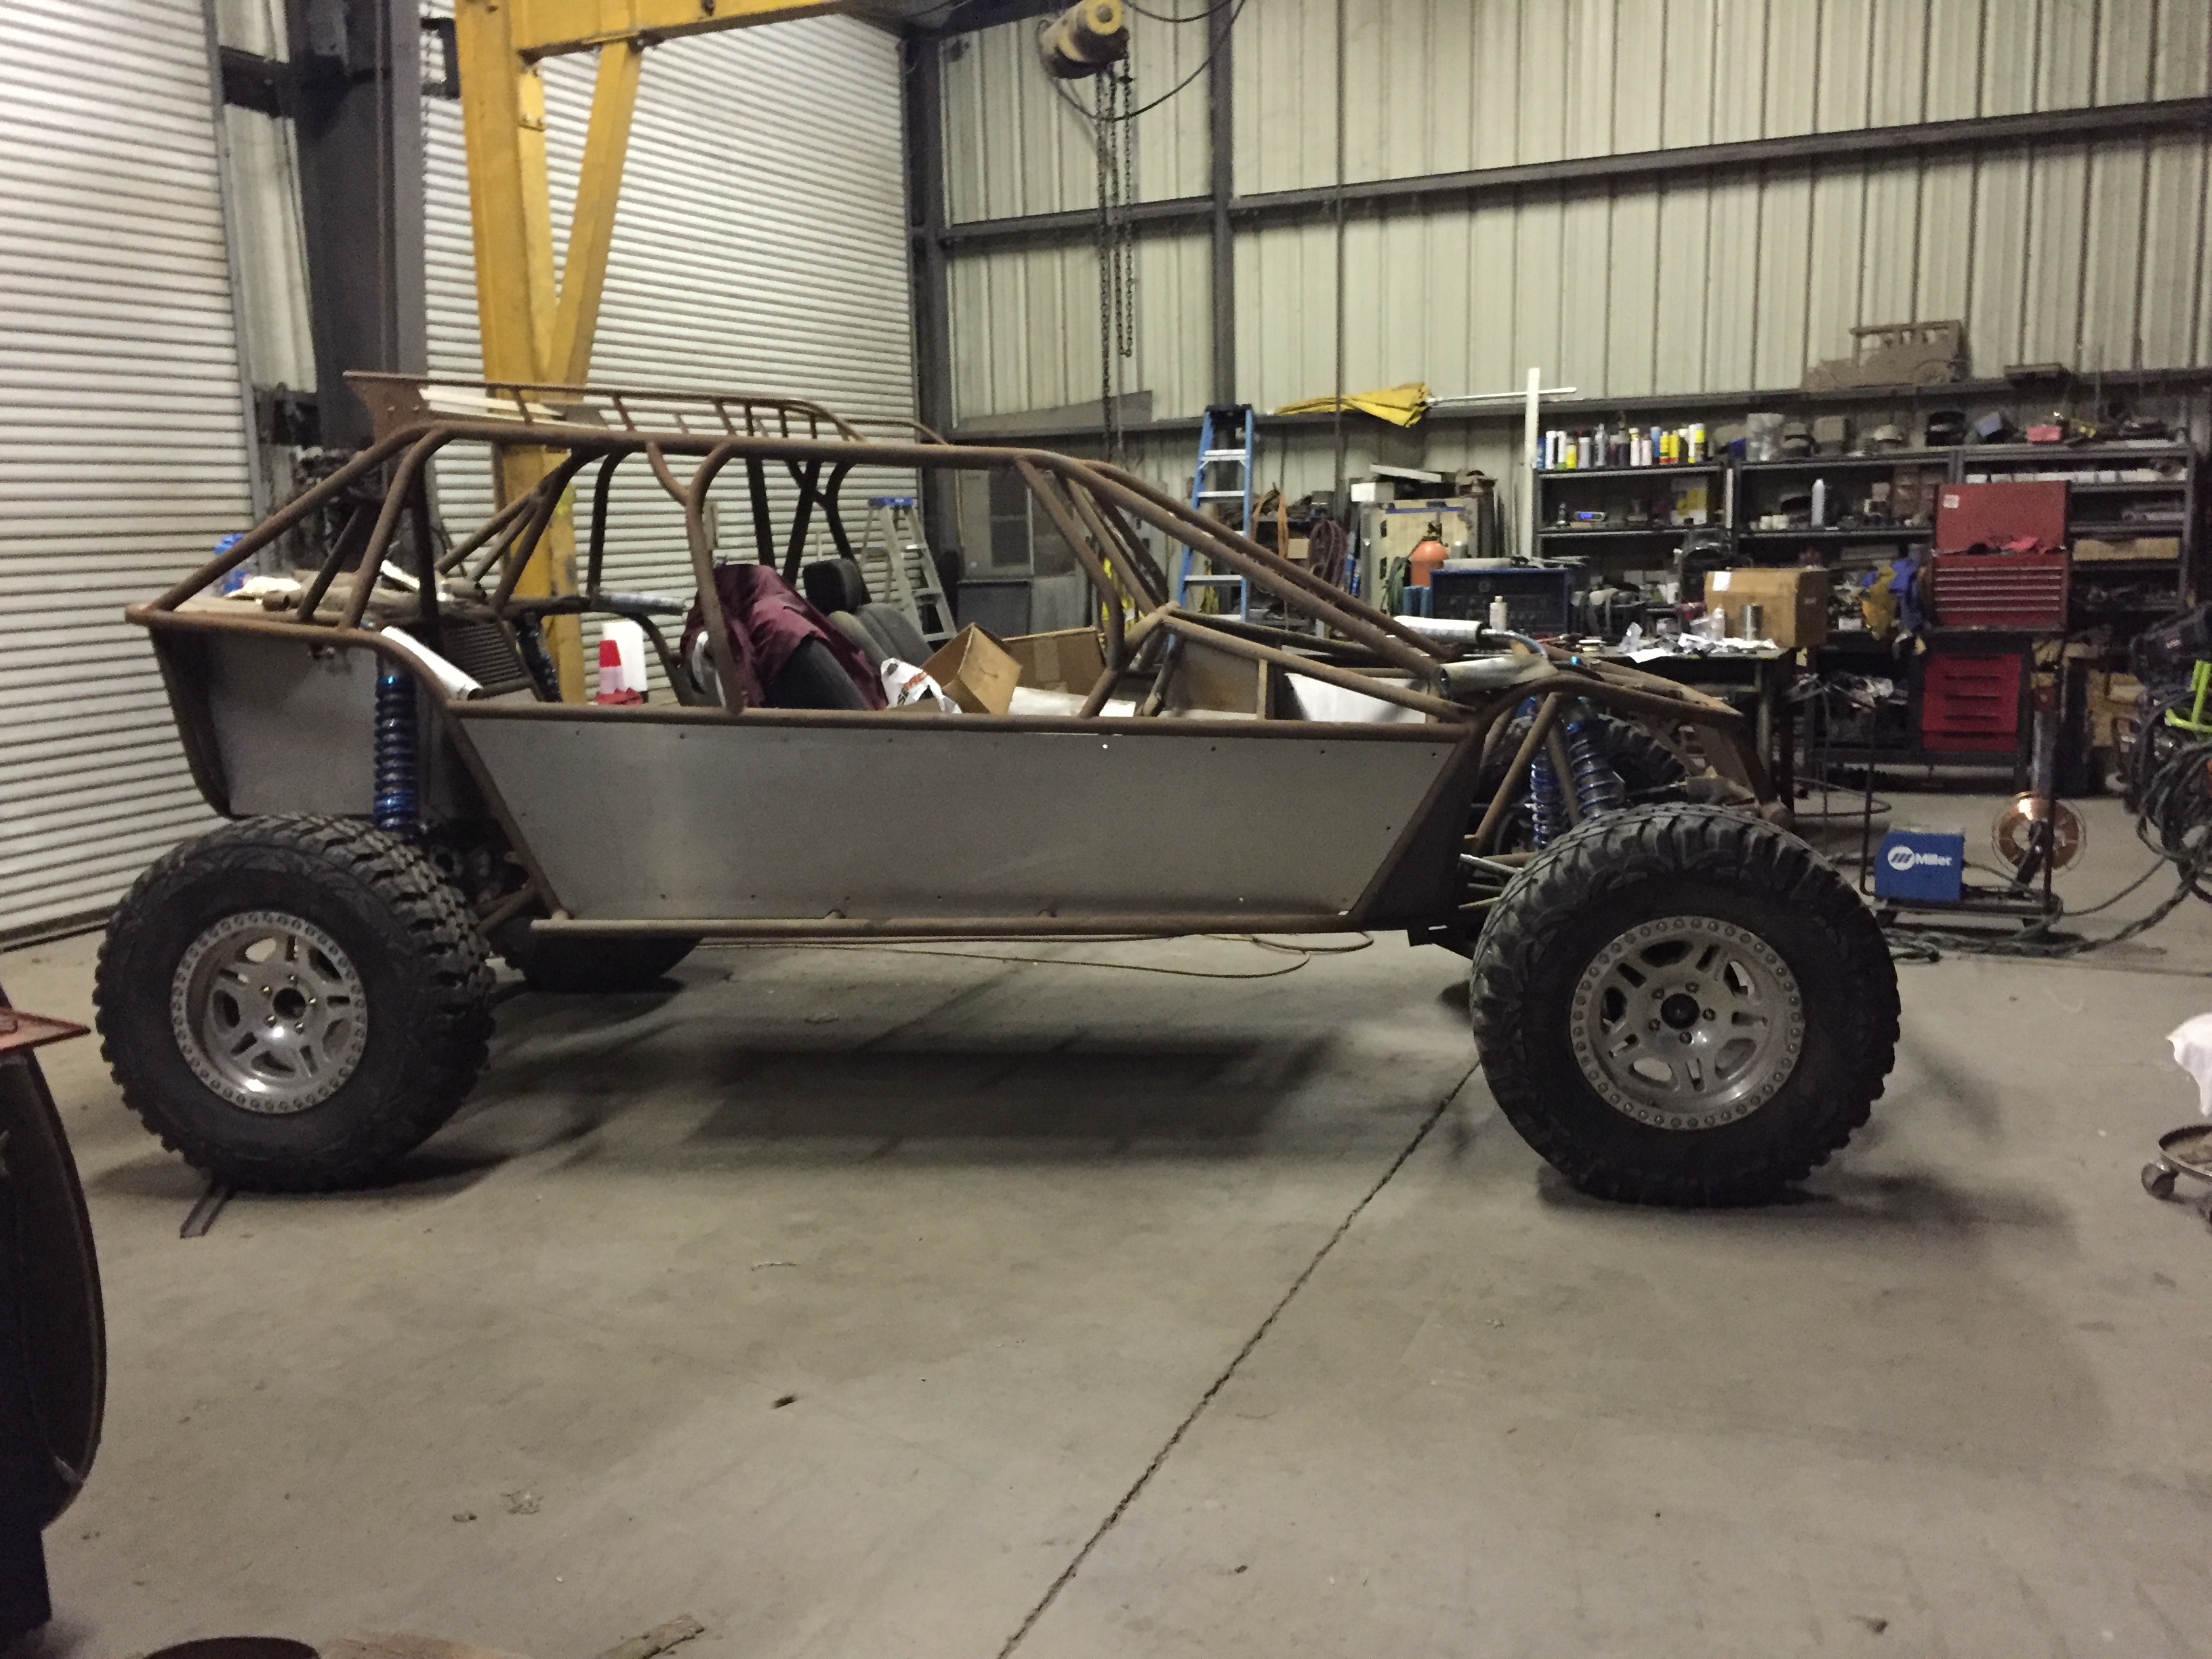
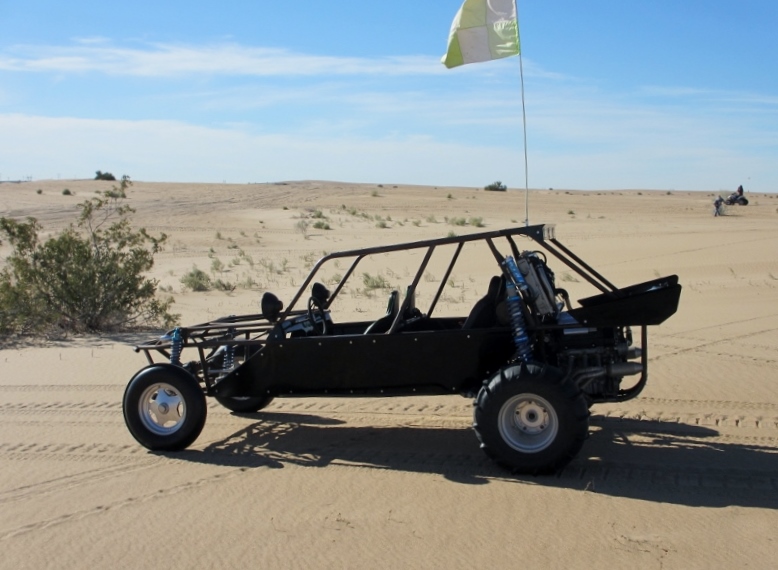
This is the next progress photo. Altogether and somewhat measured out.

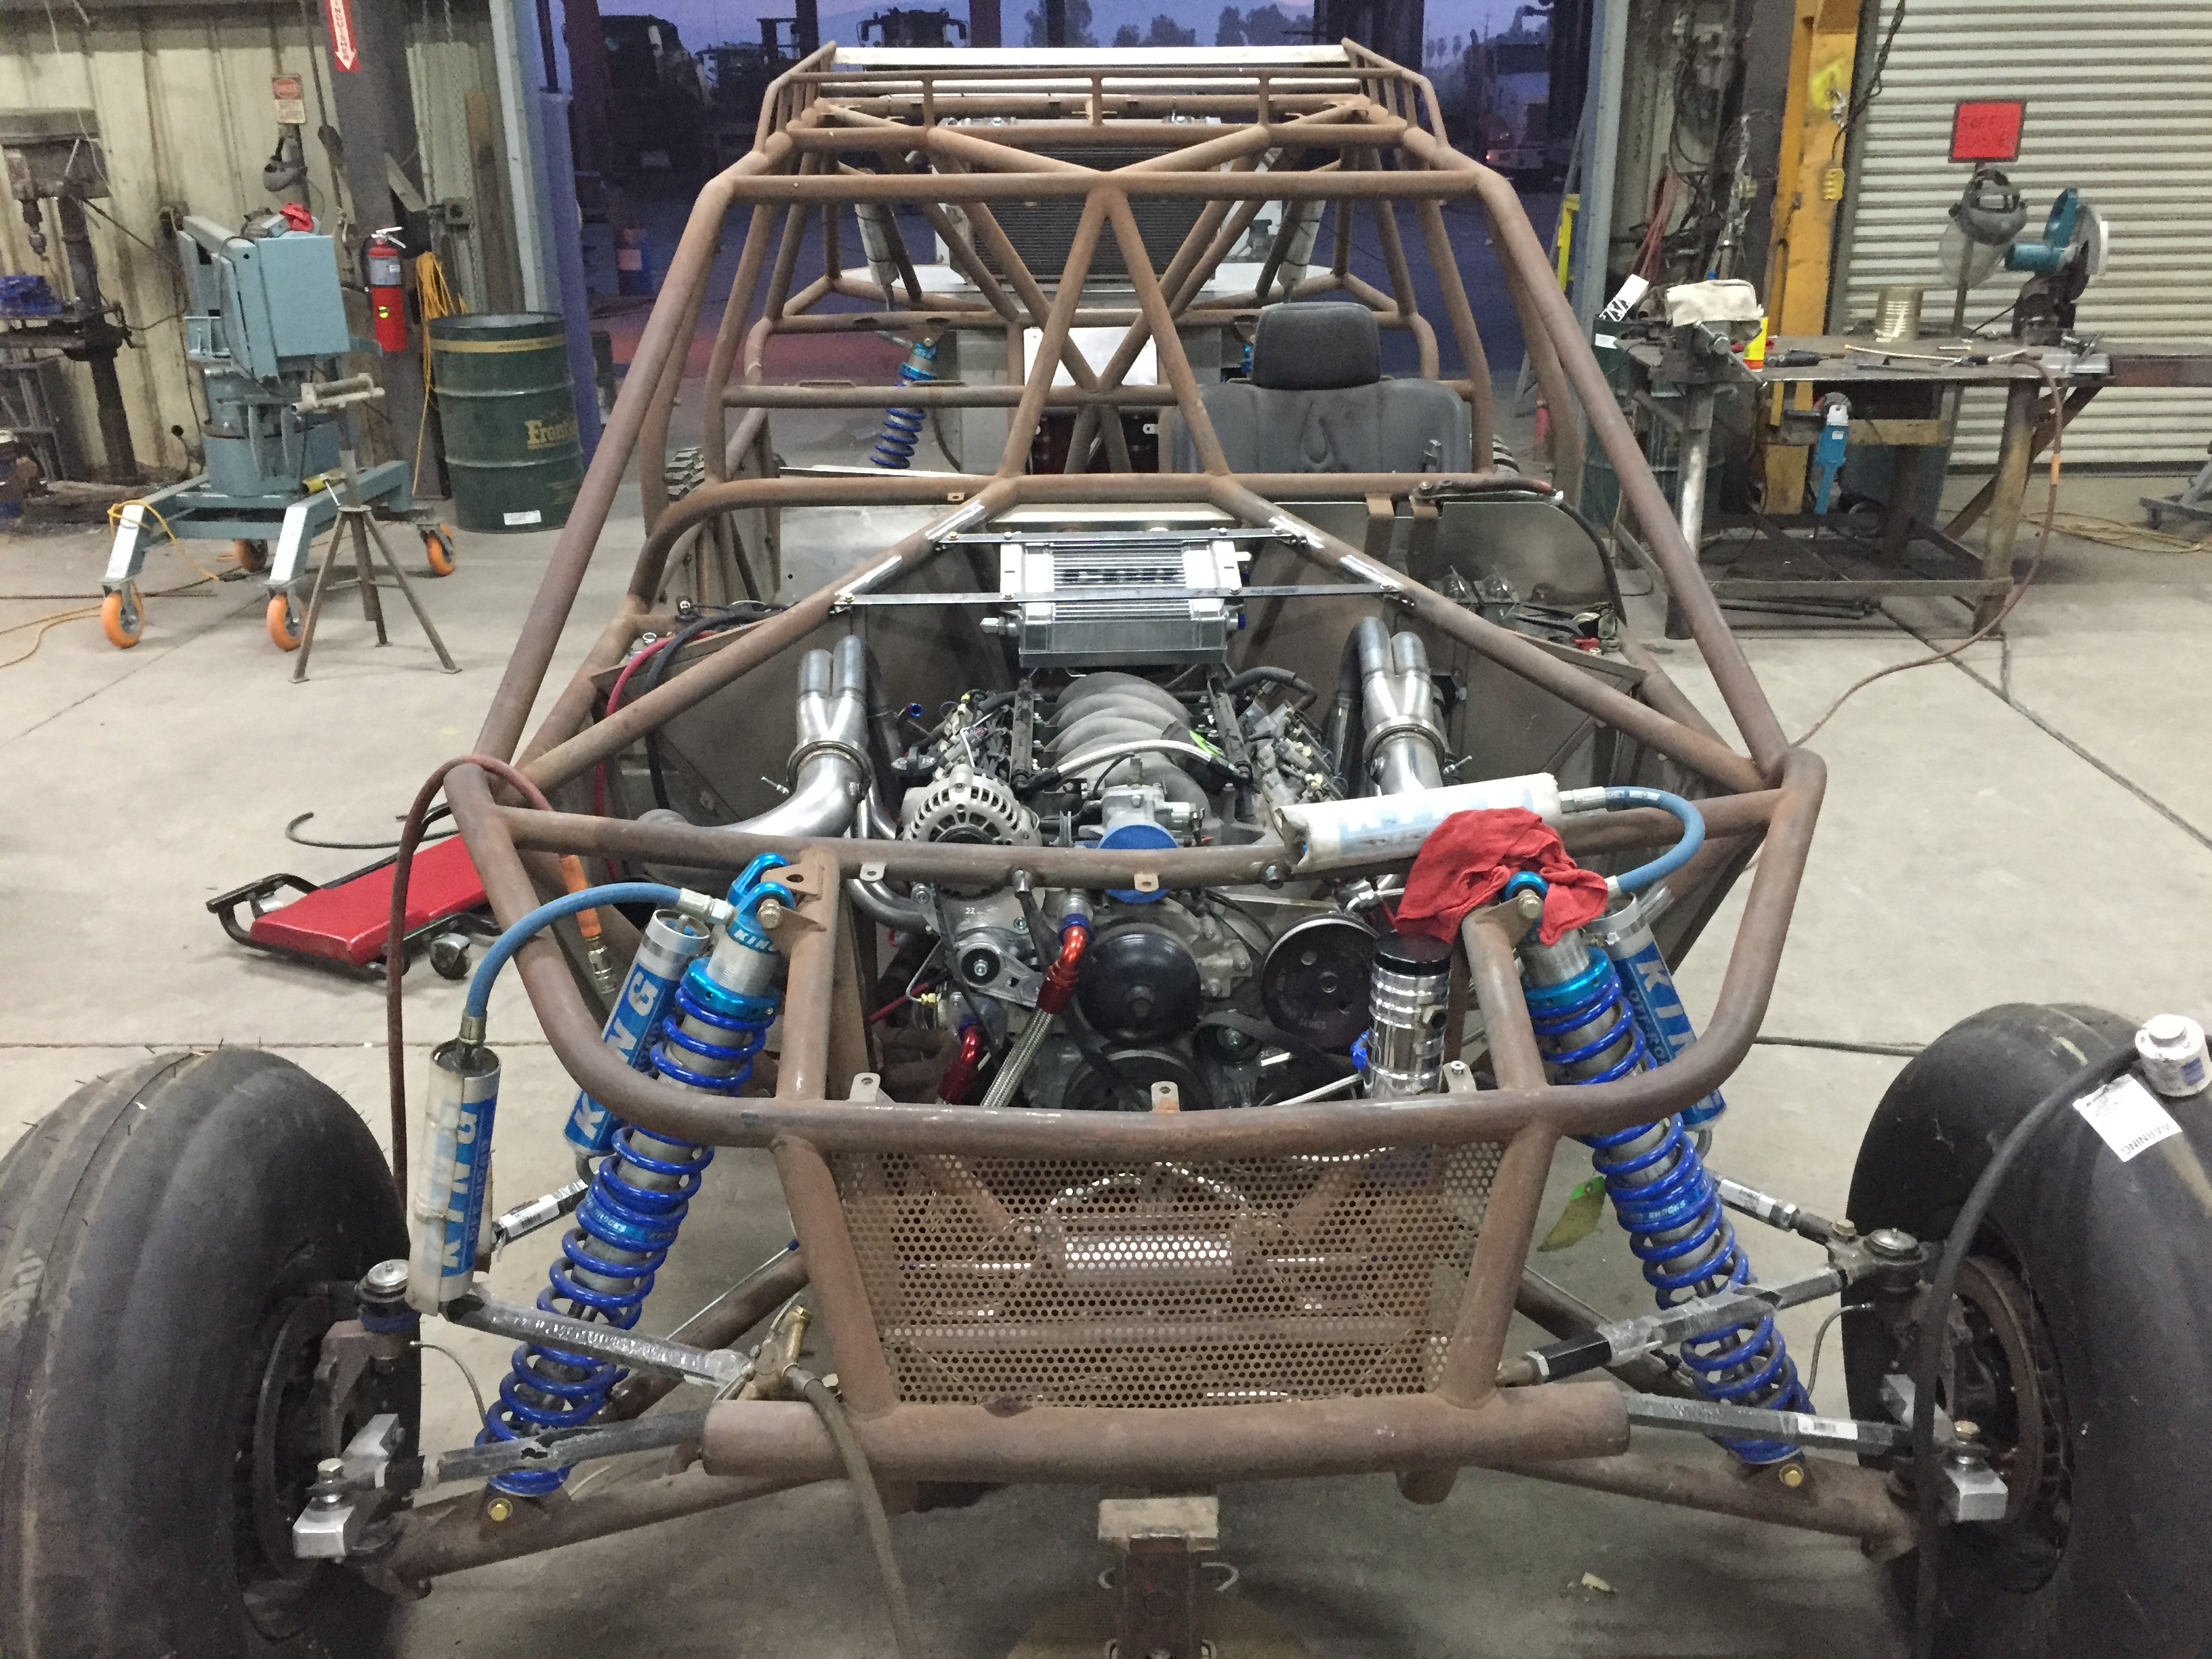
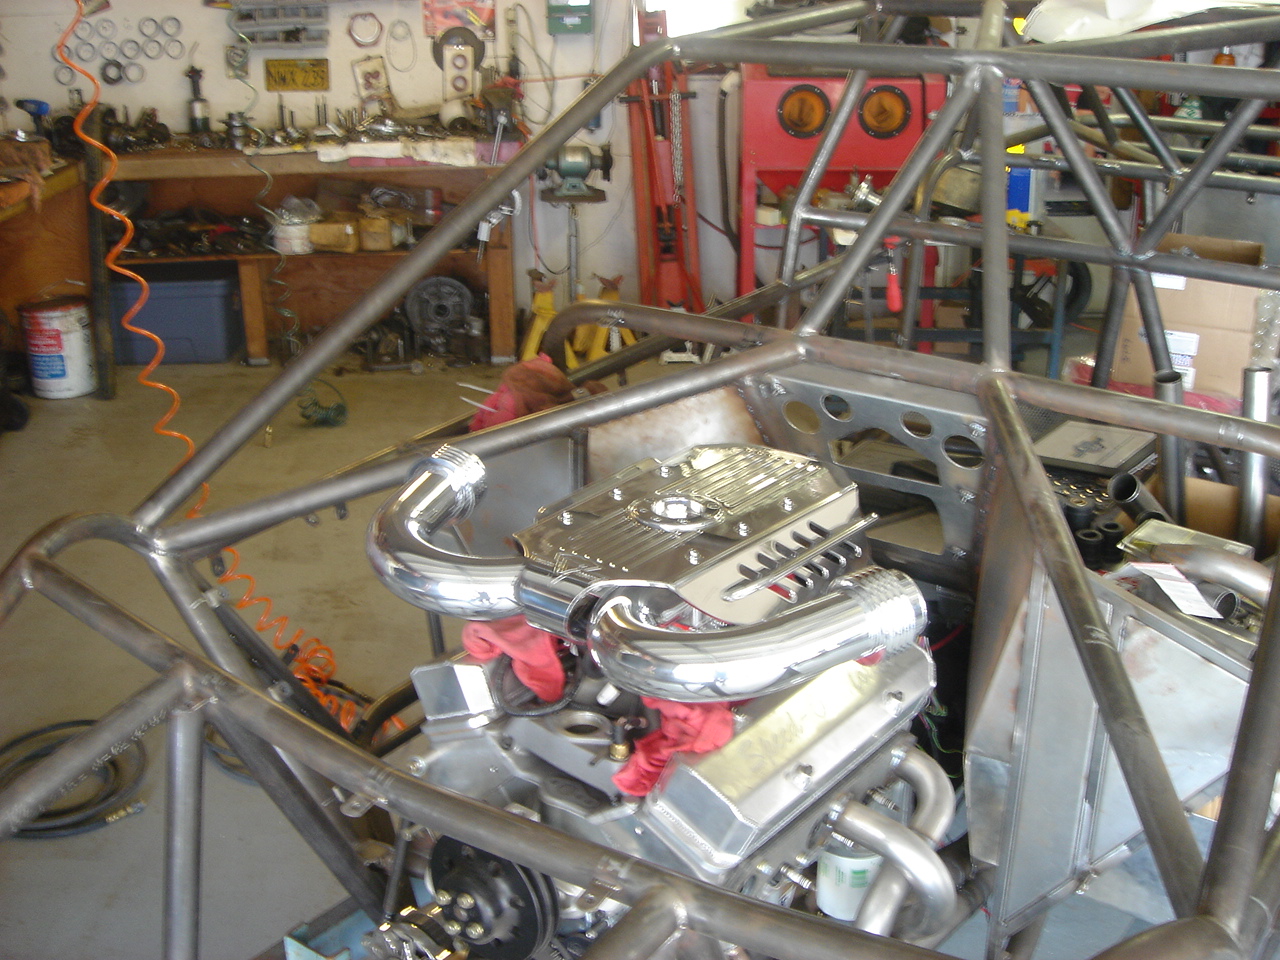
Got the motor and transmission in. Worked on the tranny mount to get it right. Motor mounts etc.
Lots of work has been done but there is not a lot to photograph. Finally got the steering shaft in. That was a pain but should be solid. Time will tell I guess.


Fuel cell in and mounted

Tried this radiator. It was to big. Returned it and got a very nice piece from champion cooling but haven't had a chance to get it mounted yet.
Slowly but surely. I was wanting to make Halloween. Still have a lot to finish between now and then.
-
-
Price drop to $9500
-
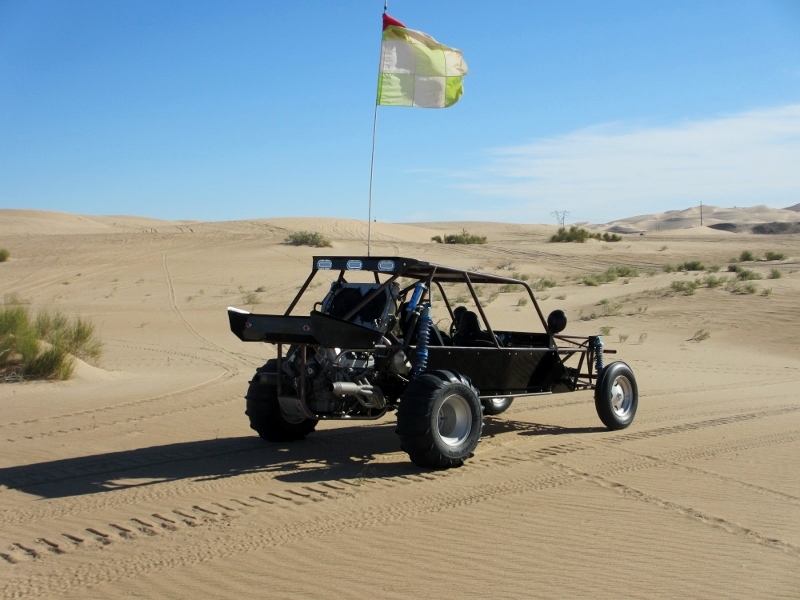
A little of yesterday's work. I felt like I got a decent amount done, but had some frustrating moments too.
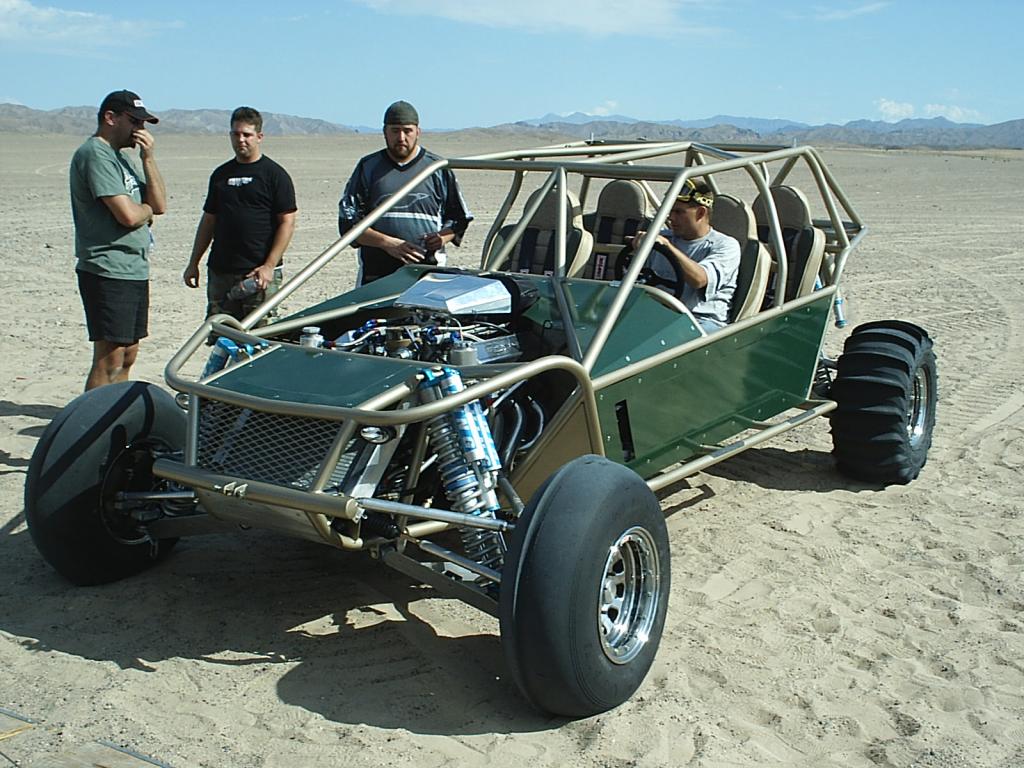
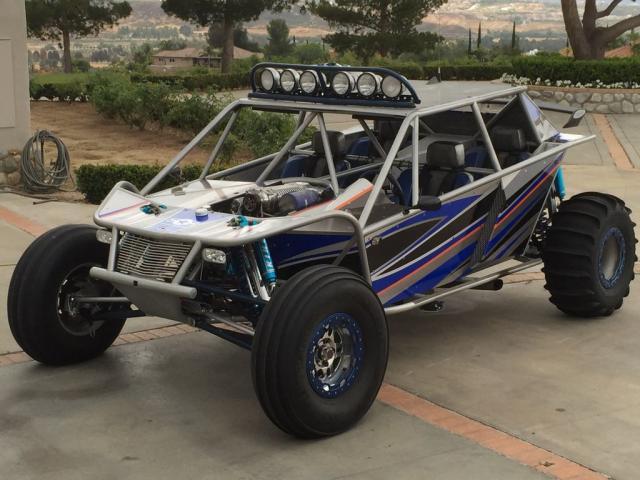
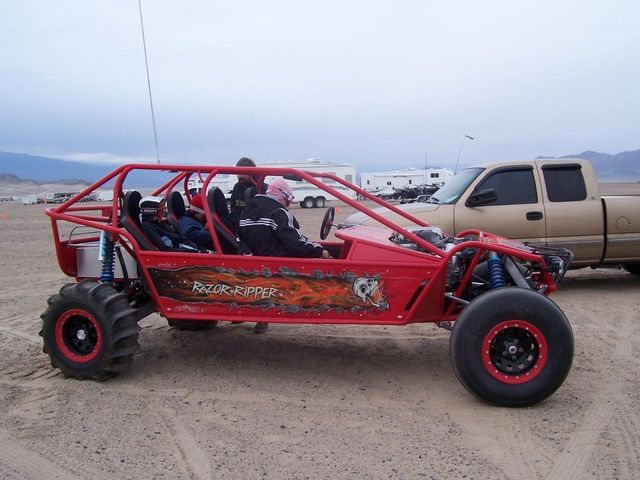
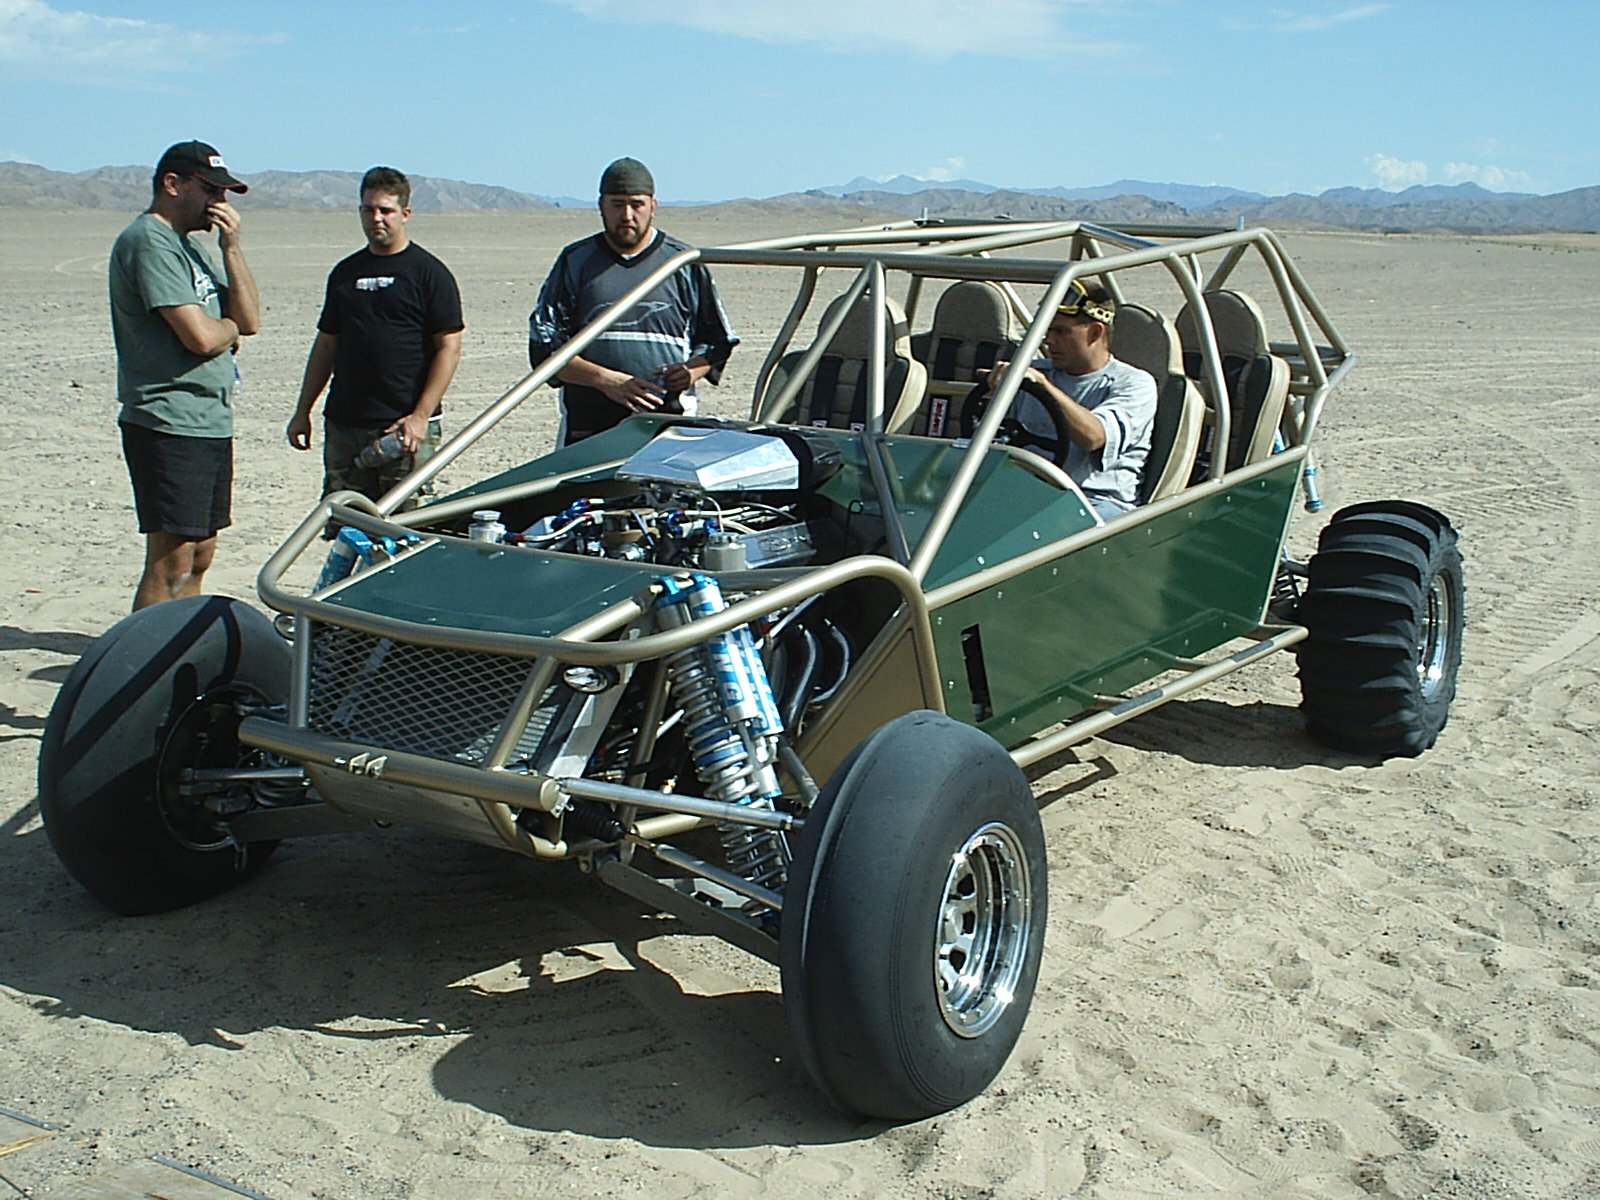
By the way I forgot to mention earlier, that when I was in Dumont and got to meet up with all the fella's that I had a surprise opportunity. There was a guy there selling this car
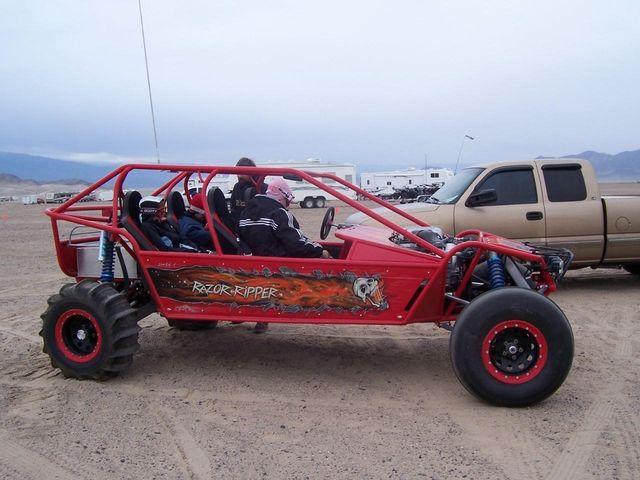
There was no way I was going to pass up the chance to check it out too, especially since he was only 2-3 camps away. I got to drive the car, and was totally excited about the way it handled, very predictable and after 2 bowls felt like I was in total control. If my car handles half as good as it did (actually expecting more out of mine) I will be like a kid in a candy store with it.
Anyway onto progress.
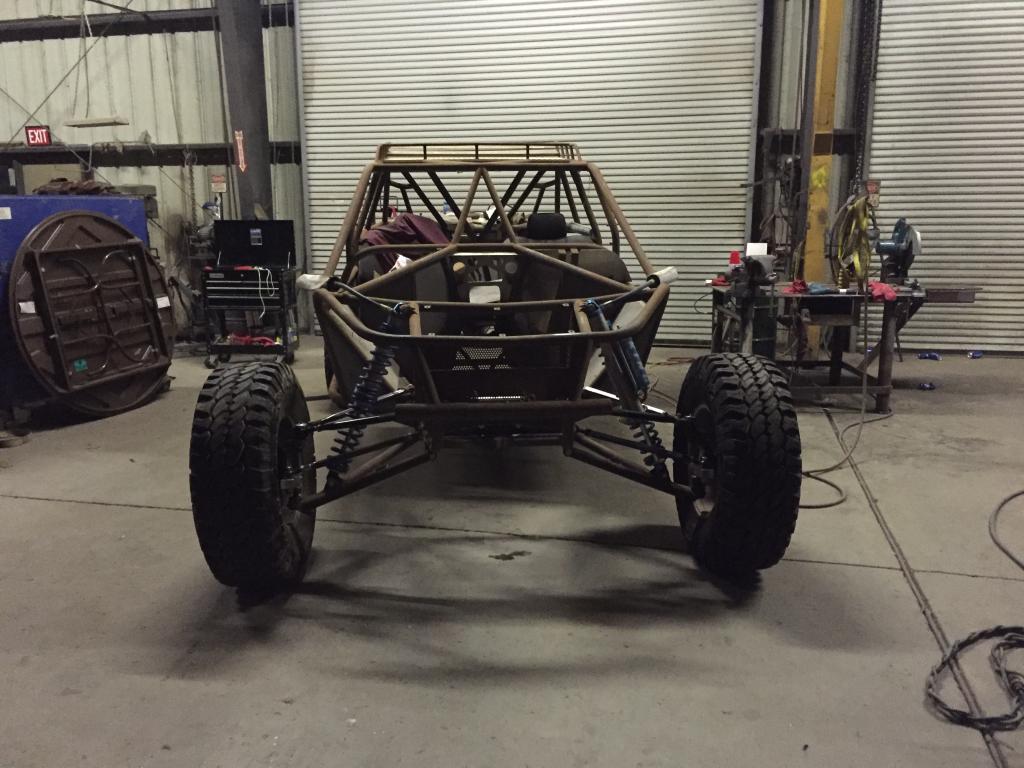
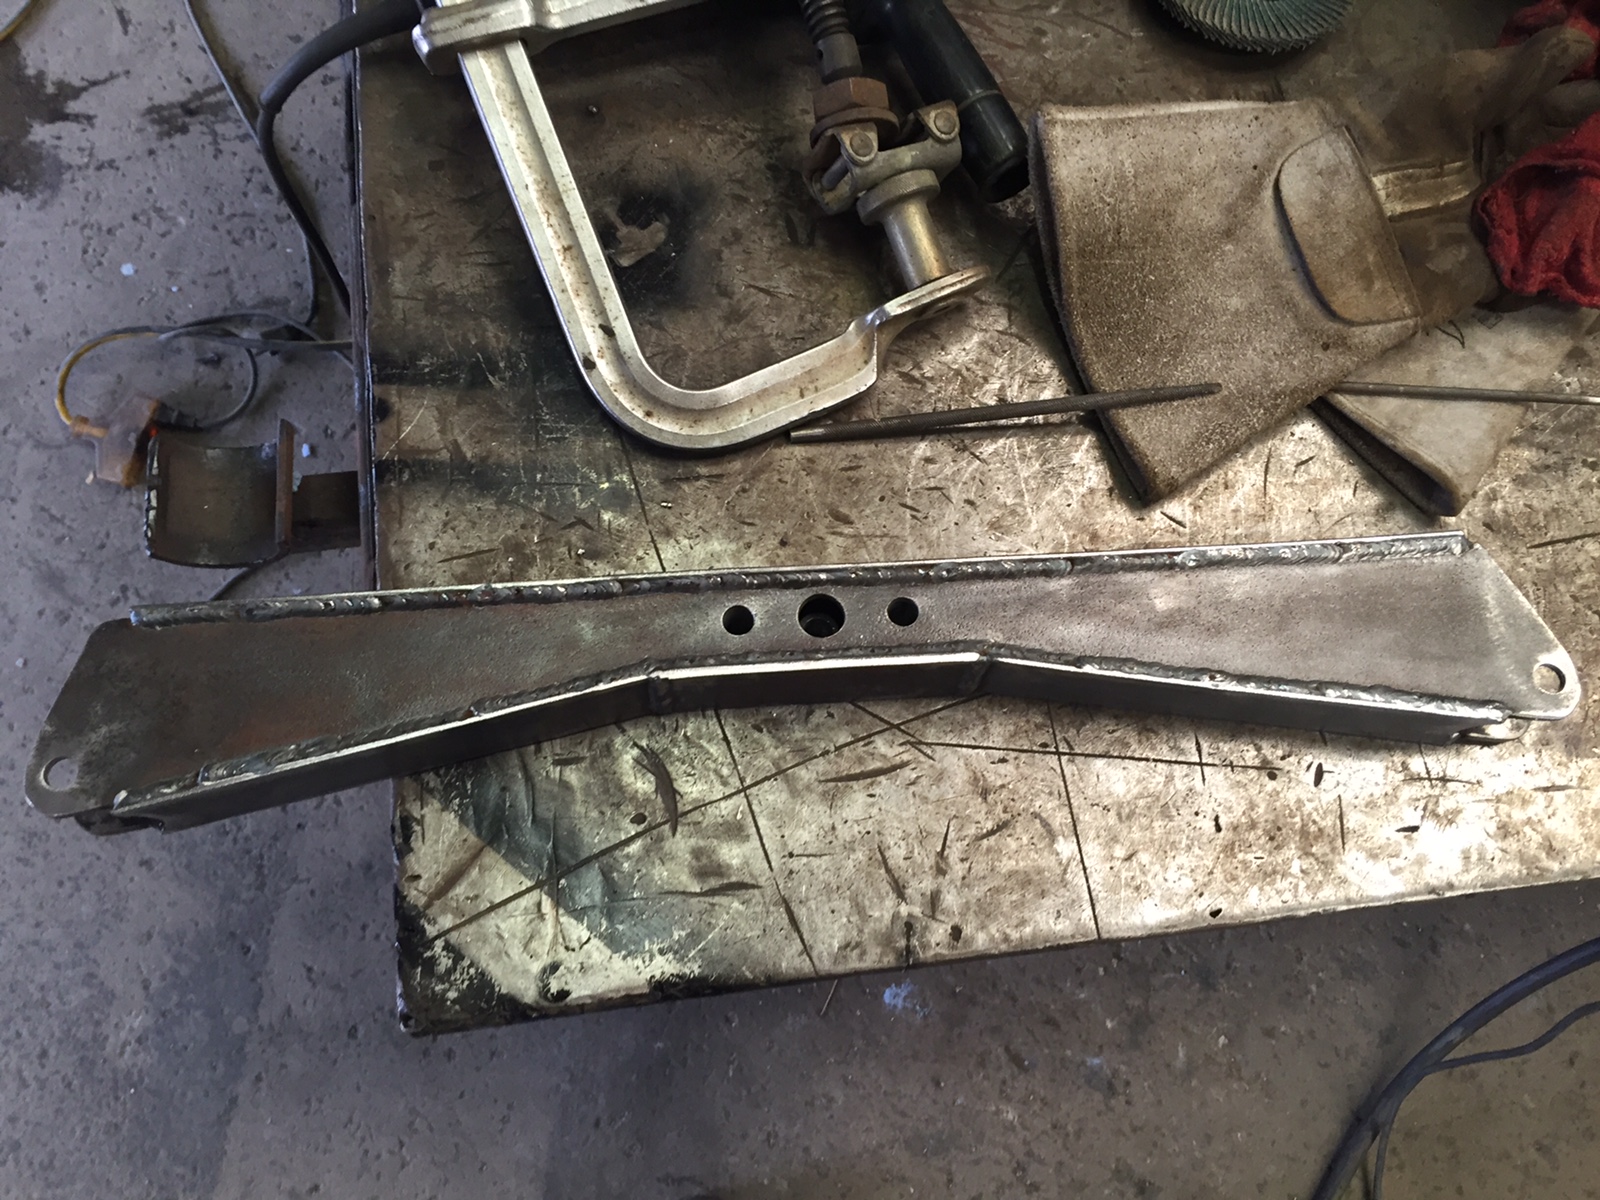
I spent the morning pulling the steering shaft and u-joints robbed off of a wrecked rail of a family member, only to find out none of it will fit, wrong splines. No biggie I knew that might be the case when I had the idea to try them. Next I got the Rack mount finished to size and gusseted in, Also welded out the spreader bar.
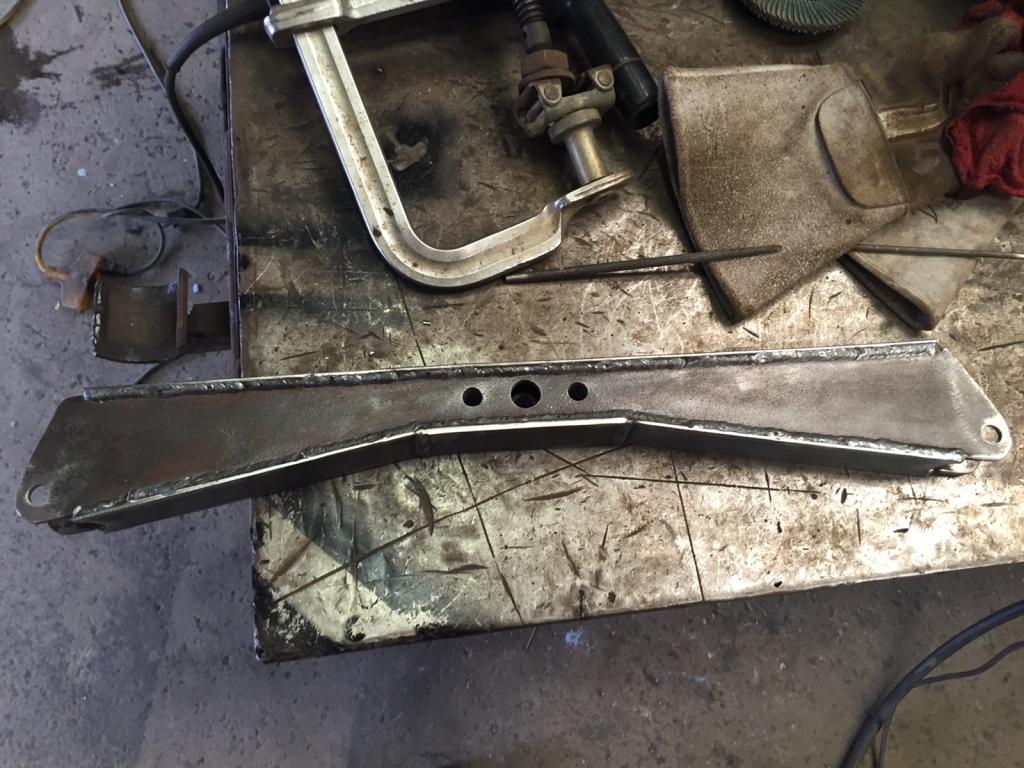
Mount cut down to size

Added tubing for support. So time consuming. First piece I cut to short and collapsed the end of in the bender when it slipped out of the die. Figured I could still make it work by notching off the smashed end, after all I will have to cut the notch. WRONG! After being done and happy with fit, I tried to notch it, and it was on the wrong angle to fit, ugh. Cut new pieces more than long enough this time (measure twice cut once
.gif) . Spent time making sure notch was perfect and making sure they were identical, so as to look uniform when welded in, and not looking like my kids made them. Finally happy with my product and got everything tacked in place.
. Spent time making sure notch was perfect and making sure they were identical, so as to look uniform when welded in, and not looking like my kids made them. Finally happy with my product and got everything tacked in place.

Looks good.
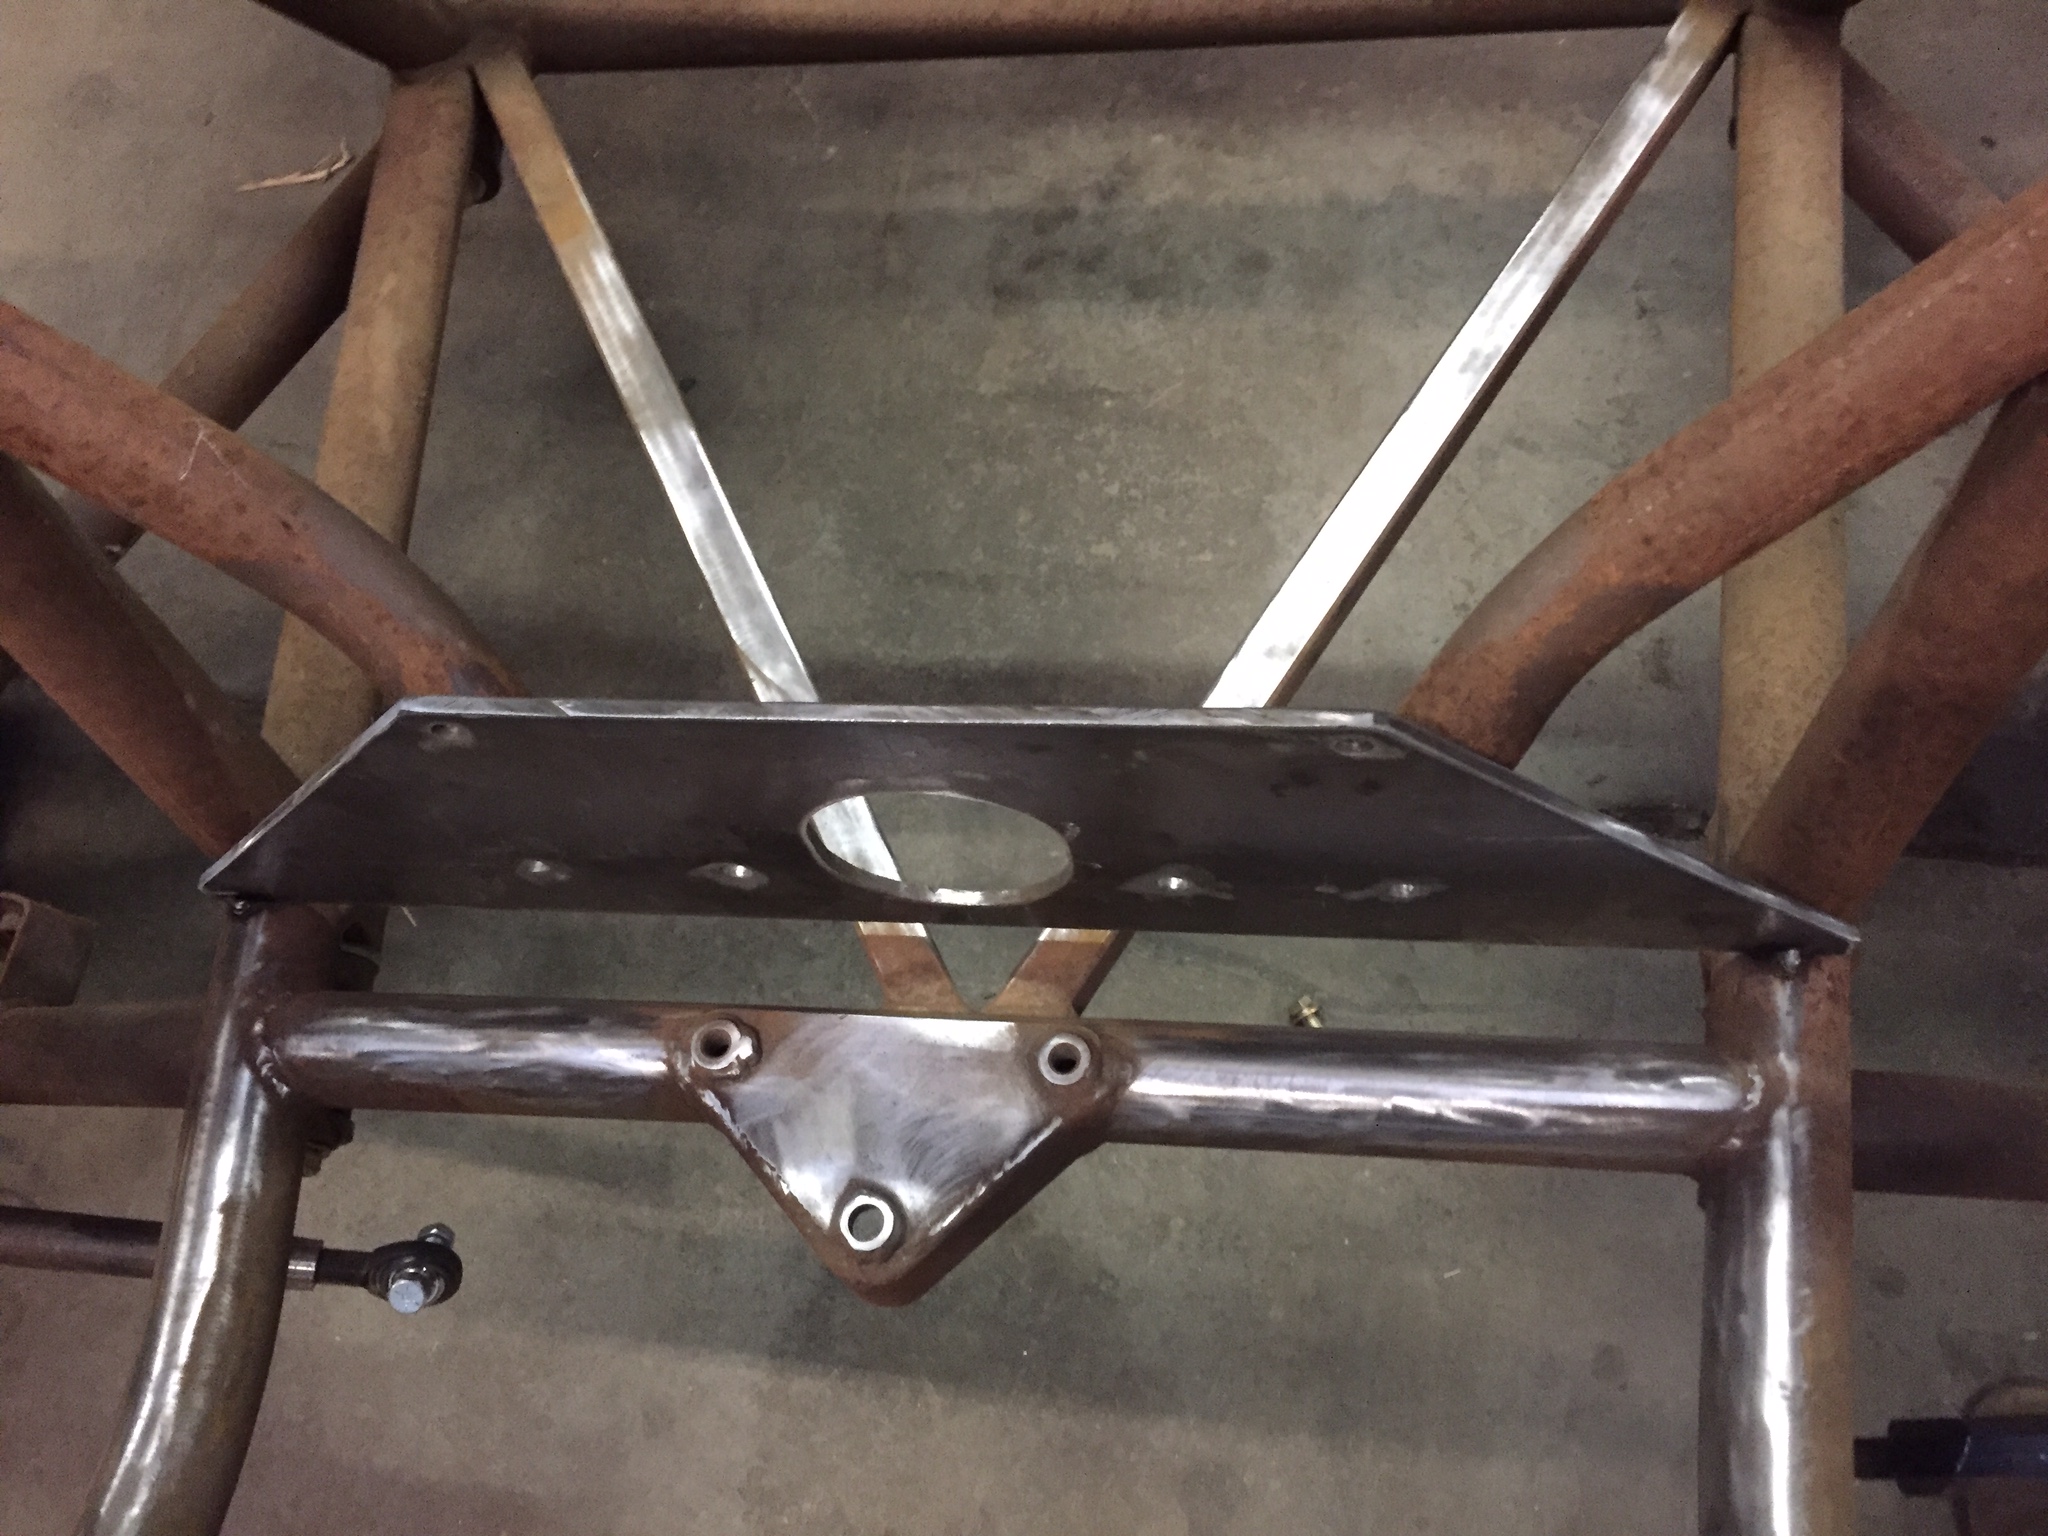
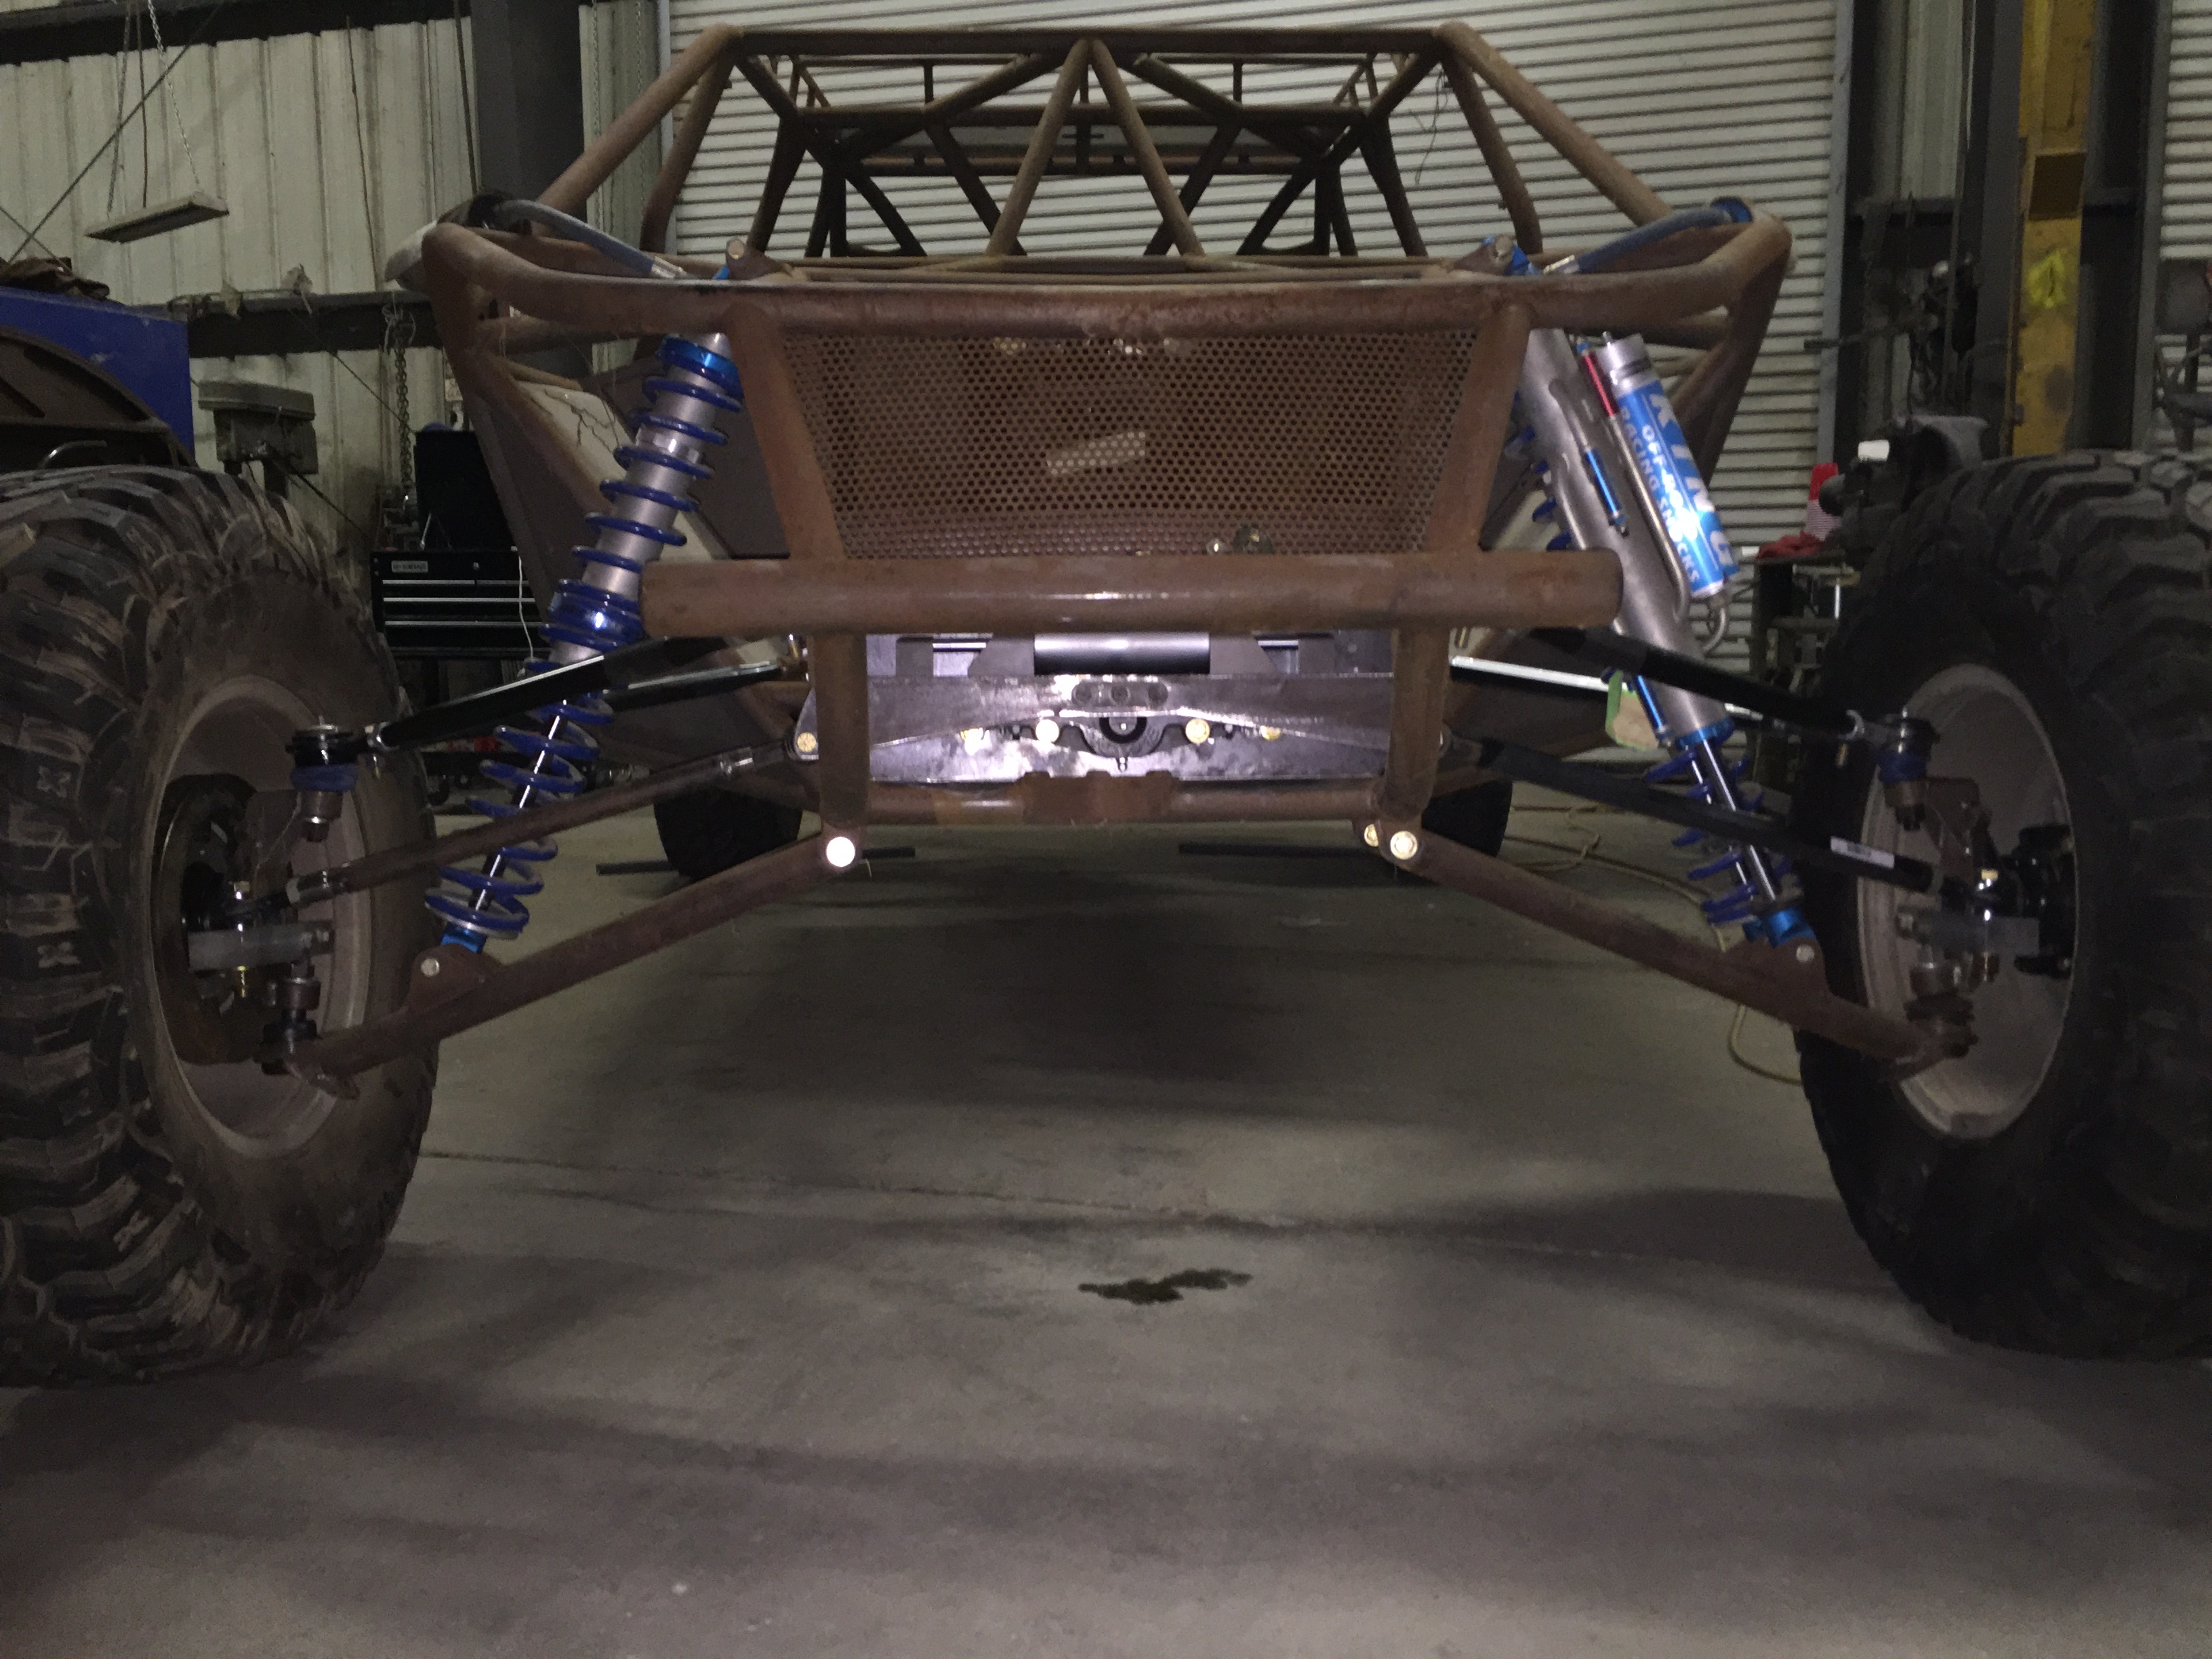
I weld it all in and am happy with fit and finish. I install the rack and when I do I see a little gap between rack and mount. Funny I don't remember seeing that before, what's going on? Upon further inspection I realize that welding the tubing on caused the plate to warp a little. I should have known this would happen, after all there is a big hole right in the center of the plate. So I snugged the bolts up on the rack hoping it would not cause the rack to break. That seems to have worked, I will loosen the rack when I get back to it and see if it flattened or not. Went ahead and finished putting the front end back together.
I adjusted the upper arms earlier in the day and everything looks really good now. I thought I would be dropping the motor in yesterday but this just took to much time. I will get to that next. I must have forgot to snap a picture of everything back together so you'll have to wait for it.
-
 1
1
-
-
The motor is 5.3 with cbm ported and polished heads and cam. Supposed to be about 450 hp. When I talked to Bruce about it, he said when I am ready to freshen up the bottom end we can punch it out to an ls1 with these heads I can get up to 800 hp. That would be fun! Reliability may come into question at that point but maybe not.
Trains is a turbo 400 with manual shift body and heavy duty sprags. Seller said it should be good for 800 hp. That's what he built it for. I had picked up a speedway quick change a couple years ago.
-
So I thought some may be interested in seeing the build.
I bought the mostly completed frame in 2012. Due to some different things going on it has mostly sat waiting to get finished. Sandblower originally built the car and then switched up to the v-Rex frame.
I have been a fan of these cars for a while, first because they do not use a transaxle. I saw flyan Ryan's green car
at a show and was amazed at how clean and well built the car was. They are good looking front engine cars, unlike any others I have seen.
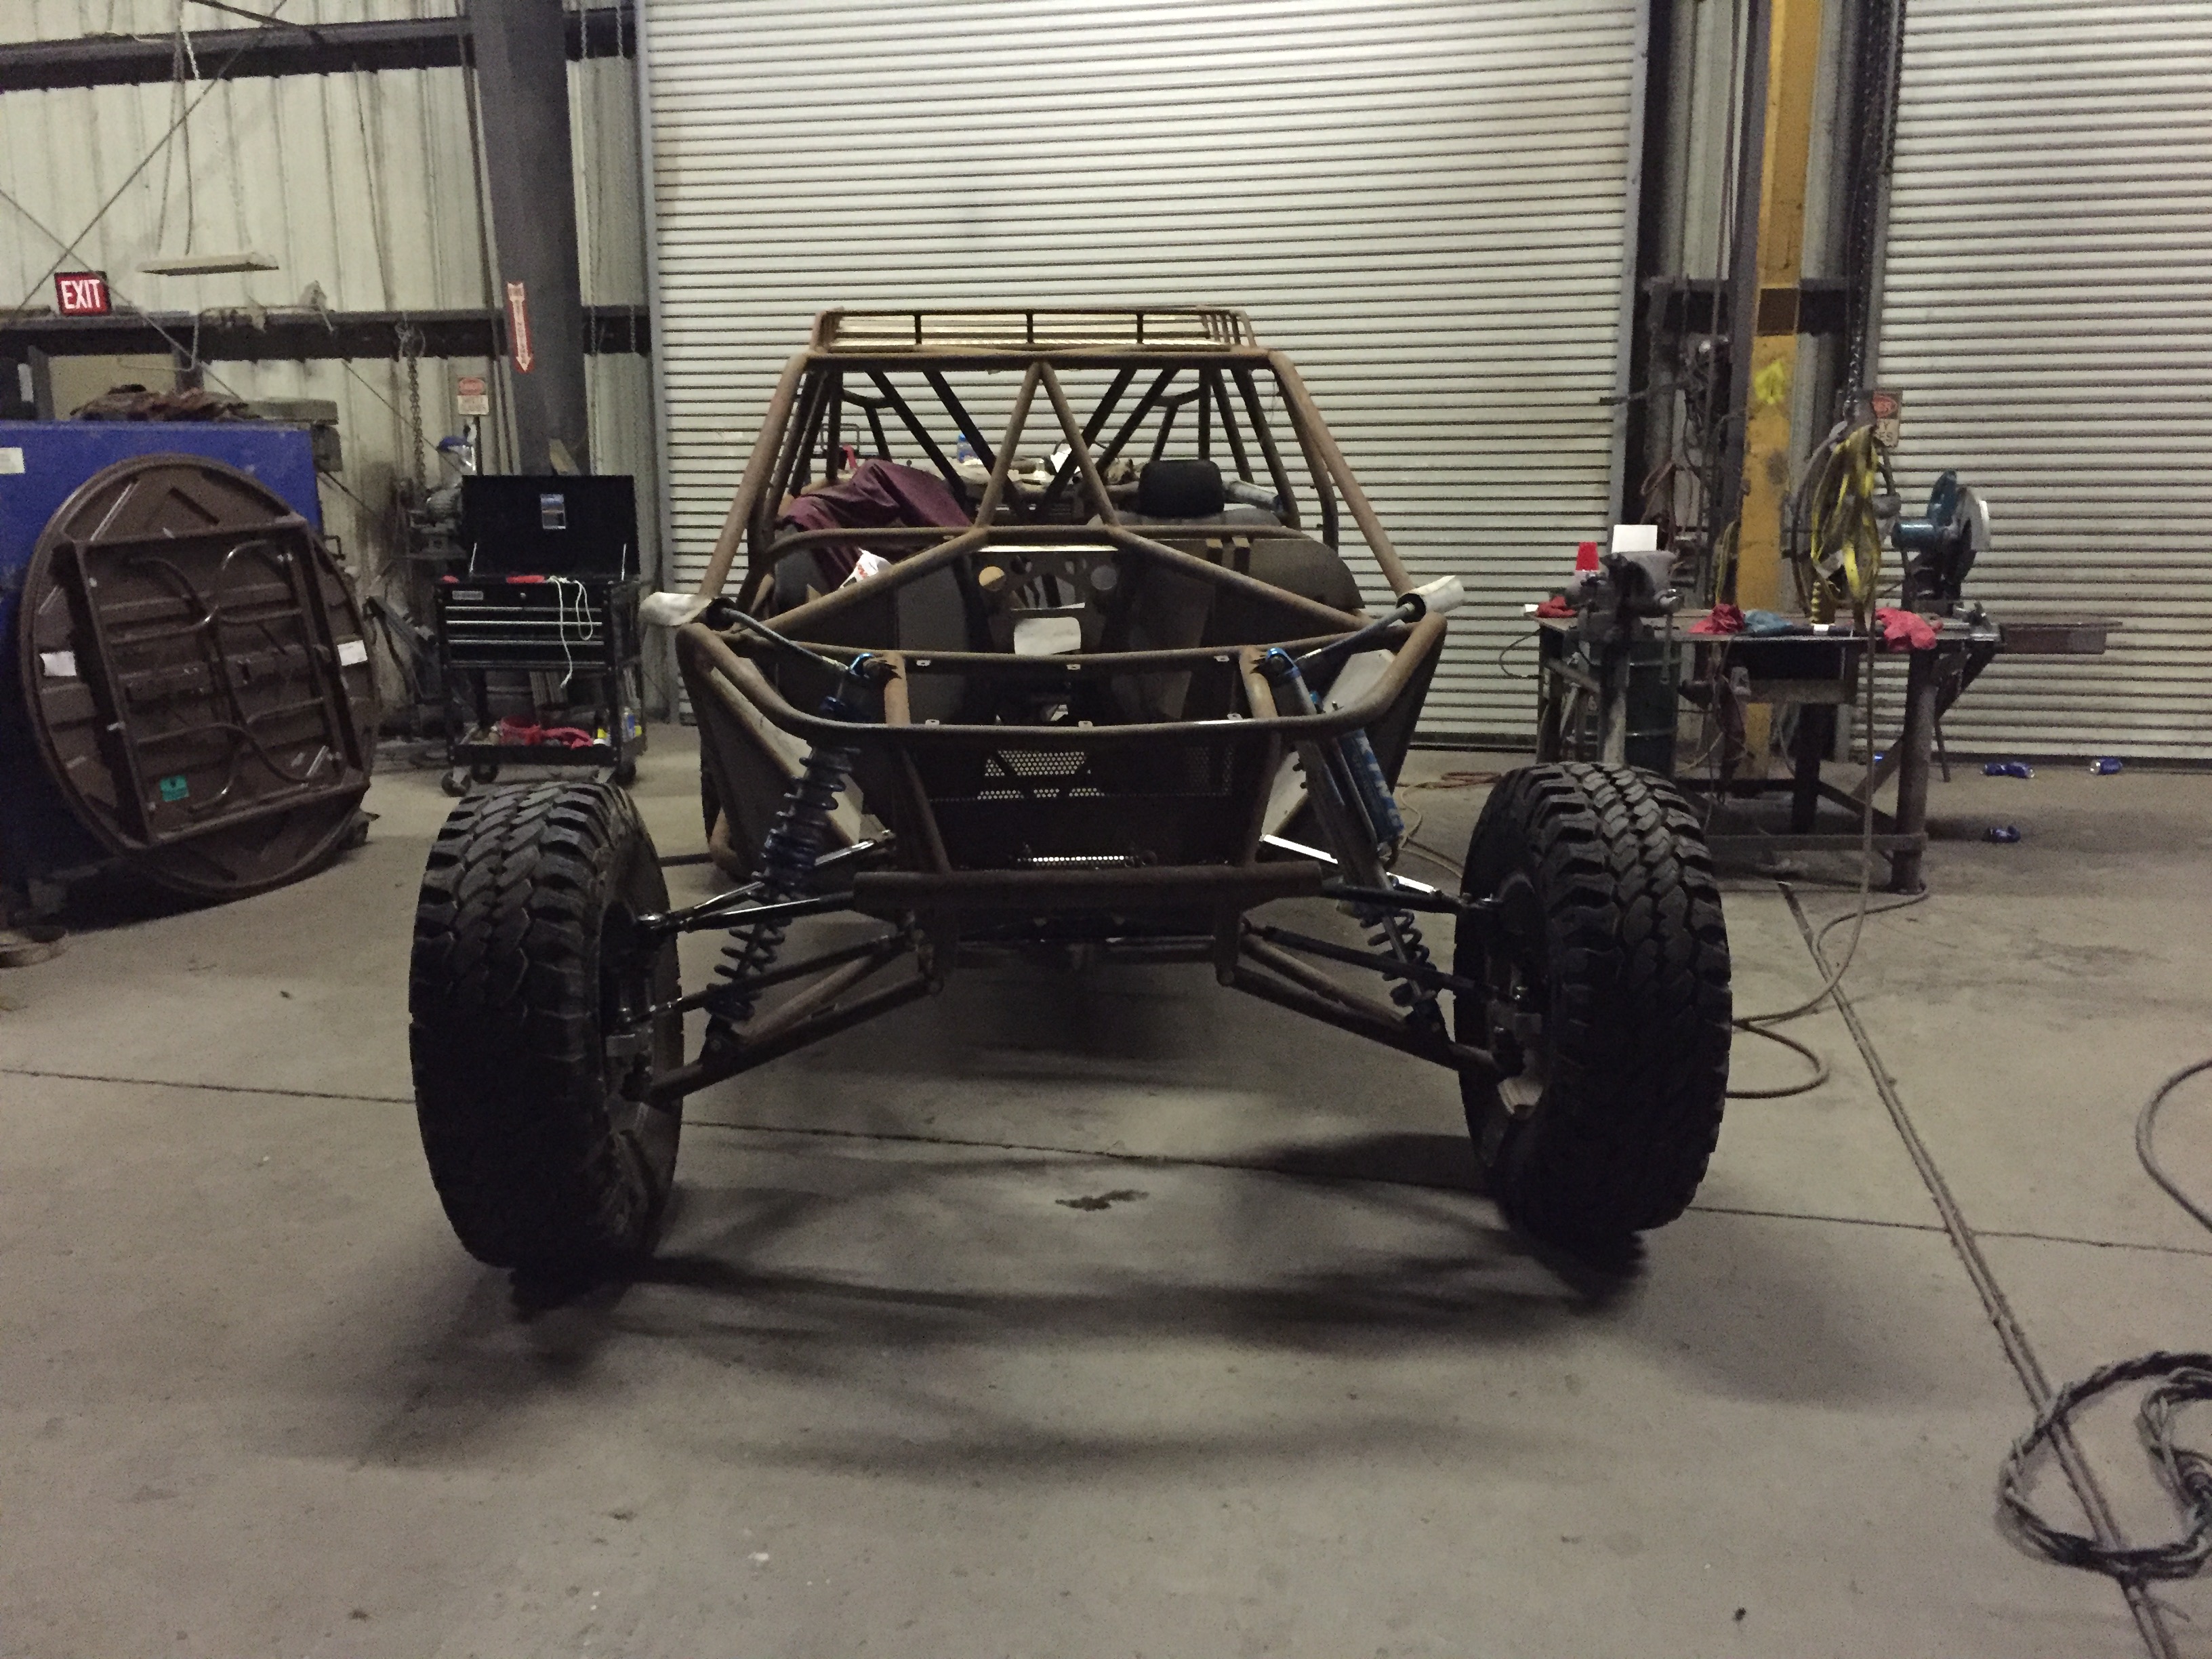
When I got the car it had 1-3/4" frame, lower A-arms, seats, a few misc. pieces like hubs brake rotors, aluminum panels, and all the shocks.
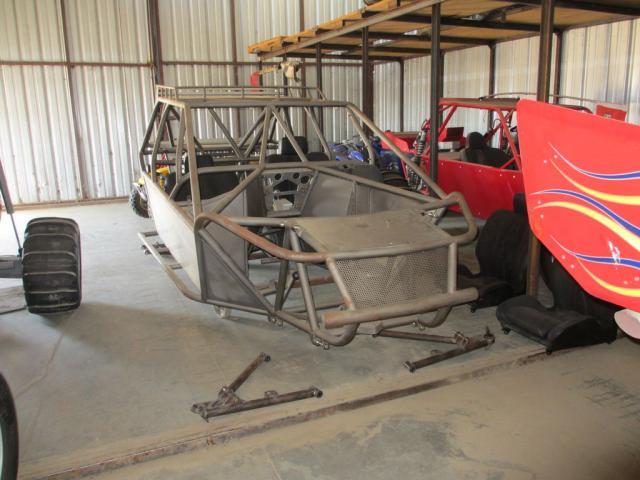
Since then I have not had much time to give to building the car, but due to the long time since buying the chassis I have been able to swipe a few good deals. So I have been collecting some pieces here and there. I have been able to do little bits and pieces, an hour here or there to get a few things done.
First thing I did was try and get ahold of owners of these cars so I could go check them out and take some measurements of the suspension pieces I am missing. I was able to meet up with Jon, he has the camera car, a 3 seater he used for the filming industry. I just happened to catch him 2 weeks before his move to Alabama. His car was also street legal like sandblowers. I got a bunch of pictures and measurements.


I was able to hook up with sandblower
and Danny

out in Dumont. Danny's car is one of 3 that are like each other. Mine being another. I was able to measure his car as well, and see some of the changes they did from the camera car to these.
So I started with front suspension needs. I was able to get close to what I needed early on, but then basically the car has set, because I did not have the time to devote to it.
Fast forward to December 2015
I have spent some of last week working on the car. I was able to get the back end together, and have the front just about ready to go as well.

On the front end I had to build upper a-arms and get a different rack and pinion than what they had intended to use. In Danny's car they used a sweet rack, and he was saying it was difficult to turn the wheels when stopped but ok when driving. Sandblower also had problems with his and installed a Howe rack. So I found a Howe rack and have been able to get a new mount made and tacked in. Everything is in the right place, but I made the mount bracket bigger than needed as a precaution, so I need to trim it down now and gusset it in.

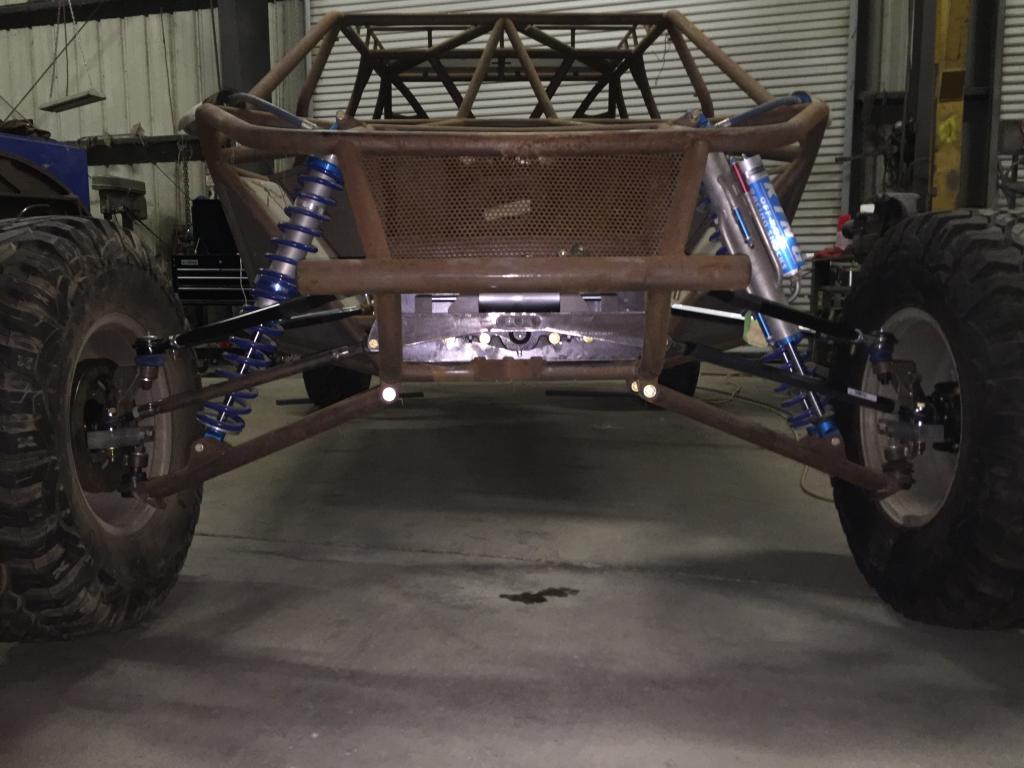
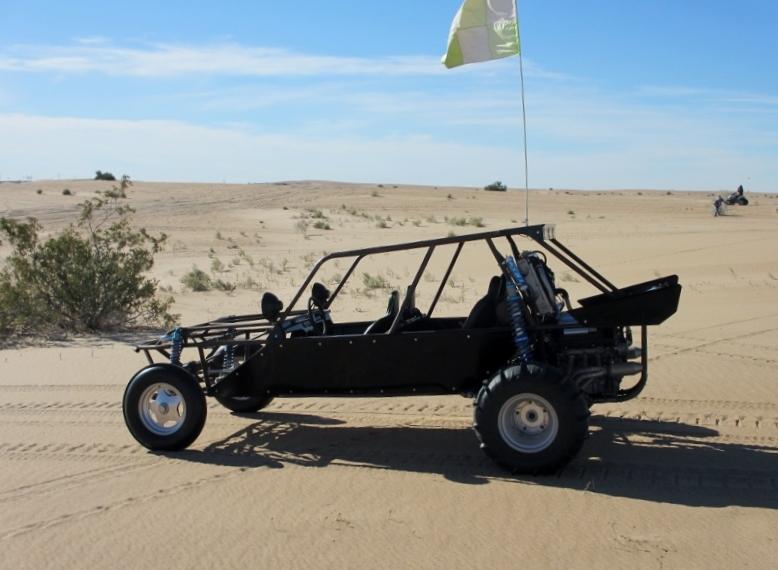
So now she sits all on her own. No more jack stands or lifts! Exciting!

So I need to finish boxing in the spreader bar I made for the rack and pinion and adjust the upper a-arms to get the camber right. Then I hope to get these goodies dropped in and in place. I am looking forward to another productive week.
Enjoy and I will update this as soon as I get a few more things done.
-
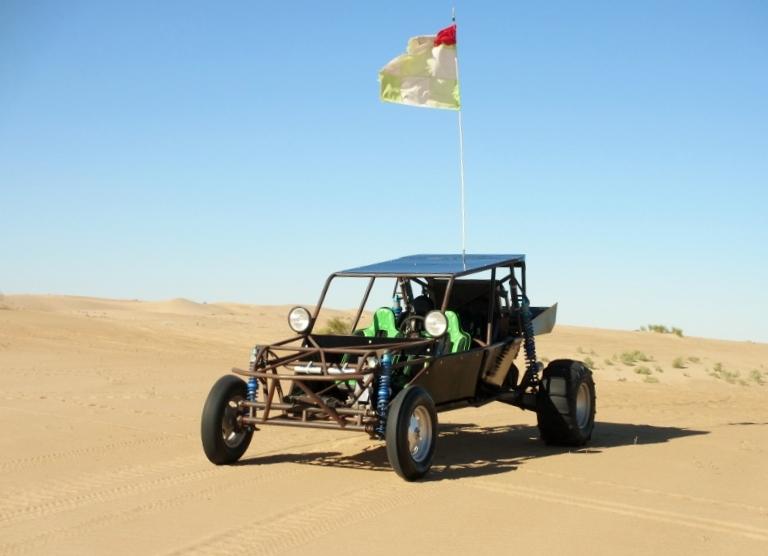
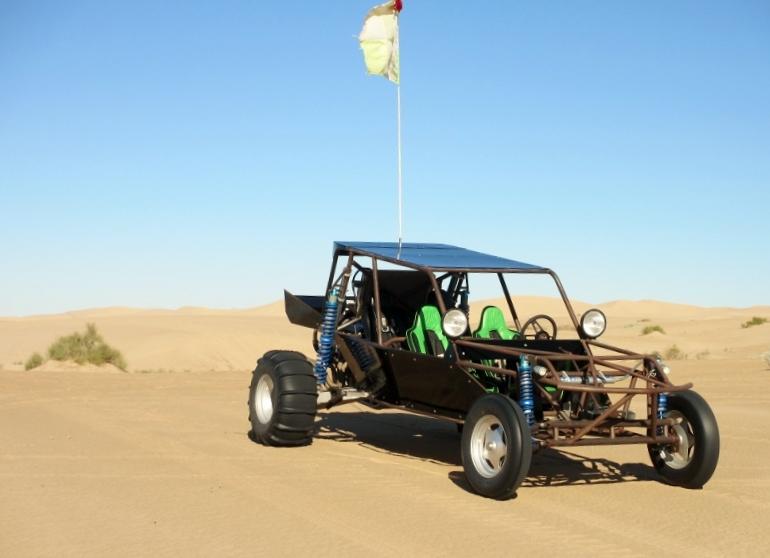
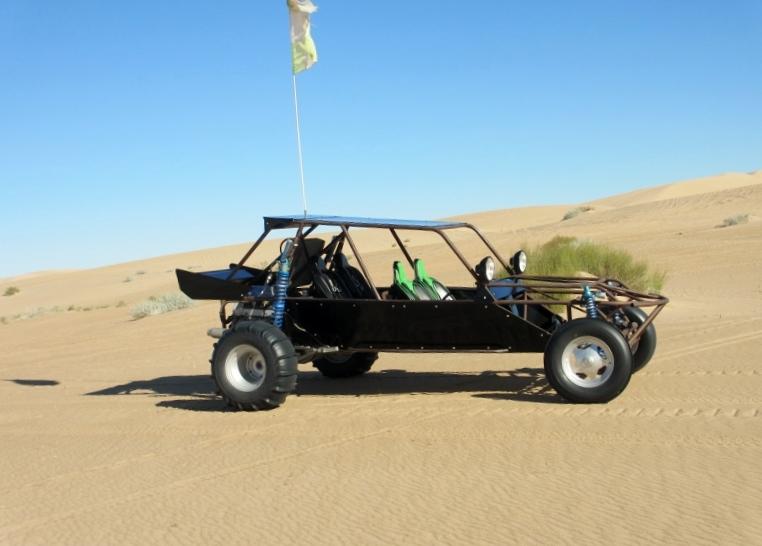
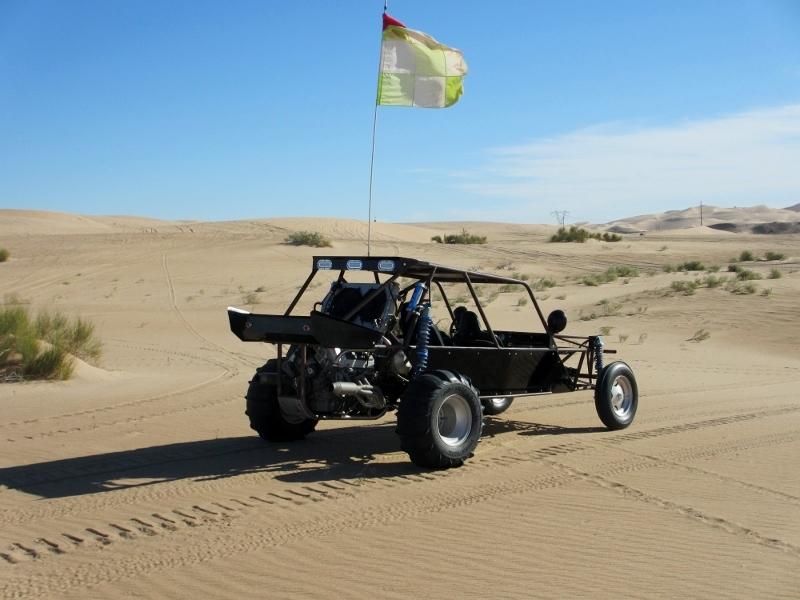
Current car, for sale

I picked this up in 2012, and finally making some progress on it. Just got it into a roller this week.
-
1
-
-
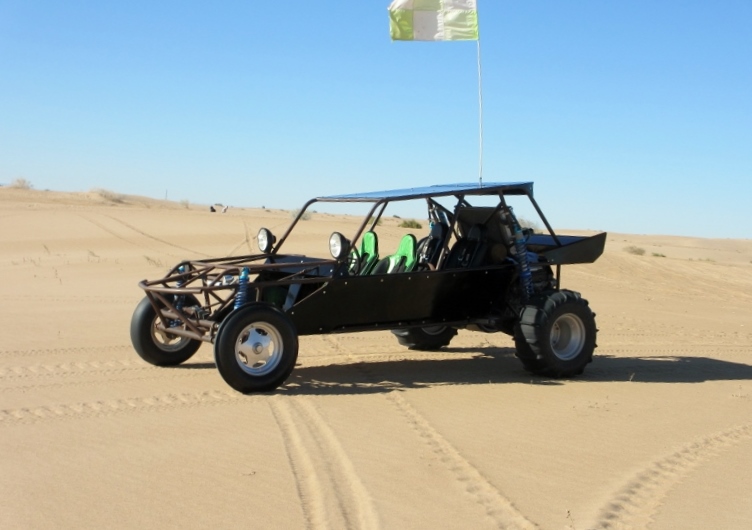
Shortstar V6
091 all of the best for internals. Klinkenberg ring and pinion. w/930's
CNC pedals
CNC 6 piston disc brakes
3X3 trailing arms
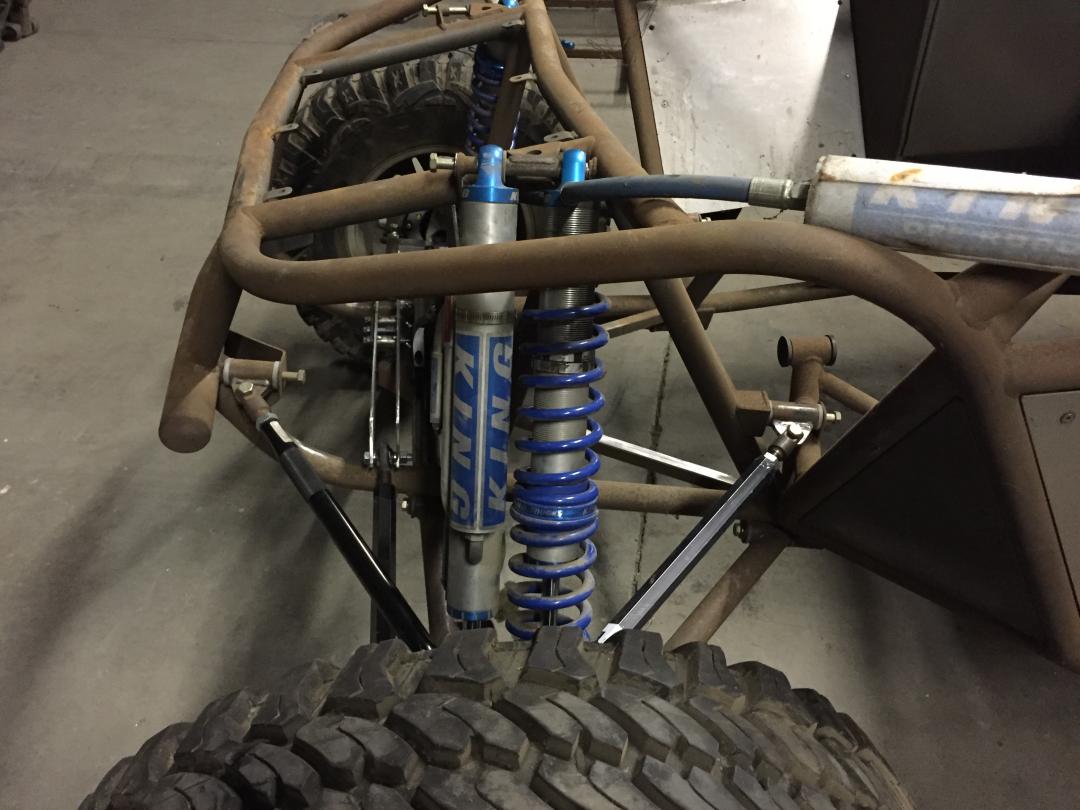
King shocks that are dialed in on this thing
Racecraft seats. I have all 4 adult seats. The back right now has prp smaller kids seats. I can install the big seats again the mounts are still there, and I still have the seats.
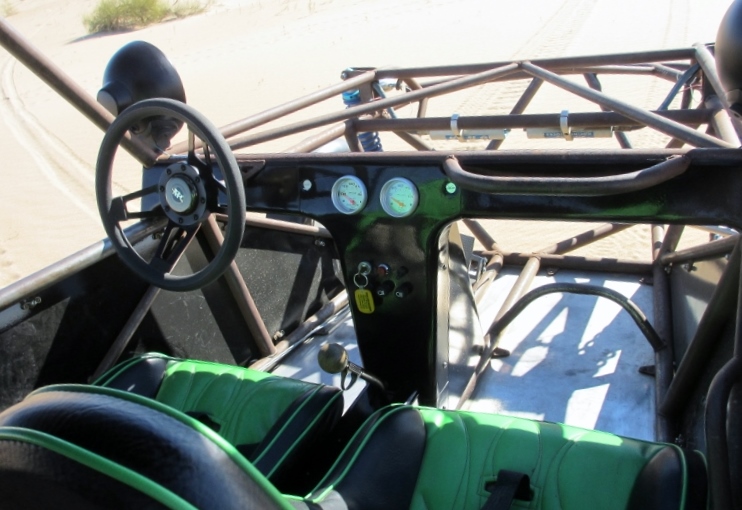
Autometer gauges
Crow 5 point padded harnesses 3" up front and 2" in the back
Hella 4000 lights, light bar as well with 4 hella 4000 mounted
Led ovals on the back
Saco heavy duty rack and pinion
Wider chromoly beam 8" I believe
Link pin arms with gusset brackets copies of woods, cnc chromoly tubing
300m link pins
Spindle mount wheels with billet centers no front brakes
Rear wheels are billet center also.
Frame is all .095 dom tubing not mild steel and is not painted
Aluminum work done by MacFab
Aluminum radiator with electric fans.
12 gallon spun aluminum gas tank.
1300 plus paddle tires on Douglas wheels
I have new paddle tires not shown in pictures
Located in Bakersfield
$10,000.00
Scott 661-201-224six


-
Some more


-
New pictures


V8rail Build
in Sandrail Talk
Posted
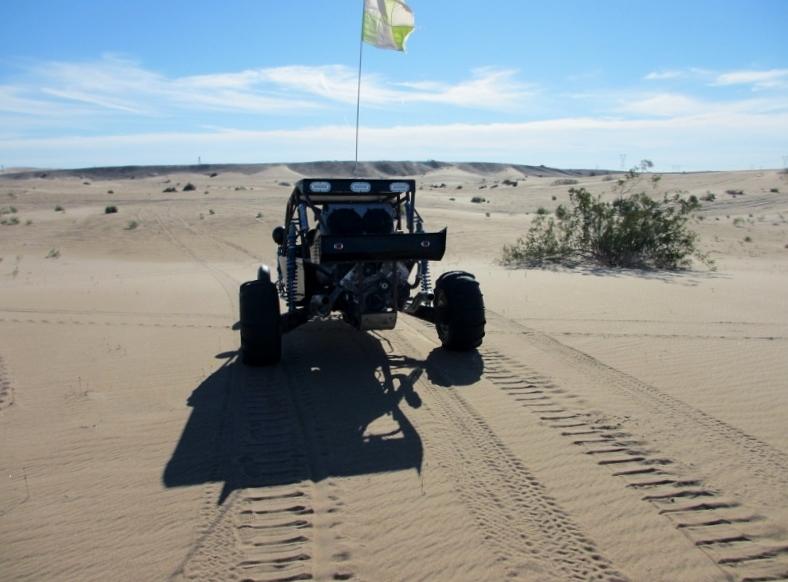
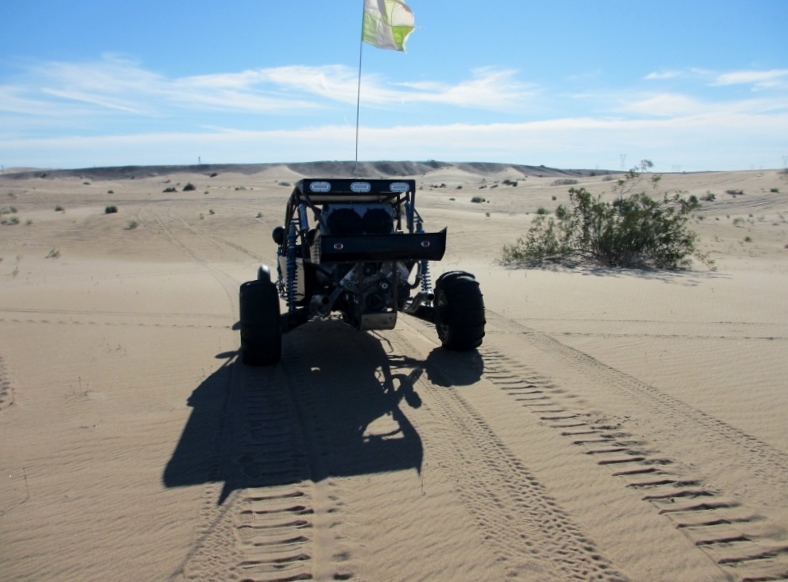
I did get out to the sand. We went to Gordon’s for New Years.
I had some issues though. Car was overheating real bad. Got stuck 3 times. Throttle was sticking and while trying to get that sorted broke the gas pedal in half. Front wheel bearings were to tight. I think that may have been a big contributor to the overheating.
Fan shroud was to tight to the radiator not allowing the fans to pull air across the whole thing. I made a cardboard spacer that helped a lot but ultimately I think the radiator is to small. I ordered a new one to replace it.
After getting all that corrected I got to take a short cruise around in the dark the night before we left. It felt like a new car but still hard to tell. So hopefully I can get some decent dune time on it now. I only burned 5 gallons of gas the whole trip. I can’t wait to run more through it.
On on the way home I dropped the car at cbm. They are going to put a color screen AEM dash in it. I was thinking of switching to throttle by wire but that required a new computer and a few other things pushing the cost way up. So I will have to get the cable working better. They are going to add O-2 sensors and give a new tune on the dyno. It might have been slightly lean adding to the overheating issue. We shall see.